
You are using an out of date browser. It may not display this or other websites correctly.
You should upgrade or use an alternative browser.
You should upgrade or use an alternative browser.
Merriman's Submarine Modelling Masterclass
- Thread starter merriman
- Start date


Scott Kenny
ACCESS: USAP
- Joined
- 15 May 2023
- Messages
- 16,989
- Reaction score
- 24,109
Why'd you redo the stern planes?

- Joined
- 18 March 2013
- Messages
- 1,498
- Reaction score
- 5,366
That was our first r/c submarine, built from the tooling we produced for a Librascope display -- at the time our outfit, D&E Miniatures, built display pieces for various industrial concerns. Static models. Display only. No practical features. The pictures below chronical that build.Why'd you redo the stern planes?


The time was the late 80's and I decided to pop new AKULA parts from the Librascope job tooling and get into the r/c submarine game.
The rest, as they say, is history.
Over the decades that 1/96 AKULA model has been through several hands and got damaged along the way. What I'm showing today is the repairs needed to get it operational again for my buddy, Dave 'Jake' Jacobson, a fellow former Torpedoman and one hell of an armor modeler. He and I make the East Coast model boat regatta rounds these days.


- Joined
- 18 March 2013
- Messages
- 1,498
- Reaction score
- 5,366
Permit me to introduce myself: I'm David Douglass Merriman lll One of the finest scale model builders you'll ever have the pleasure of knowing.
Introduction made.
Ellie and I formed D&E Miniatures nearly fifty years ago. A sole proprietorship business, we initially built industrial display pieces for defense contractors, one-offs for collectors, and also produced and sold both vacuformed and cast resin model kits. We later expanded our activities to include work for the motion picture and TV industry designing and building effects miniatures, and concluded our business producing product for the r/c submarine hobby.
My first r/c model submarine was a spin-off of a job we did for the Librascope company, a 1/96 scale AKULA submarine they used at trade-shows to illustrate the 'Soviet Threat' to potential customers. The model you see hanging from the ceiling.

Built in the late 80's the model was basic of detail, and some features just were not correct with what we now know of these boats today; the display was 'best guess' for what the AKULA looked like -- based only on some grainy pictures gotten from a Jane's Defense Annual and a few other even more dubious sources.
About a year after that job I took the tooling and laid up a hull and cast resin and metal appendages and produced an AKULA suitable for radio-control. My first r/c submarine. The innards went through many, many iterations, but eventually I had a reliable, well running model submarine.
Years later I gave this boat to a friend who operated it a while with some success. The model eventually wound up recently in the hands of my Torpedoman buddy, Dave, 'Jake' Jacobson.
The time had come to repair damage and get my old AKULA back up and running with a new r/c system and removable water tight cylinder. That work is ongoing and should be wrapped up in a week or so.
Introduction made.
Ellie and I formed D&E Miniatures nearly fifty years ago. A sole proprietorship business, we initially built industrial display pieces for defense contractors, one-offs for collectors, and also produced and sold both vacuformed and cast resin model kits. We later expanded our activities to include work for the motion picture and TV industry designing and building effects miniatures, and concluded our business producing product for the r/c submarine hobby.
My first r/c model submarine was a spin-off of a job we did for the Librascope company, a 1/96 scale AKULA submarine they used at trade-shows to illustrate the 'Soviet Threat' to potential customers. The model you see hanging from the ceiling.

Built in the late 80's the model was basic of detail, and some features just were not correct with what we now know of these boats today; the display was 'best guess' for what the AKULA looked like -- based only on some grainy pictures gotten from a Jane's Defense Annual and a few other even more dubious sources.

About a year after that job I took the tooling and laid up a hull and cast resin and metal appendages and produced an AKULA suitable for radio-control. My first r/c submarine. The innards went through many, many iterations, but eventually I had a reliable, well running model submarine.


Years later I gave this boat to a friend who operated it a while with some success. The model eventually wound up recently in the hands of my Torpedoman buddy, Dave, 'Jake' Jacobson.
The time had come to repair damage and get my old AKULA back up and running with a new r/c system and removable water tight cylinder. That work is ongoing and should be wrapped up in a week or so.


Scott Kenny
ACCESS: USAP
- Joined
- 15 May 2023
- Messages
- 16,989
- Reaction score
- 24,109
Flooding in radio!!! Flooding in the motor room!!! Flooding in the battery well!!!
- Joined
- 18 March 2013
- Messages
- 1,498
- Reaction score
- 5,366
The entire... fucking.... cylinder!!!!!Flooding in radio!!! Flooding in the motor room!!! Flooding in the battery well!!!
This is me as I race the van back home to de-water and preserve the electronics:
View: https://youtu.be/qa3jt_GXMts
Grey Havoc
ACCESS: USAP
- Joined
- 9 October 2009
- Messages
- 24,420
- Reaction score
- 17,883
- Joined
- 18 March 2013
- Messages
- 1,498
- Reaction score
- 5,366
Ima Needsme Onea Dem!!! For my Lithium-polymer charging station.
"This IS NOT a drill!" (No! it's a Black & Decker nail-gun, you fool!)
David
Idiot of the Day
- Joined
- 18 March 2013
- Messages
- 1,498
- Reaction score
- 5,366


I should know better than to leave Jake in the shop, unattended, for even three god-damned minutes, without coming back to find him undoing hours of painstaking, exacting, hard work. What a Dick!


Scott Kenny
ACCESS: USAP
- Joined
- 15 May 2023
- Messages
- 16,989
- Reaction score
- 24,109
Tepes Protocol.I should know better than to leave Jake in the shop, unattended, for even three god-damned minutes, without coming back to find him undoing hours of painstaking, exacting, hard work. What a Dick!
Take the shop broom, and shove the handle where the sun don't shine.
- Joined
- 18 March 2013
- Messages
- 1,498
- Reaction score
- 5,366
Think: Two bulls in a China-shop.Tepes Protocol.
Take the shop broom, and shove the handle where the sun don't shine.


Scott Kenny
ACCESS: USAP
- Joined
- 15 May 2023
- Messages
- 16,989
- Reaction score
- 24,109
I guess at this size (and low production volume), it makes more sense to paint than to do decals.
T. A. Gardner
ACCESS: Top Secret
- Joined
- 18 February 2021
- Messages
- 1,725
- Reaction score
- 3,097
Actually, in many cases, painting is superior to decals. For example, it's often better on aircraft models like RAF or Japanese ones to paint on the national insignia than use a decal. This is because painting doesn't leave a raised surface on the final product, nor does it require an overcoat of clear to fix the decal in place. With Merriman's submarines, the RC ones are in a wet submerged location in use and that is problematic for decals too.I guess at this size (and low production volume), it makes more sense to paint than to do decals.
- Joined
- 18 March 2013
- Messages
- 1,498
- Reaction score
- 5,366
The decals took way, way too much time to prepare and apply. So, I took what I started and scrubbed them off and went old-school with masking tape and paint.I guess at this size (and low production volume), it makes more sense to paint than to do decals.
- Joined
- 18 March 2013
- Messages
- 1,498
- Reaction score
- 5,366
All good solid points.Actually, in many cases, painting is superior to decals. For example, it's often better on aircraft models like RAF or Japanese ones to paint on the national insignia than use a decal. This is because painting doesn't leave a raised surface on the final product, nor does it require an overcoat of clear to fix the decal in place. With Merriman's submarines, the RC ones are in a wet submerged location in use and that is problematic for decals too.


jeffb
ACCESS: Top Secret
- Joined
- 7 October 2012
- Messages
- 1,532
- Reaction score
- 2,943
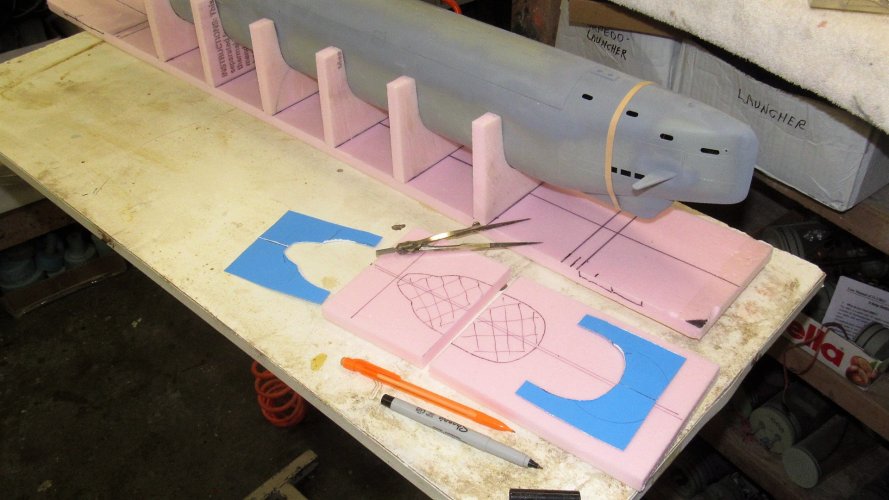
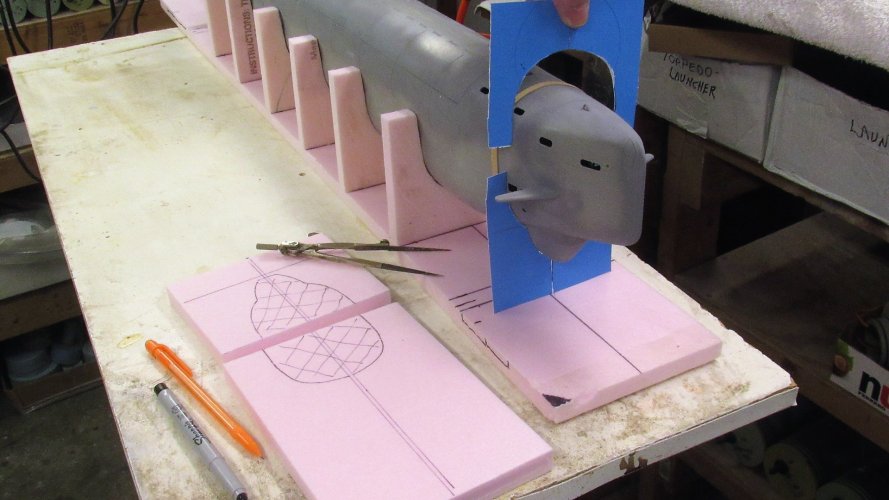
Hey Merriman, amazing pics as usual. I was looking at the photos above where you're preparing a transport box for one of your display models (a Sierra II I think) and wondered if you'd ever tried out one of these contour gauge gizmos as a quick way to profile stuff, like for the foam supports?

Might be a bit quick and dirty, but then again, might be useful.

Might be a bit quick and dirty, but then again, might be useful.
T. A. Gardner
ACCESS: Top Secret
- Joined
- 18 February 2021
- Messages
- 1,725
- Reaction score
- 3,097
Mine is an antique Stanley one, but that is one useful tool.Hey Merriman, amazing pics as usual. I was looking at the photos above where you're preparing a transport box for one of your display models (a Sierra II I think) and wondered if you'd ever tried out one of these contour gauge gizmos as a quick way to profile stuff, like for the foam supports?
View attachment 783274
Might be a bit quick and dirty, but then again, might be useful.
- Joined
- 18 March 2013
- Messages
- 1,498
- Reaction score
- 5,366
I found that this tool takes so much pressure to conform to contour that the little pins start to scare the surface of the model. Instead I just use a length of big gauge solder wire to mimic the contour and transfer that to the foam with a Sharpie pen. Or, I simply cut a folded over paper-stencil and go at it with scissors till I get the contour right.Hey Merriman, amazing pics as usual. I was looking at the photos above where you're preparing a transport box for one of your display models (a Sierra II I think) and wondered if you'd ever tried out one of these contour gauge gizmos as a quick way to profile stuff, like for the foam supports?
View attachment 783274
Might be a bit quick and dirty, but then again, might be useful.
Attachments


Similar threads
-
-
Merriman's Modelling Tips: Stretching Sprue/Runner
- Started by merriman
- Replies: 2
-

-
-
