Good timing, and we are thinking on the same wave-length: I'll incorporate design, construction, and use of scribing tools into the above requested tutorial.
Good timing, and we are thinking on the same wave-length: I'll incorporate design, construction, and use of scribing tools into the above requested tutorial.
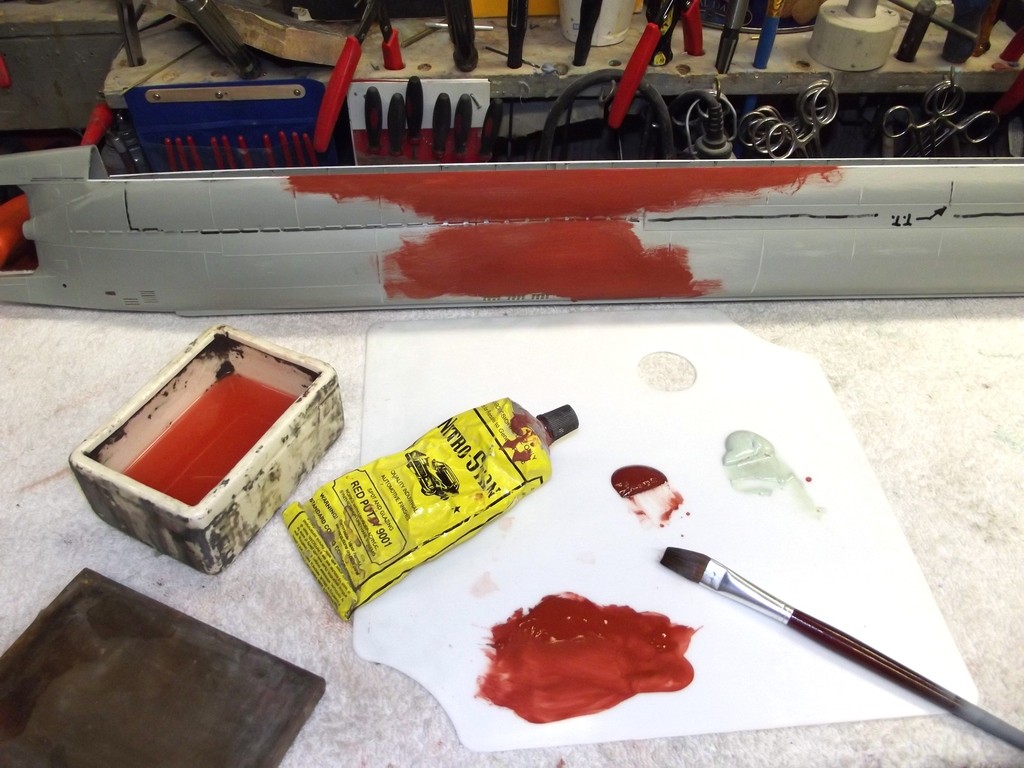
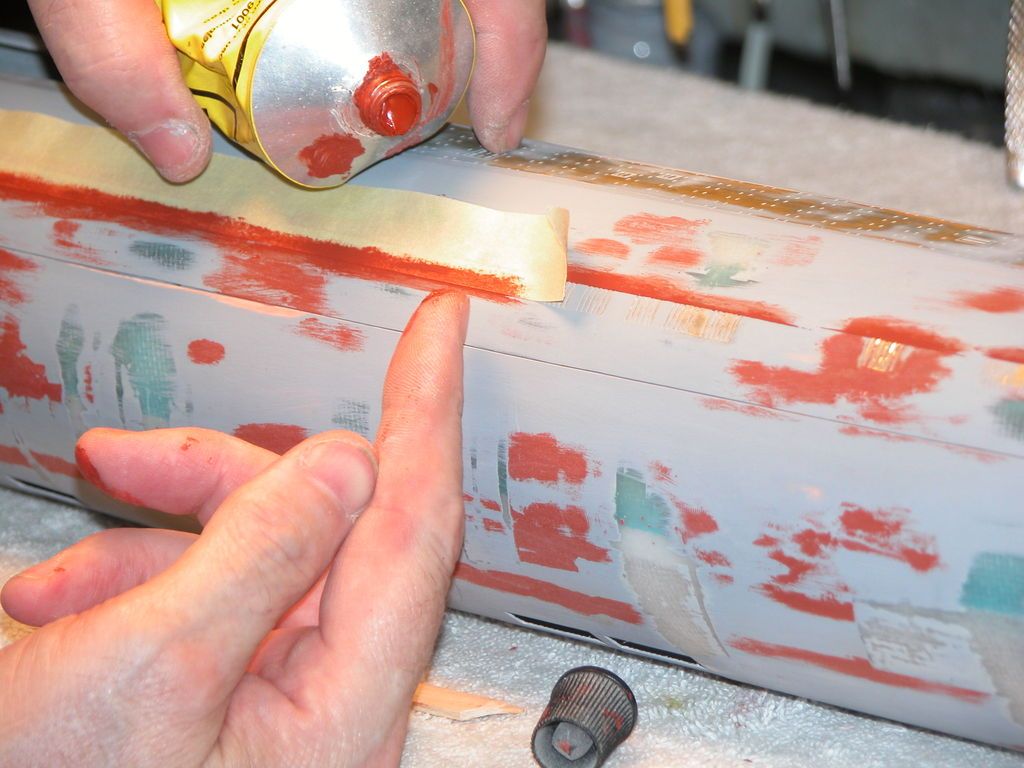
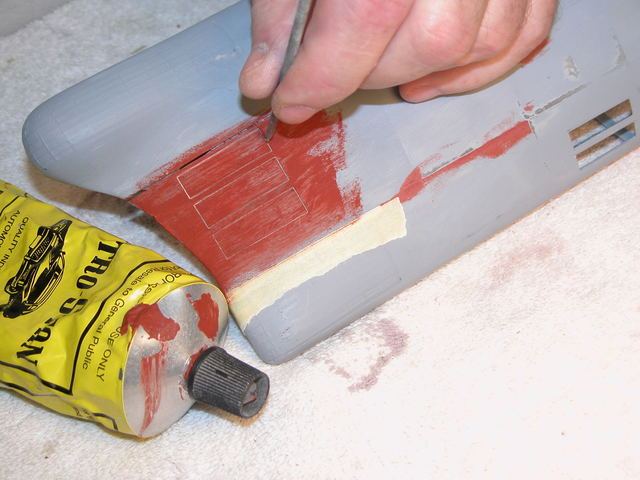
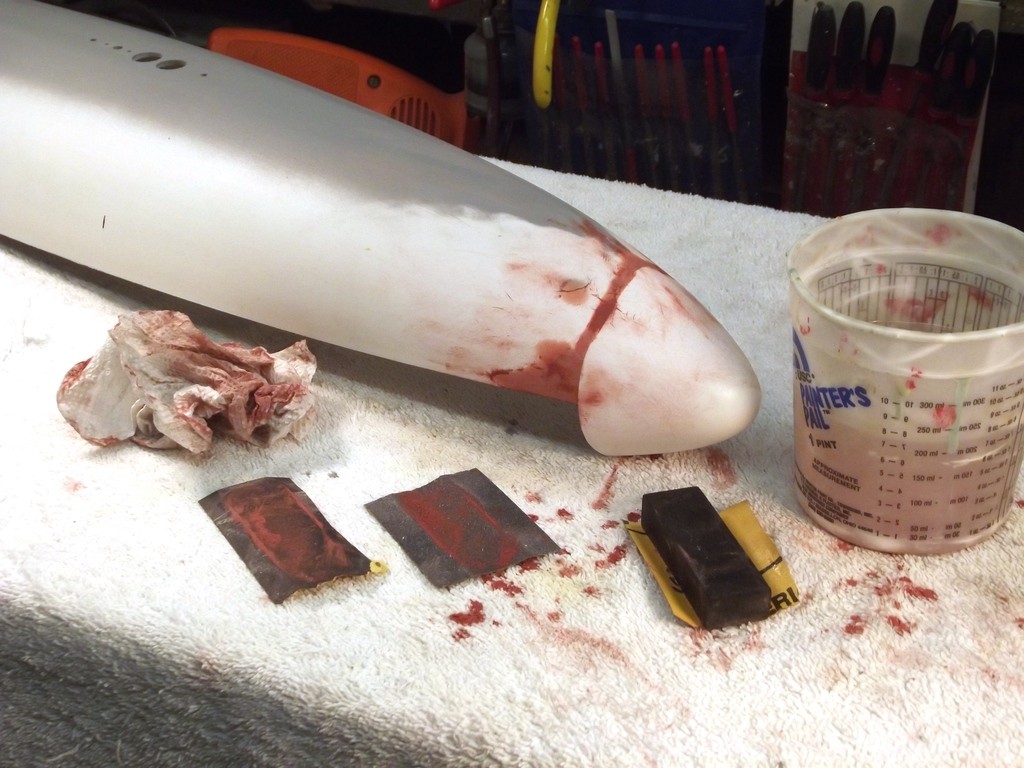
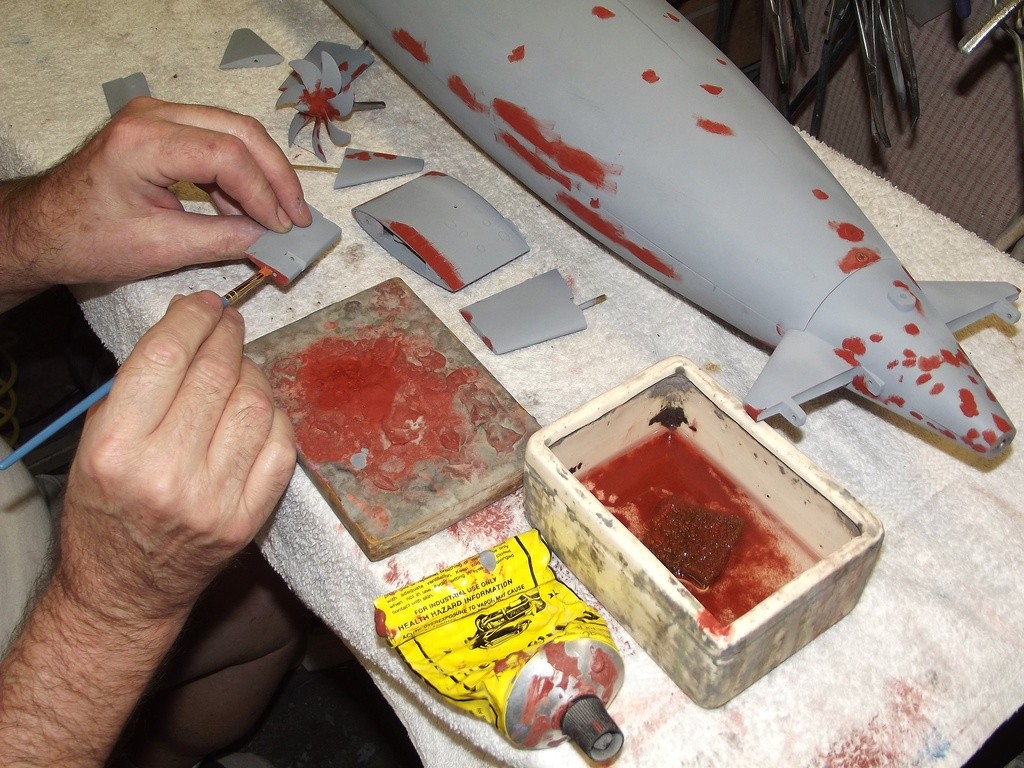
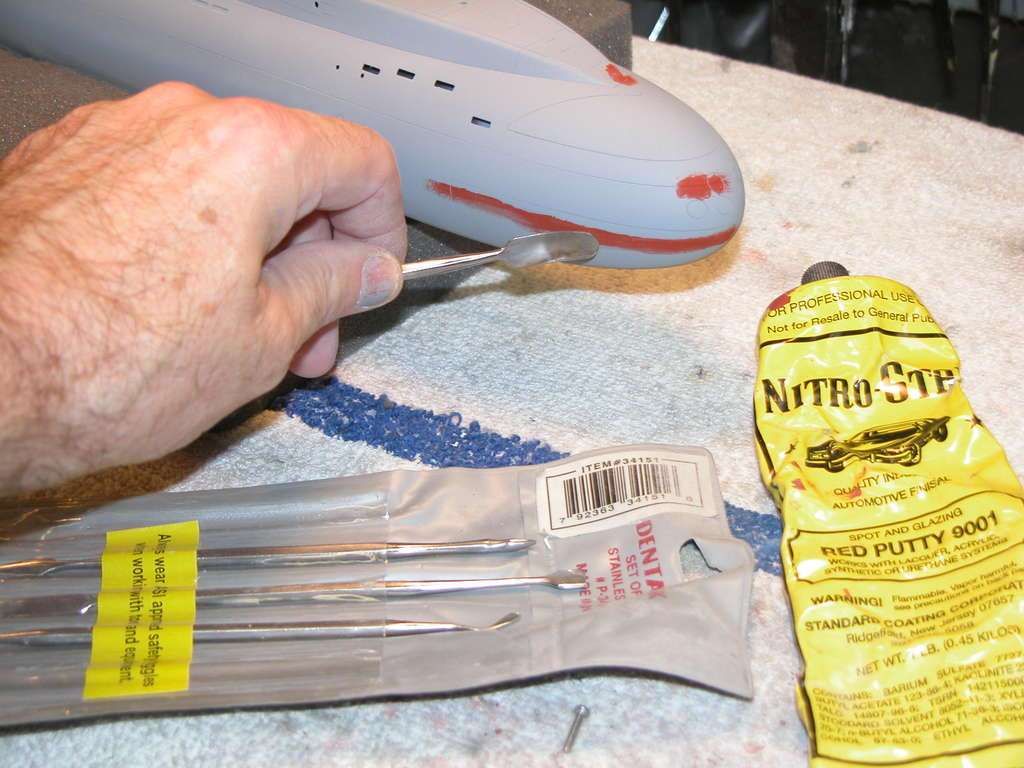
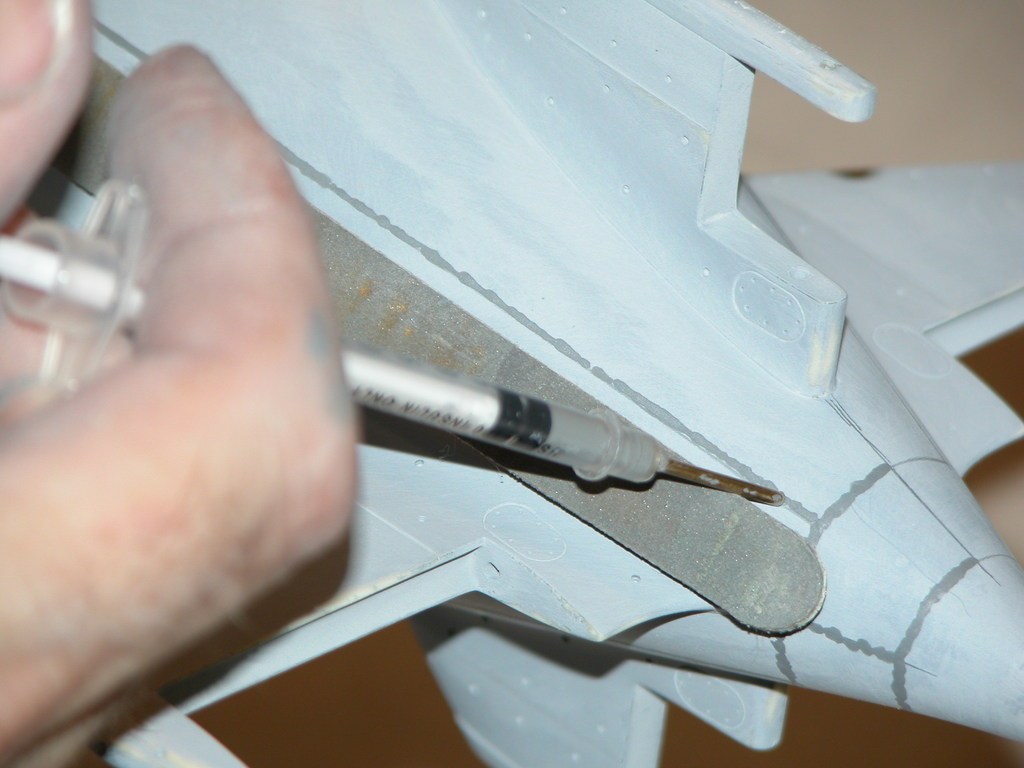
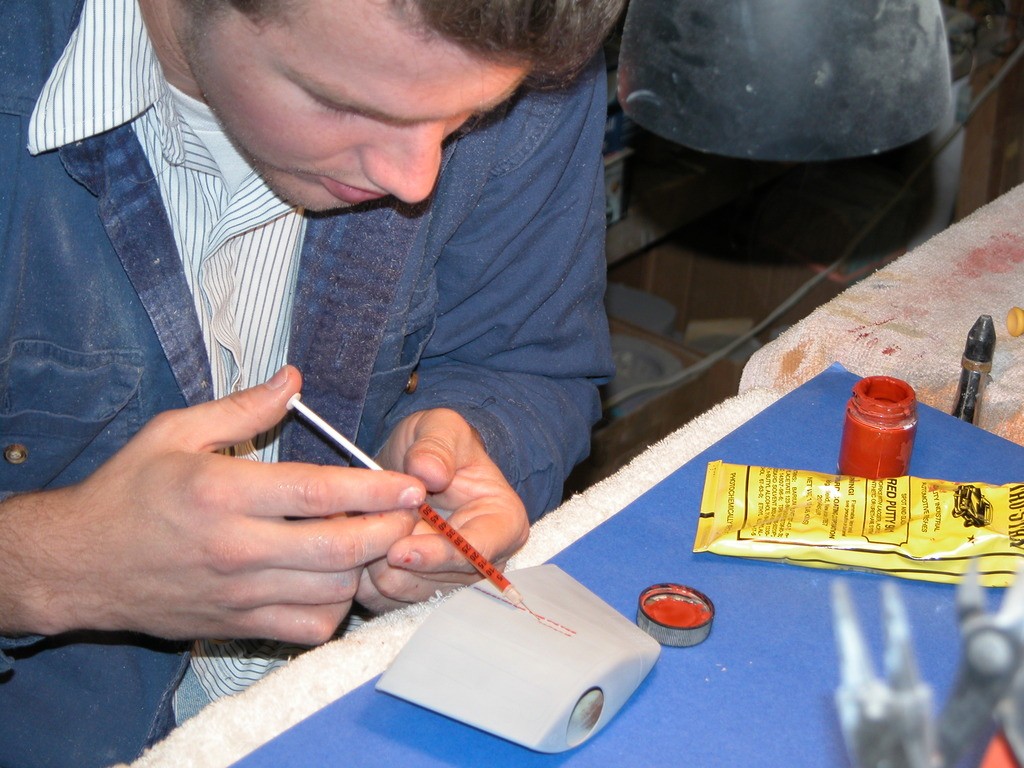
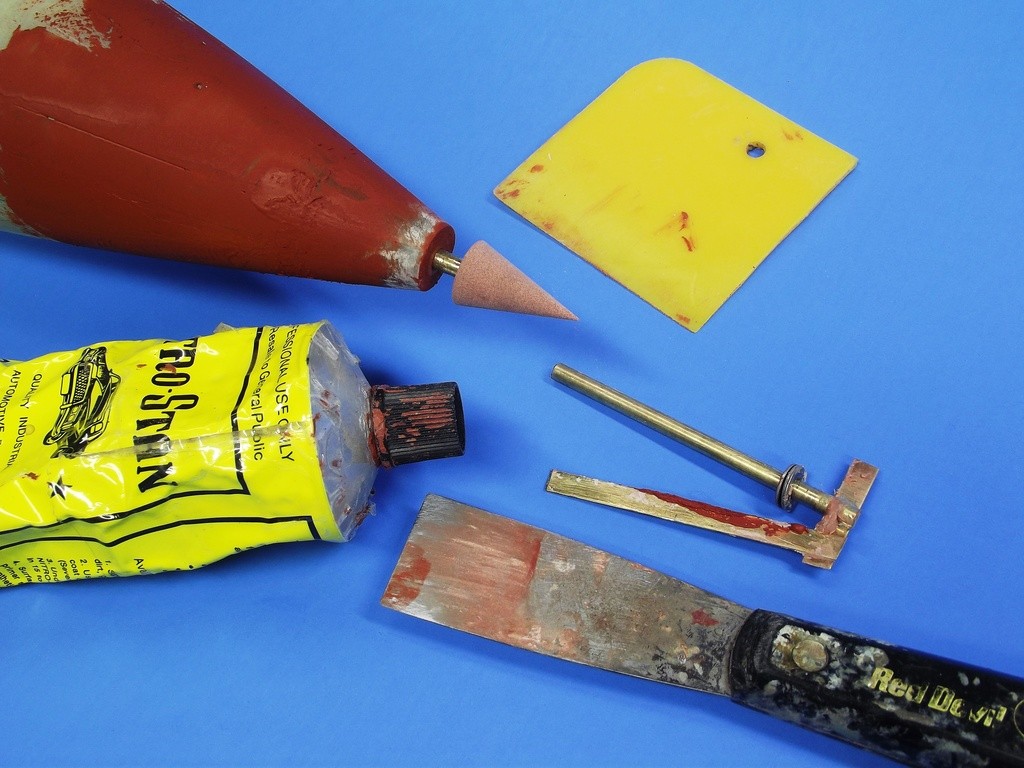
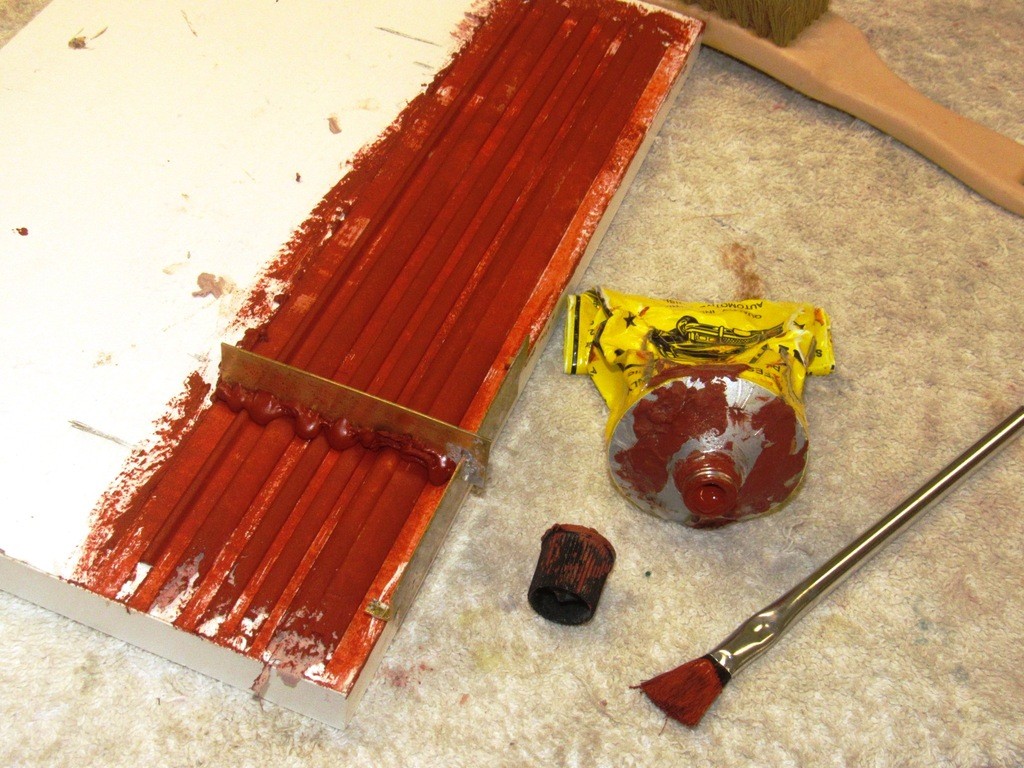
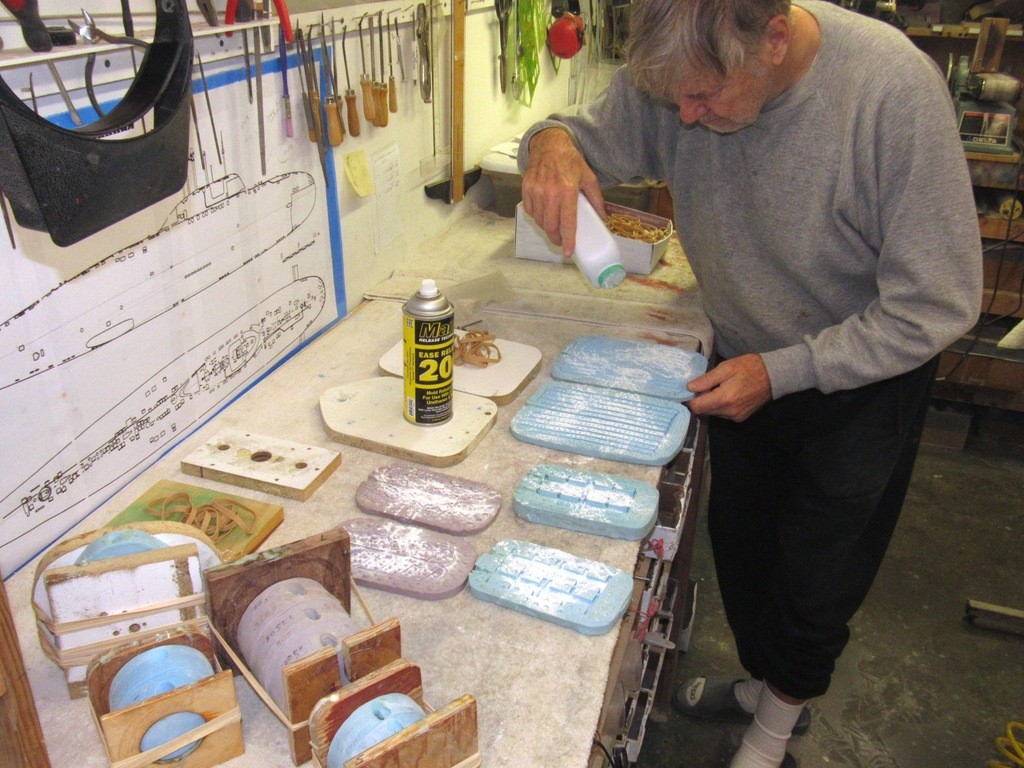
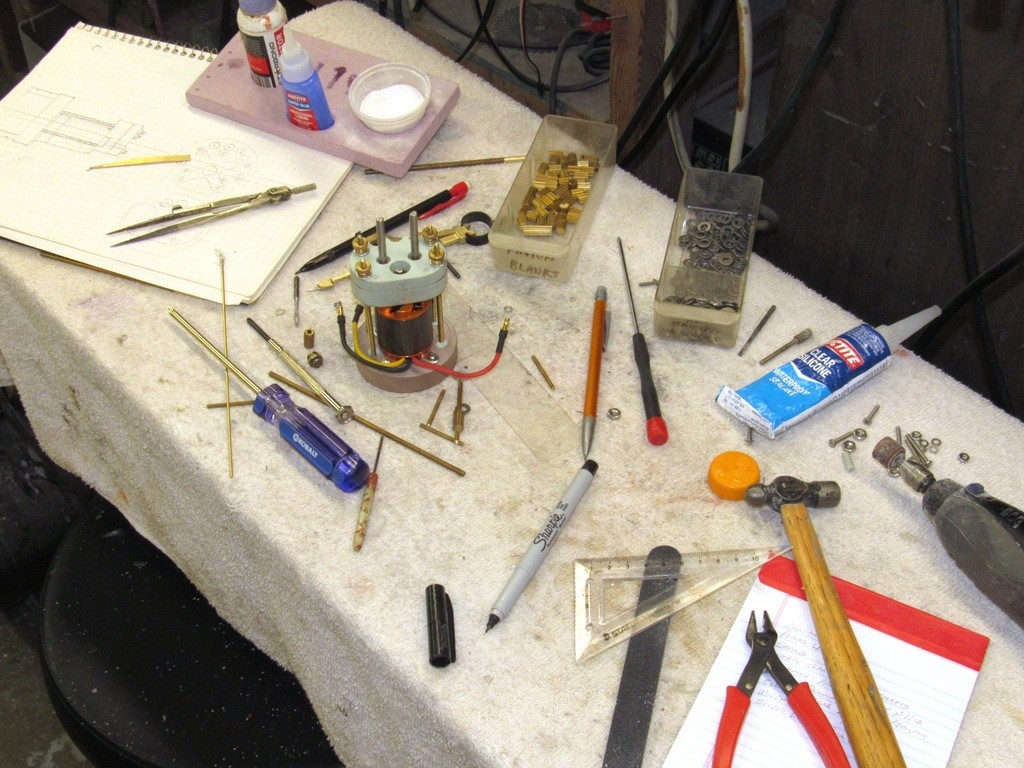
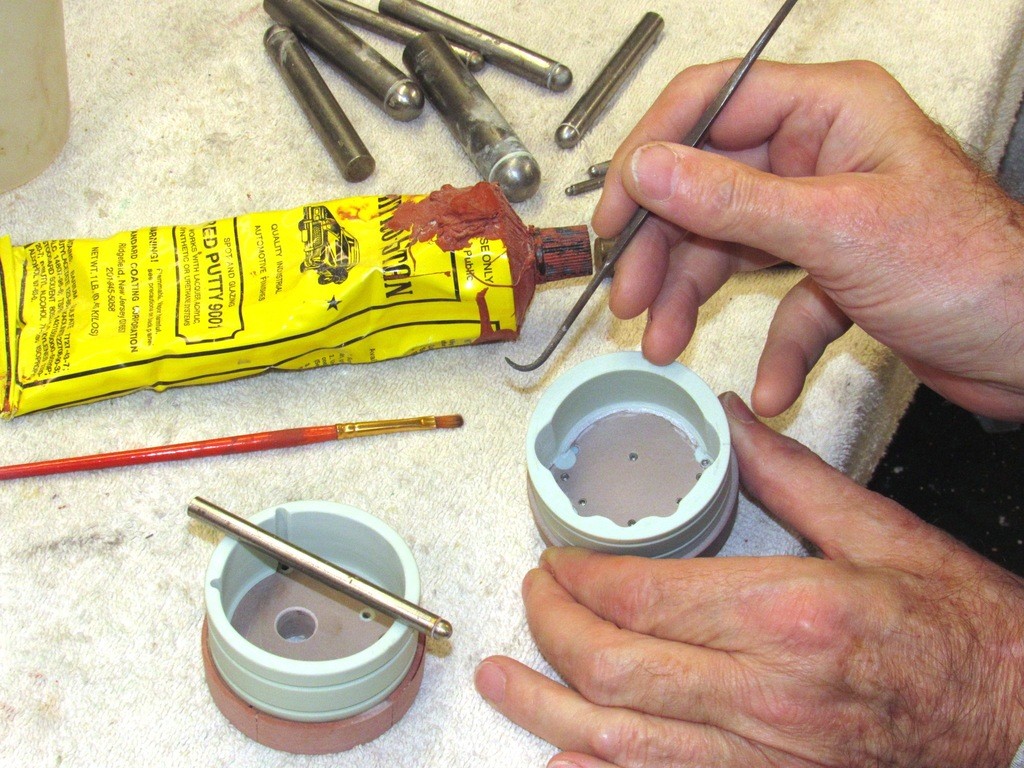
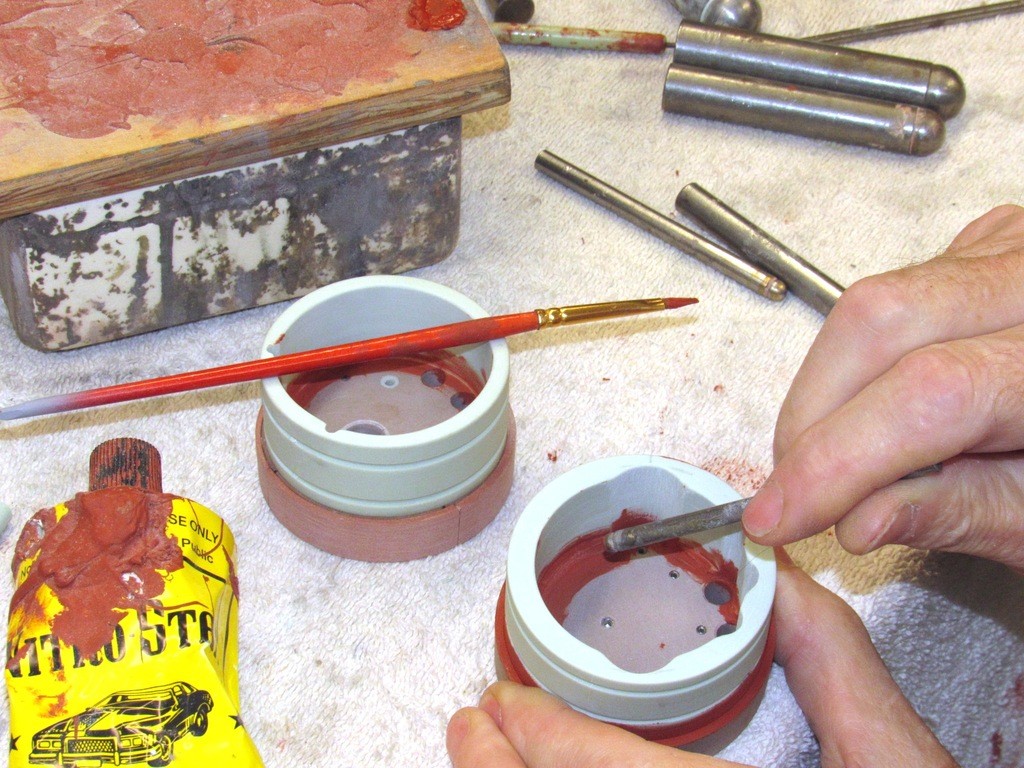
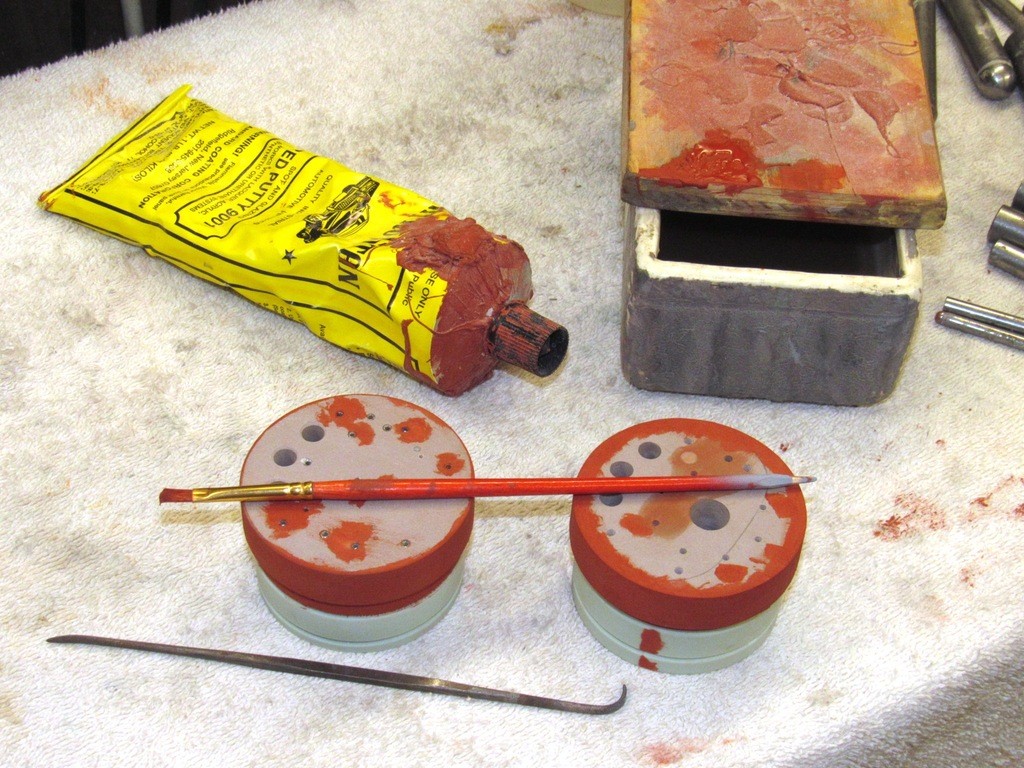
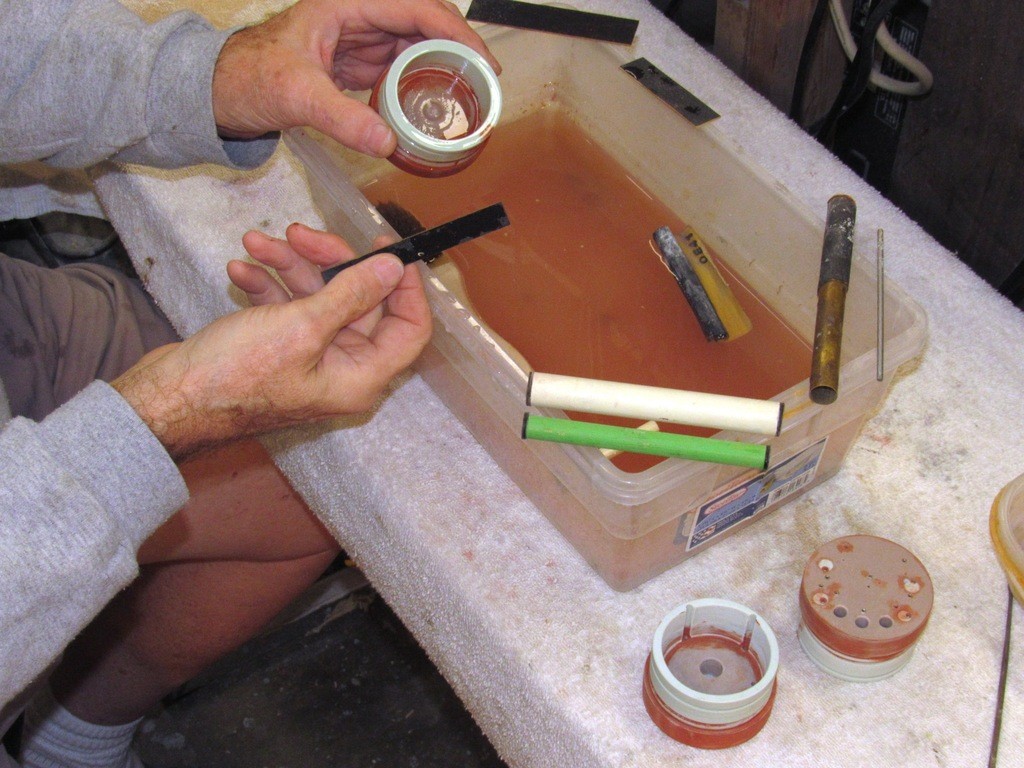
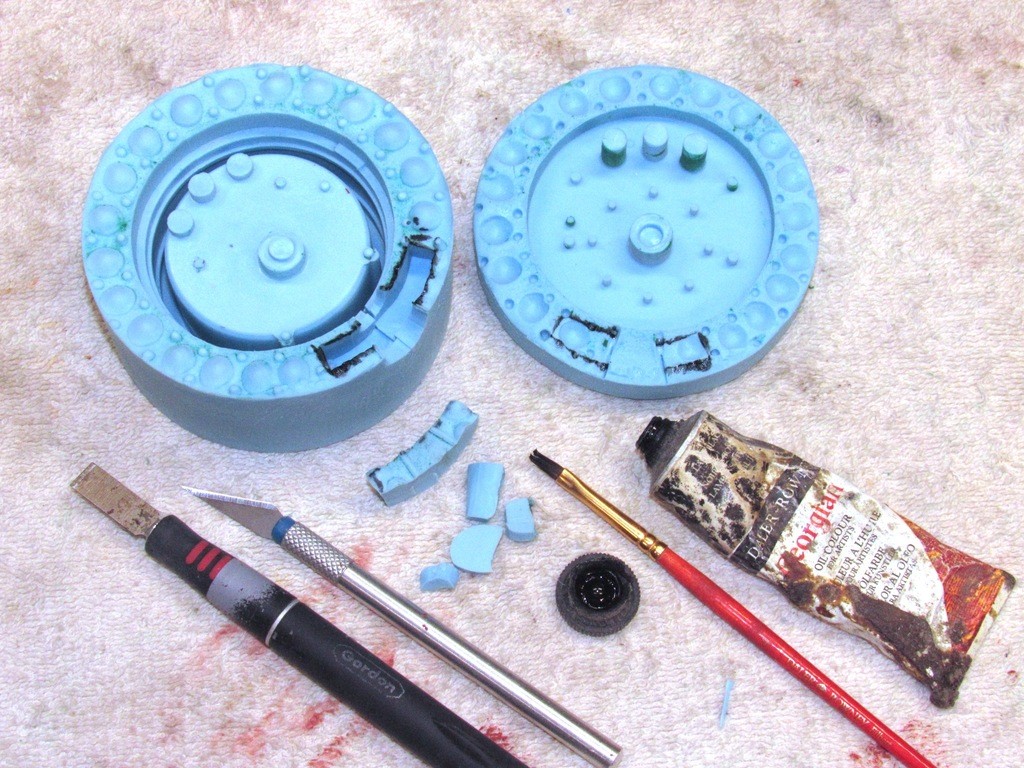
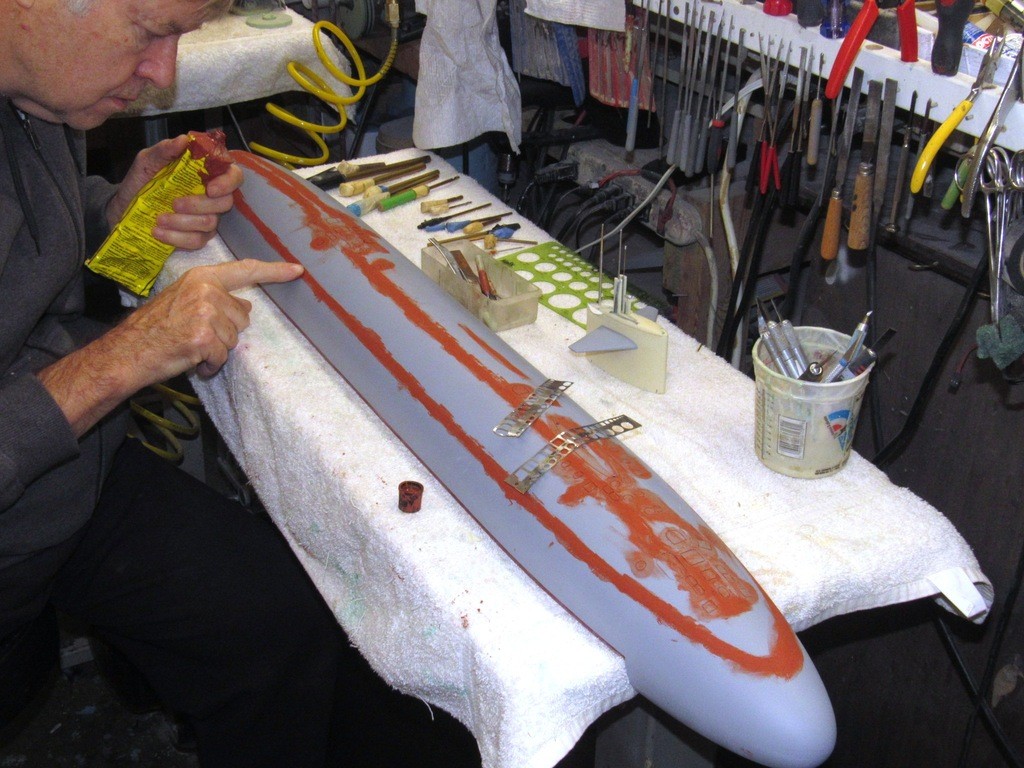
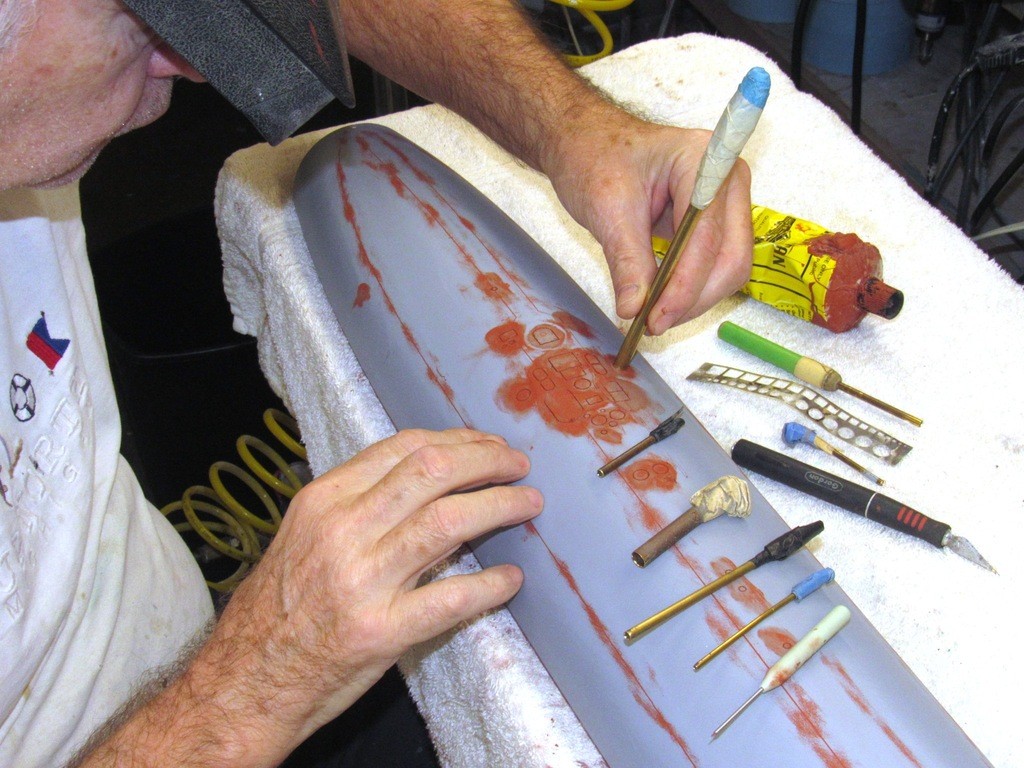
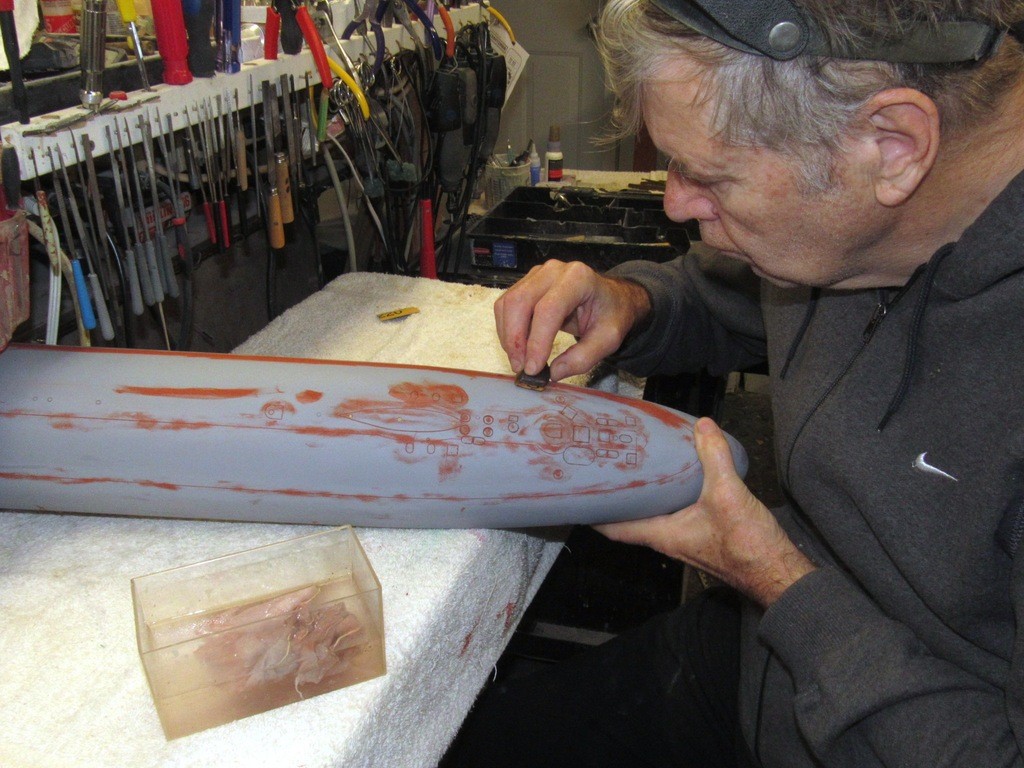
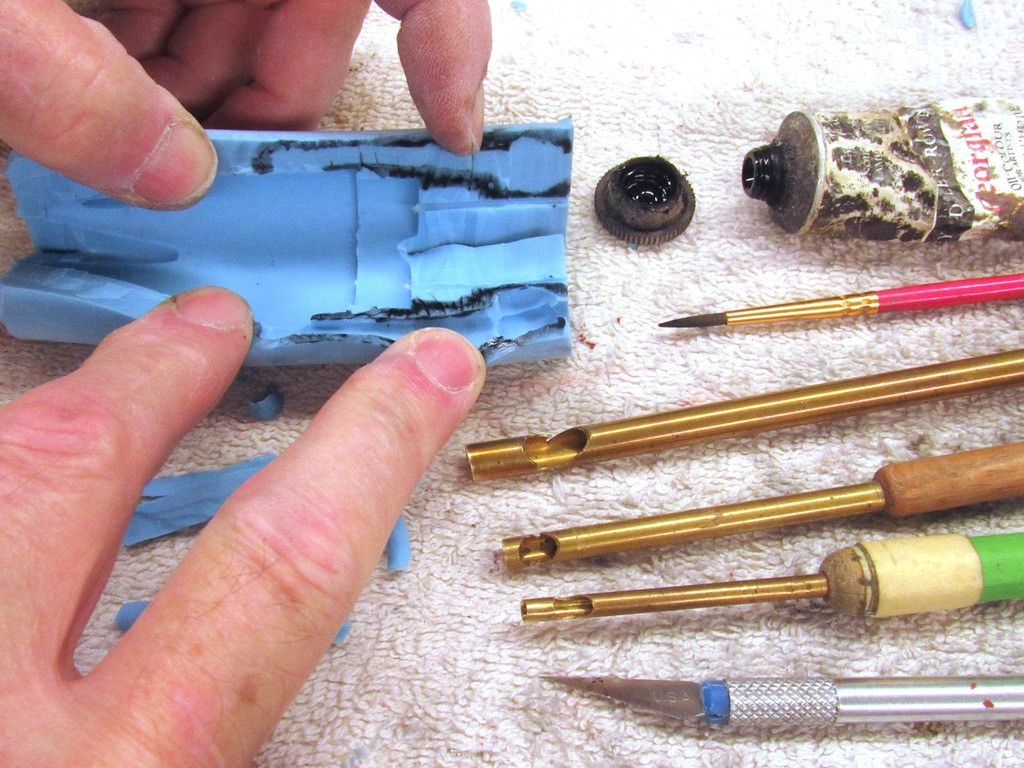
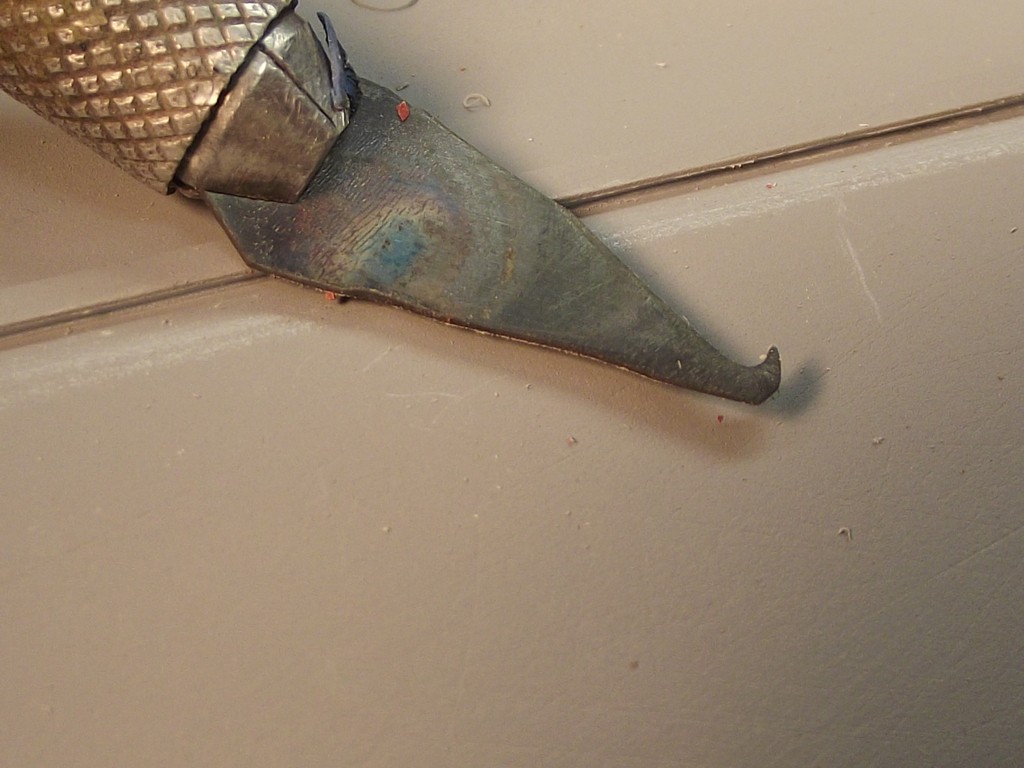
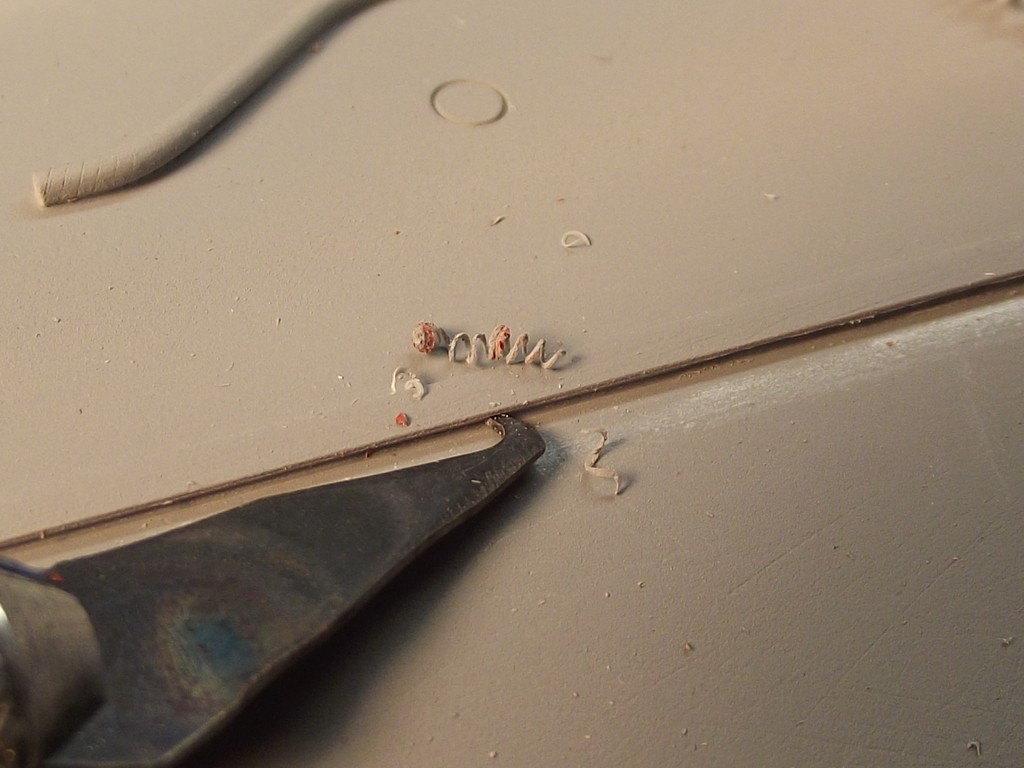
It's Nitro-Stan air-dry, lacquer based touch-up putty. It's used to fill shallow tool marks, scratches, seams, and small-fill contouring work.
Scribing is very much like sausage making and eating: the result is wonderful and most enjoyable, but the process of manufacture is ugly. After I've scribed a models surface there invariably will be over-strikes and mistakes. These errors are covered, along with the desired engraved lines, with the putty, followed by a light re-scribing of the engraved lines I wish to preserve to chase out the putty. That done the surface is sanded smooth leaving only the engraved lines to capture light and shadows.
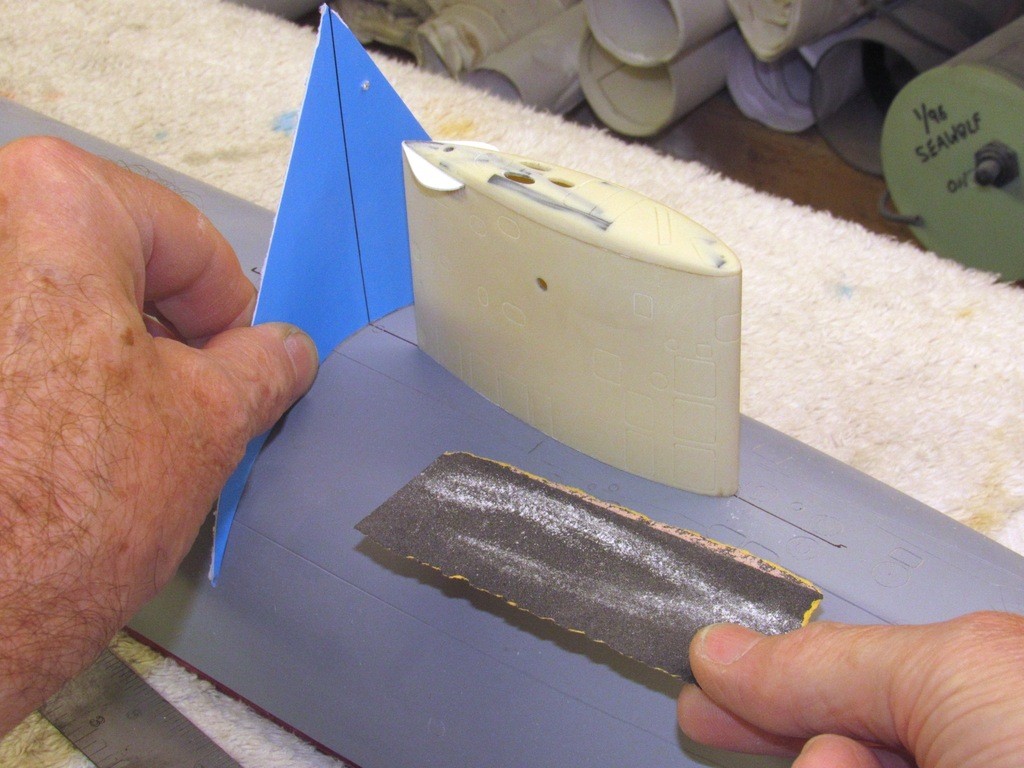
Here are some shots of application techniques employed to lay down the putty:
It occurs to me that this series of posts could form the basis of a phenomenal highly-illustrated and textually well-described book on how to scratchbuild a professional model. Whether it would be a *profitable* book, I dunno, but I'd sure and shootin' get in line early to buy a copy.
It occurs to me that this series of posts could form the basis of a phenomenal highly-illustrated and textually well-described book on how to scratchbuild a professional model. Whether it would be a *profitable* book, I dunno, but I'd sure and shootin' get in line early to buy a copy.
I can't argue about the profitability of books, but the fact is, compared to the internet, a well make book will likely *far* outlast a bunch of internet posts on a forum that a person needs to be signed in to to view. I wonder if Mortons out of Britainistan with their "bookazine" format might be interested. Perhaps talk to our very own Dan Sharp about that. Hell, you've apparently already got all the illustrations... all you need is the descriptive text. the SPF here might be a good place to finish out your series of posts, take questions and suggestions and refine the final product...
As to the craft being dead: 3D CAD modeling and various 3D printing systems certainly have their place; I use them myself. But the fact is that, at least so far, such systems *still* require the skilled hand of Man to finalize. A 3D printed Akula sub of that scale would be either a fabulously expensive thing to print while still requiring a lot of hand finishing, or a still-pretty-expensive thing to print requiring a *vast* amount of hand finishing.
Posterity is fine. But, my current goal is to get in as much model-building as possible while I'm still able to do so. I'm 70 years old and the clock is running out. I have time for quick Internet posts. But not books.
I'm flattered at your suggestion about getting this work on pages again (I've authored well over 80 magazine articles over the decades and have contributed to two hard-cover books) but the return -- monetary and recognition -- was, now that I look back on it, not worth the effort. I've played that game. Simply put, Scott: just not enough interest out there in the world of instant gratification to warrant the time and effort to cobble together a book chronicling my work and techniques. My time and effort is better spent in the shop.
Additive and subtractive 'build' machines are ever improving -- only a few years from now and it all will be Star Trek Replicator quality stuff. And buggy-whip makers like me will join the spoke and barrel makers. Fact is: the robots do it faster, better, and cheaper. As long as the electrons flow we'll be OK.
"Mr. Wordsworth, you have been found to be …. obsolete!"
Additive and subtractive 'build' machines are ever improving -- only a few years from now and it all will be Star Trek Replicator quality stuff. And buggy-whip makers like me will join the spoke and barrel makers.
Nah. You won't join the spoke and barrel makers... you'll join the artisans. The people who hand-print and hand-bind books, the painters, sculptors, knife makers, armorers, etc. Sure, there will be a *lot* less business for them... but once the field is winnowed down to just the really good ones, they can name their price. Something I put in my space opera sci-fi: what would the Han Solo types actually get paid to fly across the stars? People, sure. But... drugs? Nope. Weapons? Farm equipment? Building supplies? Nope, nope, nope. All that can be fabbed on-site using nothing more than a replicated fabber, a desktop Mr. Fusion and the local asteroid population. What they *would* get paid for is the sort of stuff that people with more money than sense always blow their money on: hand-made "novelty" stuff. You don't think a Jackson Pollack "painting" is actually objectively worth more than wallpaper, do you? No, it only has value because people have decided it does, because in their original forms there just aren't that many of them.
Spokes, barrels, buggy-whips are distinctly different in that they were always mass-produced an interchangable commodities.
All that said, you do you with respects to how you want to impart your experience and skills. if'n that comes in the form of randomly posted photos, so be it. I highly doubt anyone but the nattering nabobs will complain overly much that "that's not relevant to the forum, blah, blah, blaaaaahhhhhrrrrg." If you want to post what you want to post and then go back over it at your leisure and add further comments and descriptions for each photo to old posts, that'd be great too. "Here, I'm doing X with Y."
All that said, you do you with respects to how you want to impart your experience and skills. if'n that comes in the form of randomly posted photos, so be it. I highly doubt anyone but the nattering nabobs will complain overly much that "that's not relevant to the forum, blah, blah, blaaaaahhhhhrrrrg." If you want to post what you want to post and then go back over it at your leisure and add further comments and descriptions for each photo to old posts, that'd be great too. "Here, I'm doing X with Y."
There you go. I lay out the raw stuff and amplify when someone wants clarification or additional info. As you well know, writing -- good writing -- takes a lot of time. Pictures are quick and serve as a fine discussion-starter.
By the way, I looked you up on the Interlink. My God! You crank out a lot of neat stuff, sir!
A bit at a time builds up. A couple sentences a day can create a modest book before you know it. And of course you know better than anyone else what you're doing with what in those photos; sometimes people might not know what questions to ask, but you might know what answers to give.
By the way, I looked you up on the Interlink. My God! You crank out a lot of neat stuff, sir!
Fair enough, sir. I'll throw in a few words here and there. Reasonable.
I've imagined your Up-Ship work, the highlights, turned into a large format, coffee-table book of glossy pictures. The Klep, Bonestell, R.A. Smith, Coggins, Freeman, Tinsley kind of stuff. I wonder if Ron Miller (NOT his first edition) and Jack Hagerty made any worthwhile money with their big books, Scott?
Last I heard a year or two ago when I asked Ron about a possible second edition of "Dream Machines," the publisher still hadn't sold out of the first edition. Sigh. But it was sort of a pre-internet, very expensive beast of a book.
Last I heard a year or two ago when I asked Ron about a possible second edition of "Dream Machines," the publisher still hadn't sold out of the first edition. Sigh. But it was sort of a pre-internet, very expensive beast of a book.
Yeah. I just don't see this stuff selling like the old Viking books did when they hit the streets. Not today. I think your work, presented on the Internet, is the best possible way to get your good works 'out there'. But it has to be a love of subject -- no one is going to make any real money over such ventures. I know I'm resigned to that fact. And I assume you are as well, Scott.
"Real money" as in buying out Steven King? Yeah, you're probably right. Hell, my first truly serious book project (which was to be a "spaceflight engineering for sci-fi authors" book) died of terminal depression and obsolescence when I saw the Atomic Rockets website. But as much as I'd love getting into a "I'm more jaded and cynical than you" contest - and believe you me, I can mount a good defense there - we're getting a bit afield from the topic of you posting photos and advice on how to create these remarkable sub models.
So, to everyone else, take a few minutes to go to aerospaceprojectsreview.com, buy everything you can there, then come back here and learn how to make models with skills that ILM woulda drooled over.
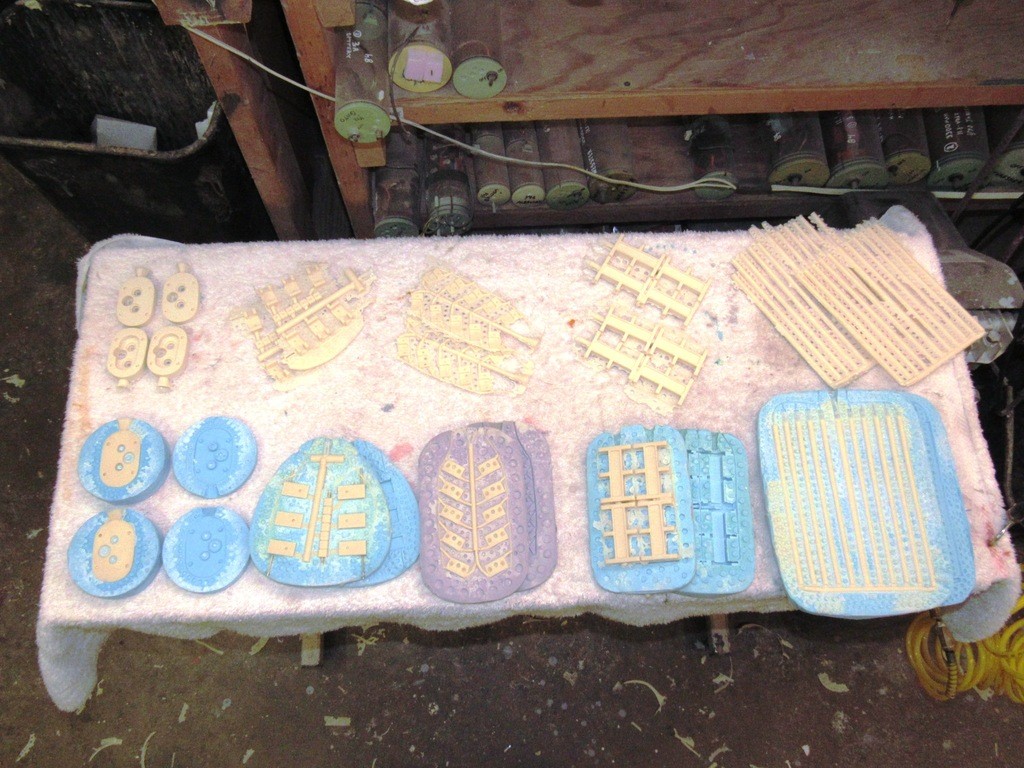
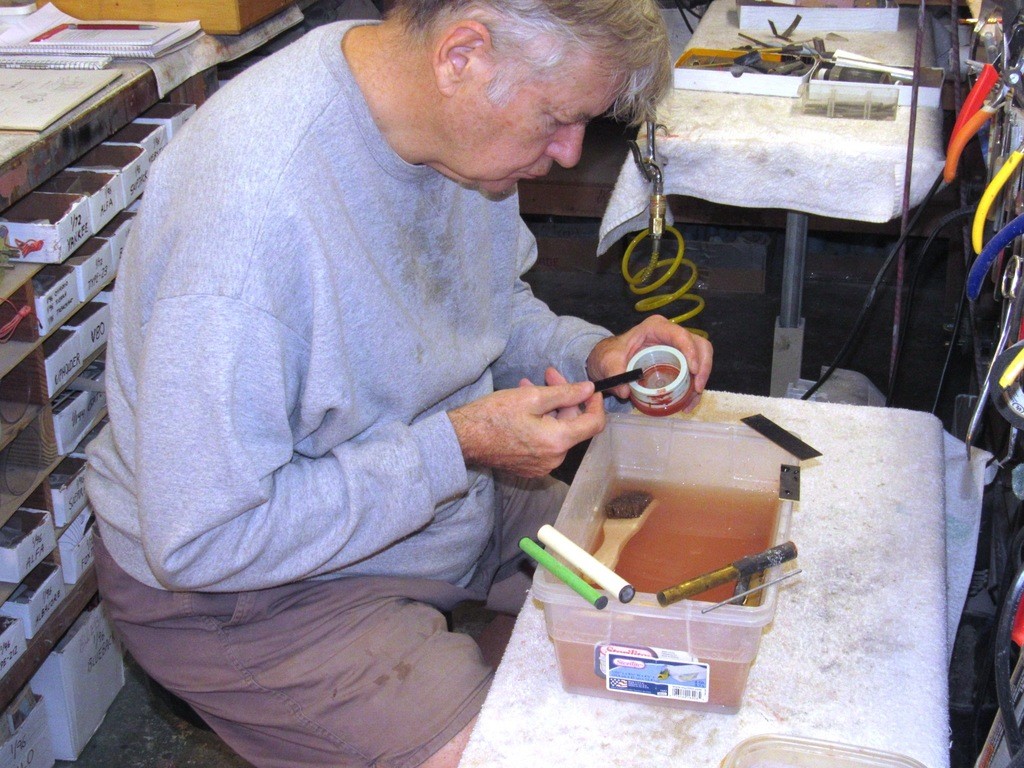
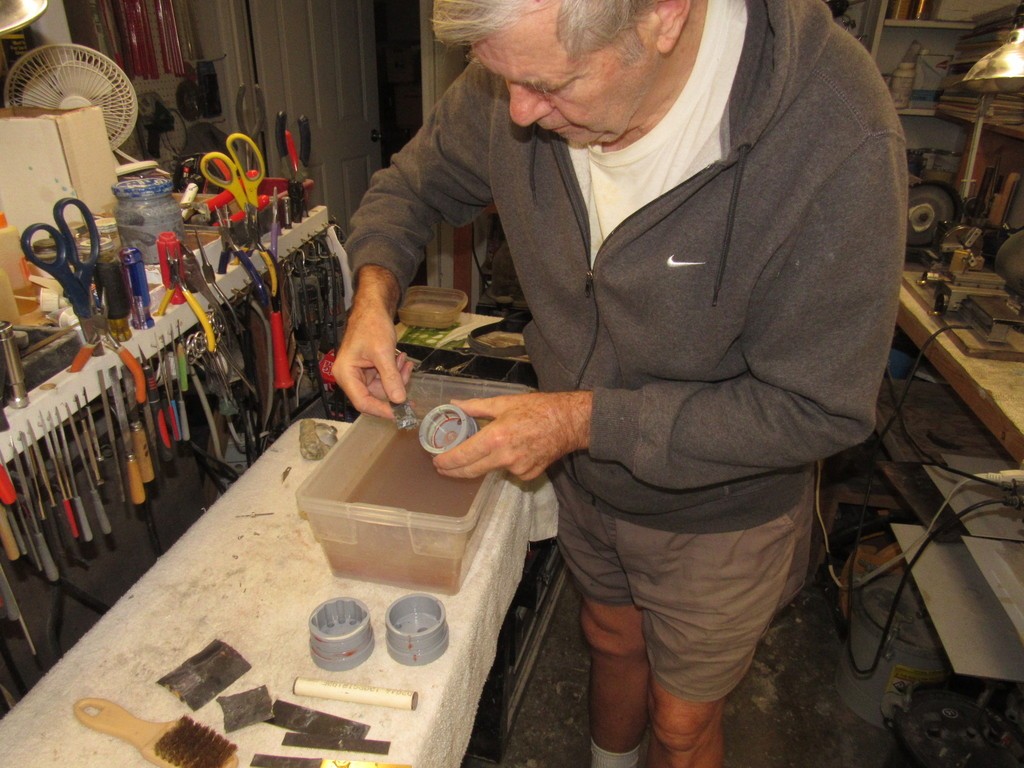
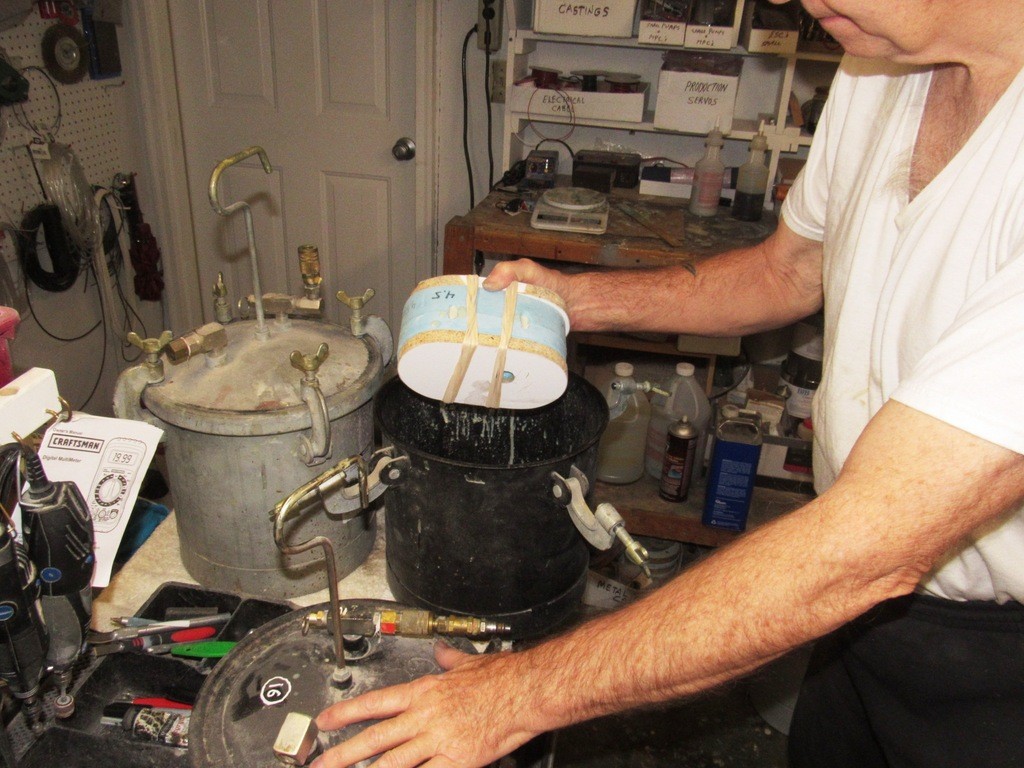
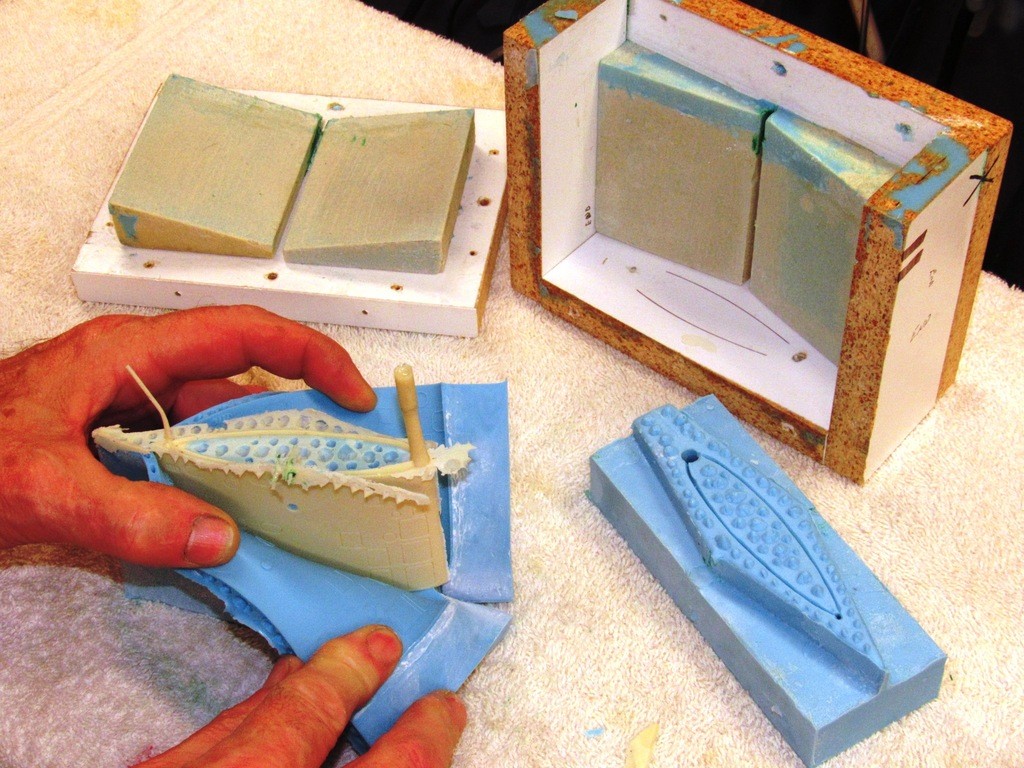
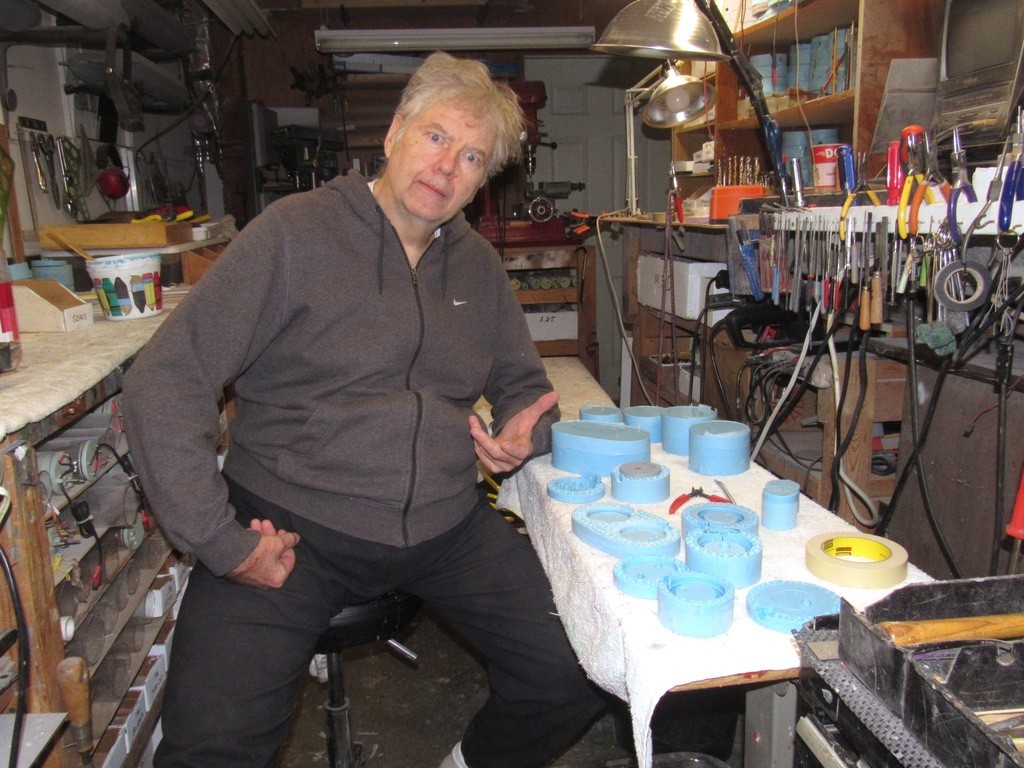
I rely heavily on reproducible model building techniques. My principle one is resin casting. Most of that work, as illustrated here, is simple pressure assisted casting. Some hum-drum piece work needed to make the parts utilized by the r/c submarine modular systems I market through the Nautilus Drydocks. Polyurethane casting resin is catalyzed, poured into rubber tools, pressurized till it hardens, then the tools are opened and the cast parts extracted, and the process repeated.
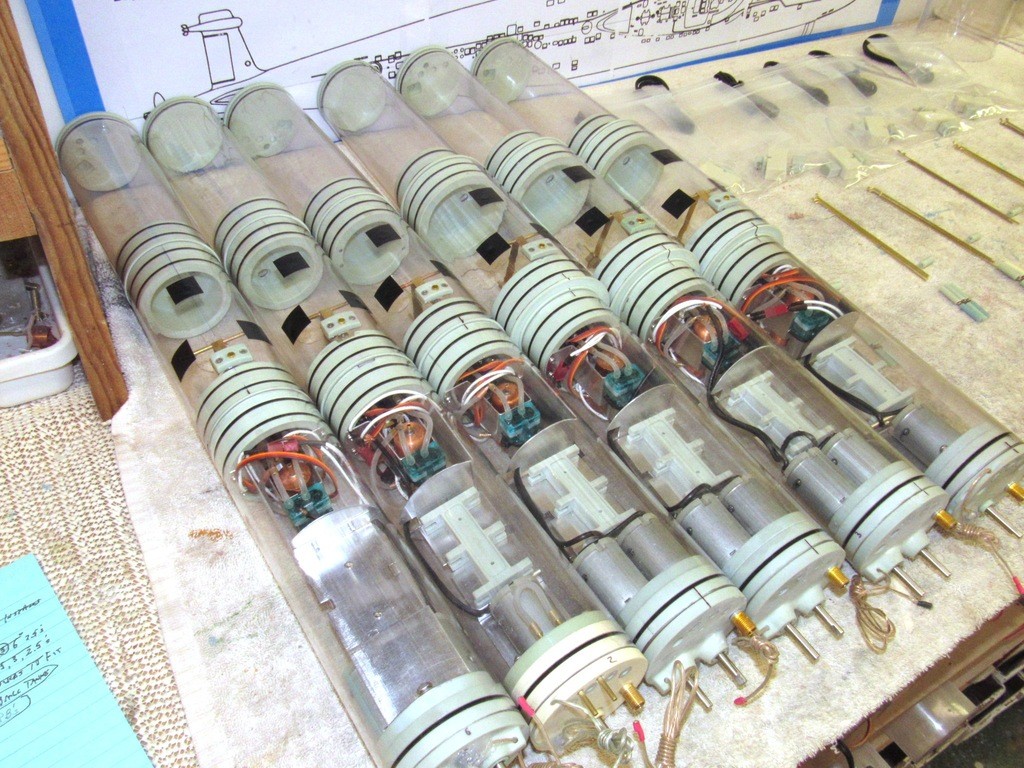
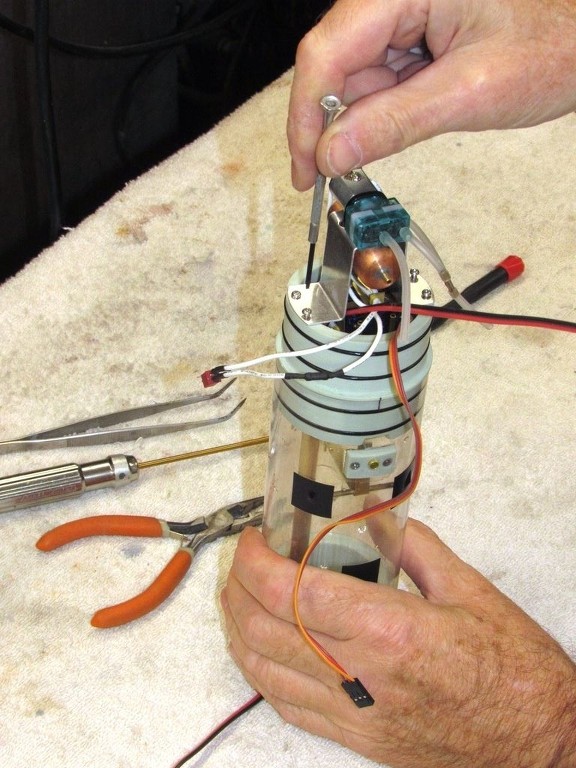
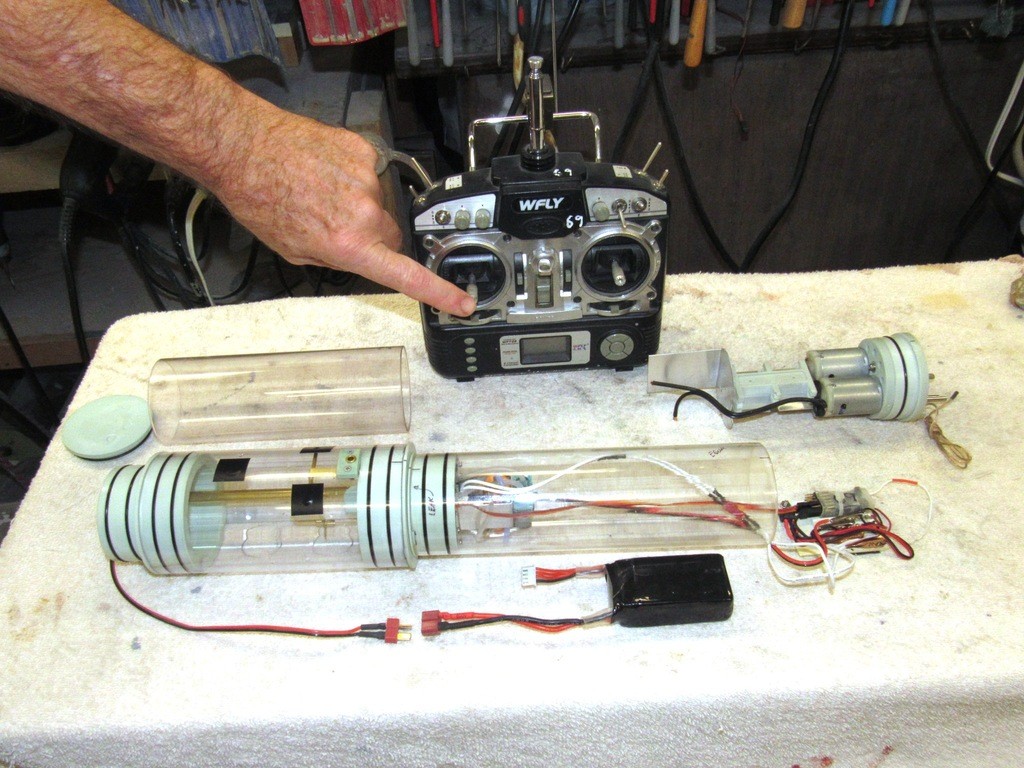
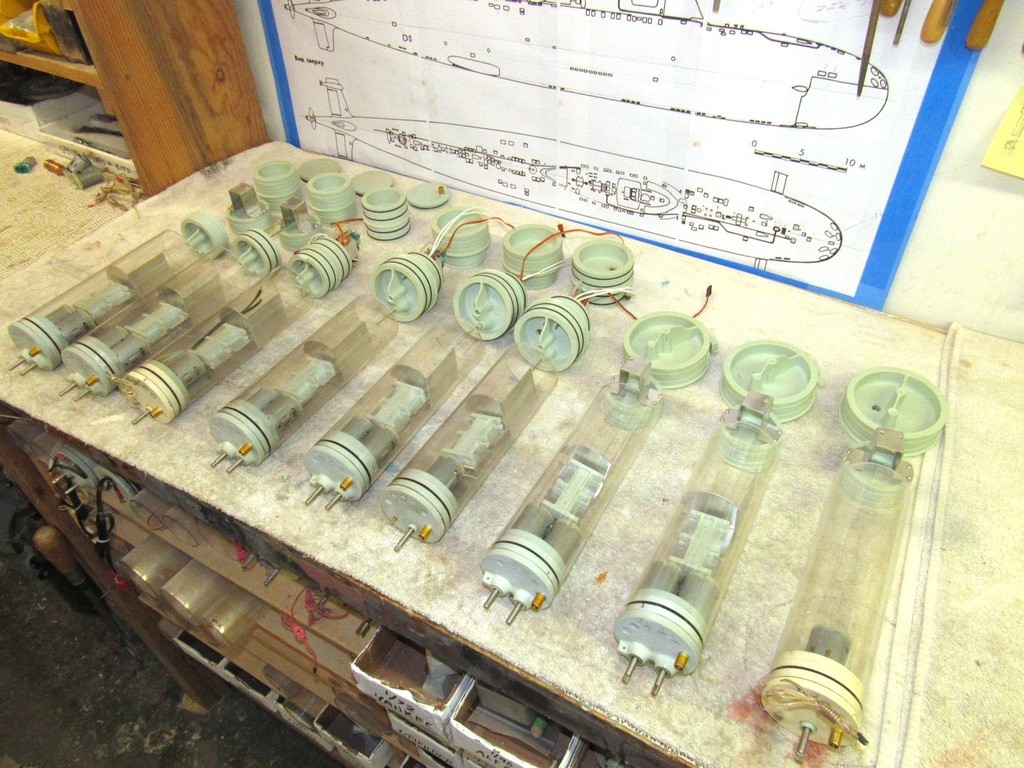
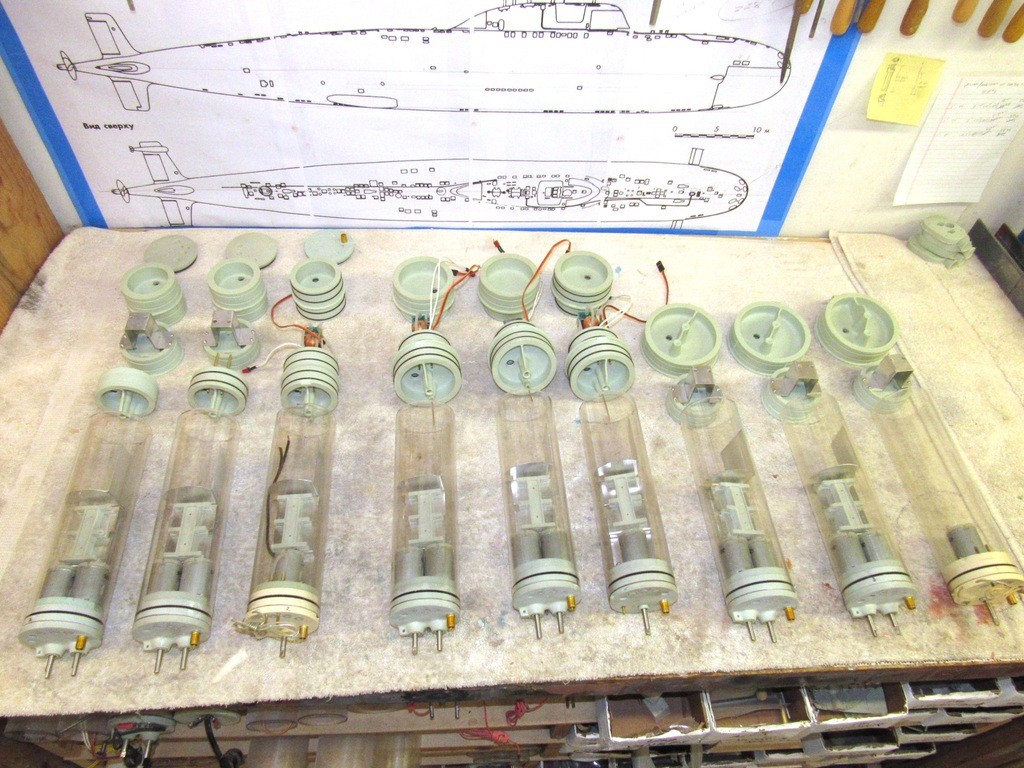
Spent most of last week leak checking and certifying a group of our major project, the SubDriver. This is a watertight enclosure containing the propulsion, control, and ballast sub-systems needed to operate an r/c model submarine. These things are our bread-and-butter. We used to do industrial displays, movie effects miniatures, private commissions, and resin kits (remember Lunar Models?). Today we support the r/c submarine hobby trade.
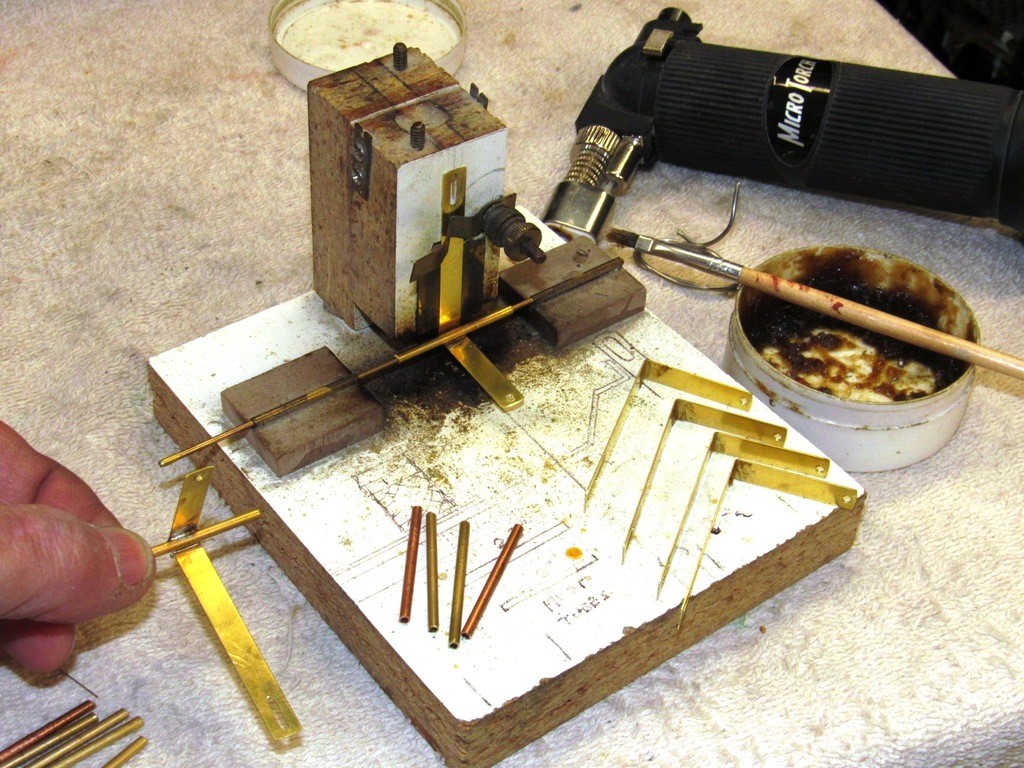
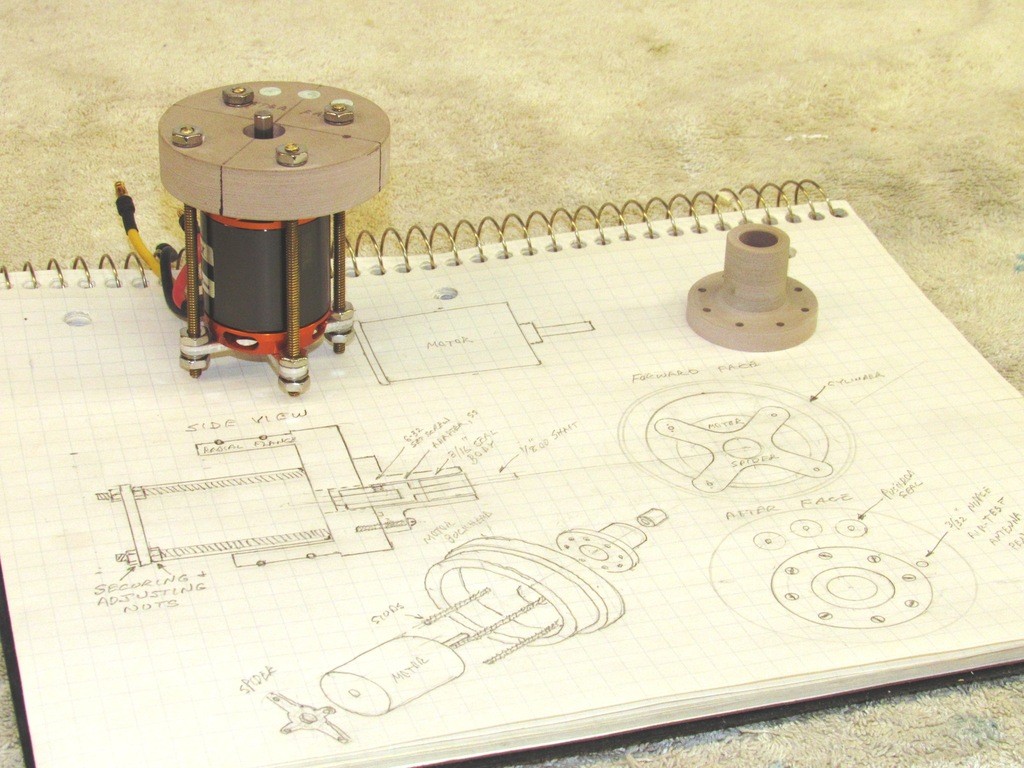
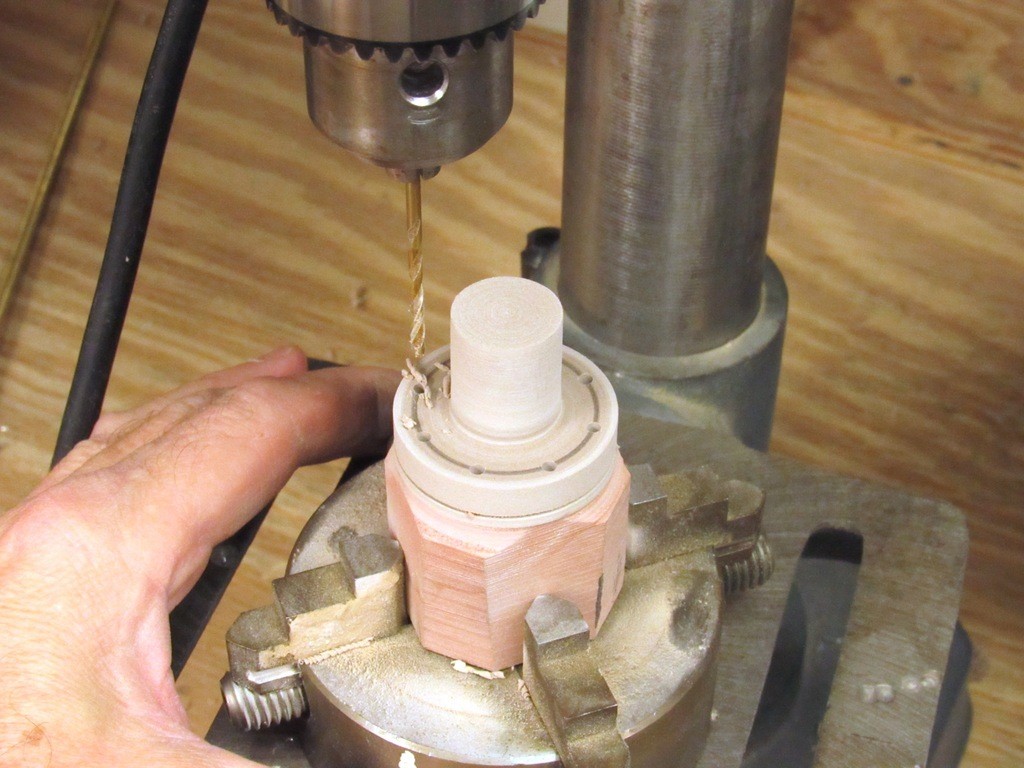
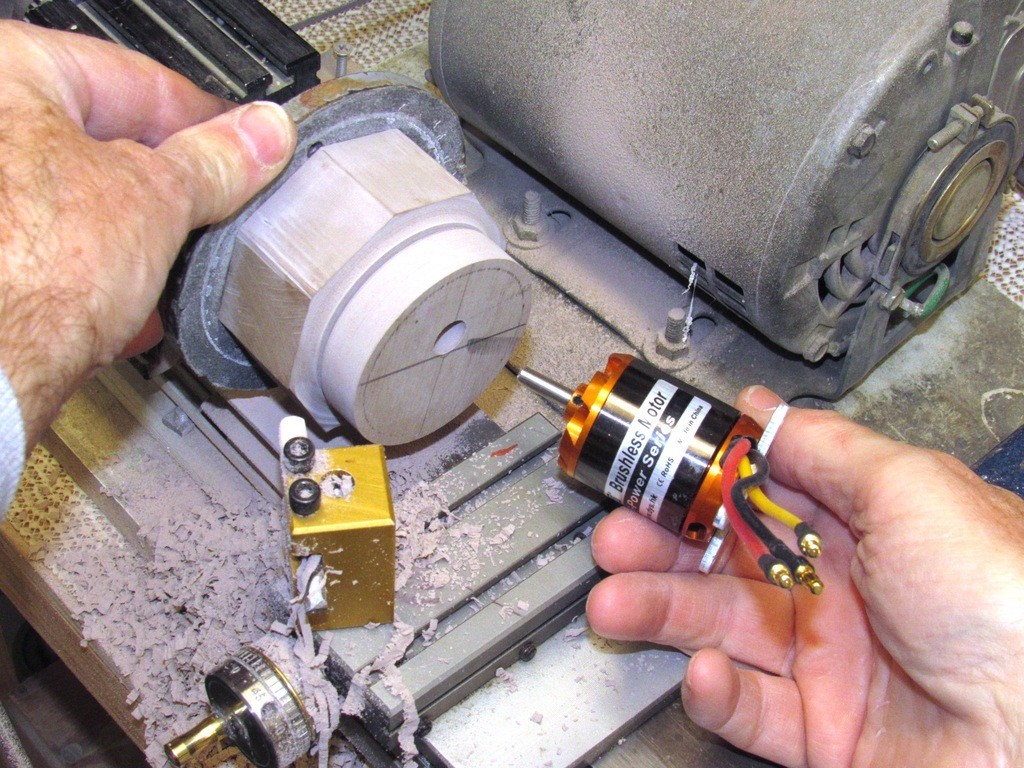
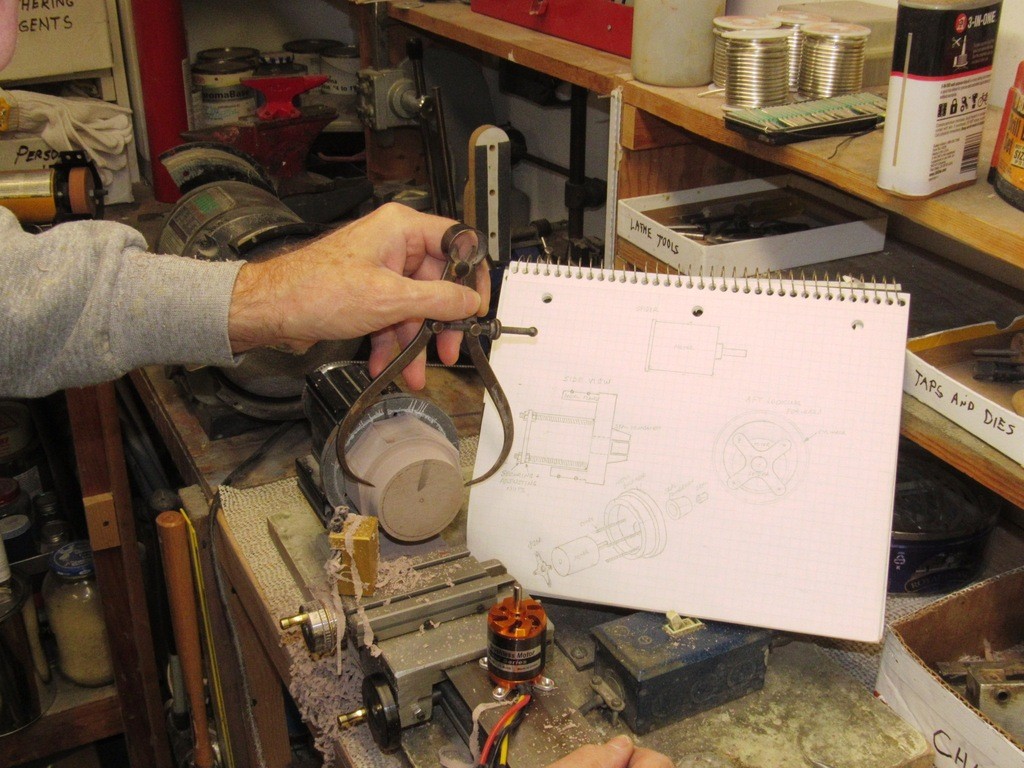
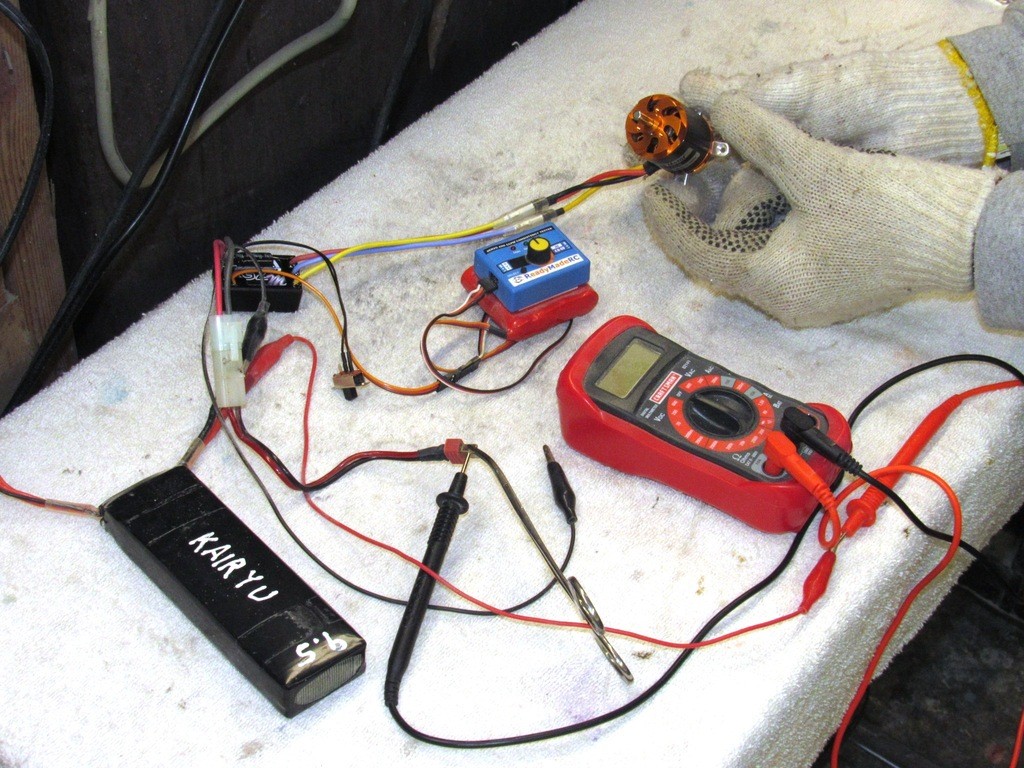
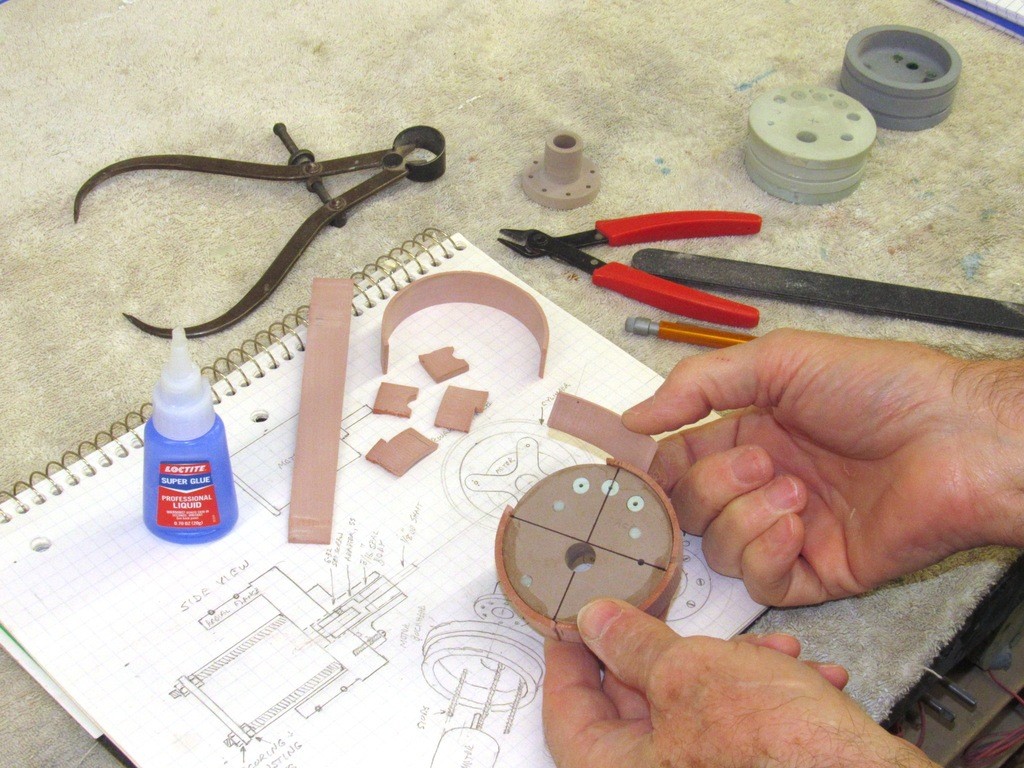
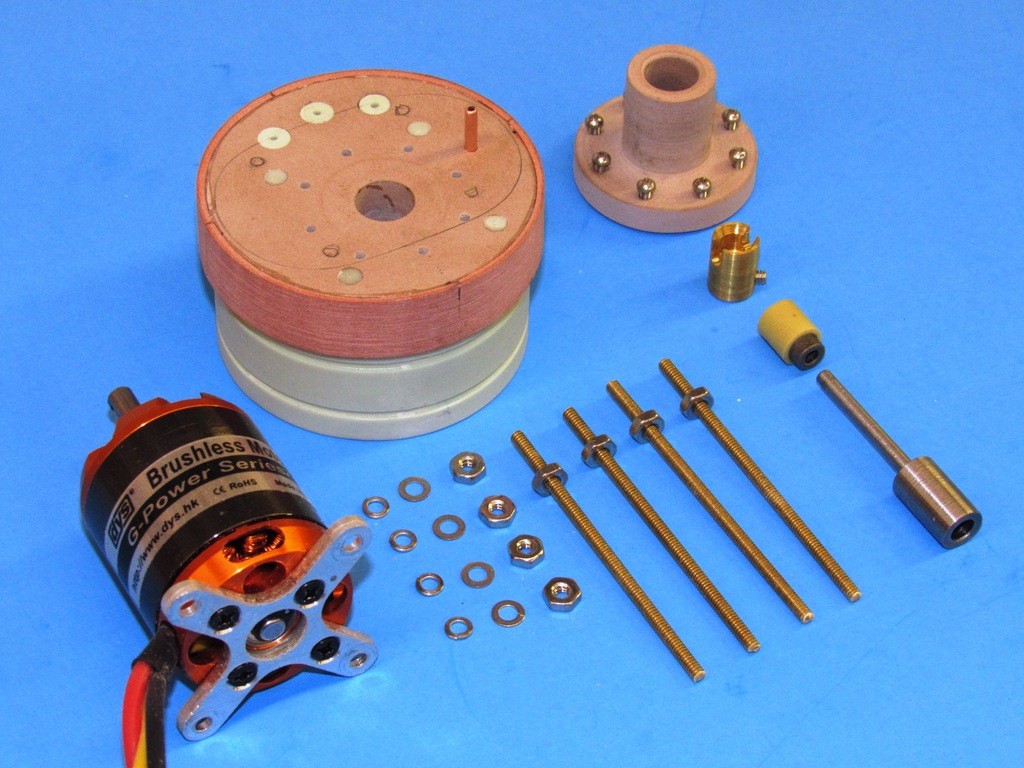
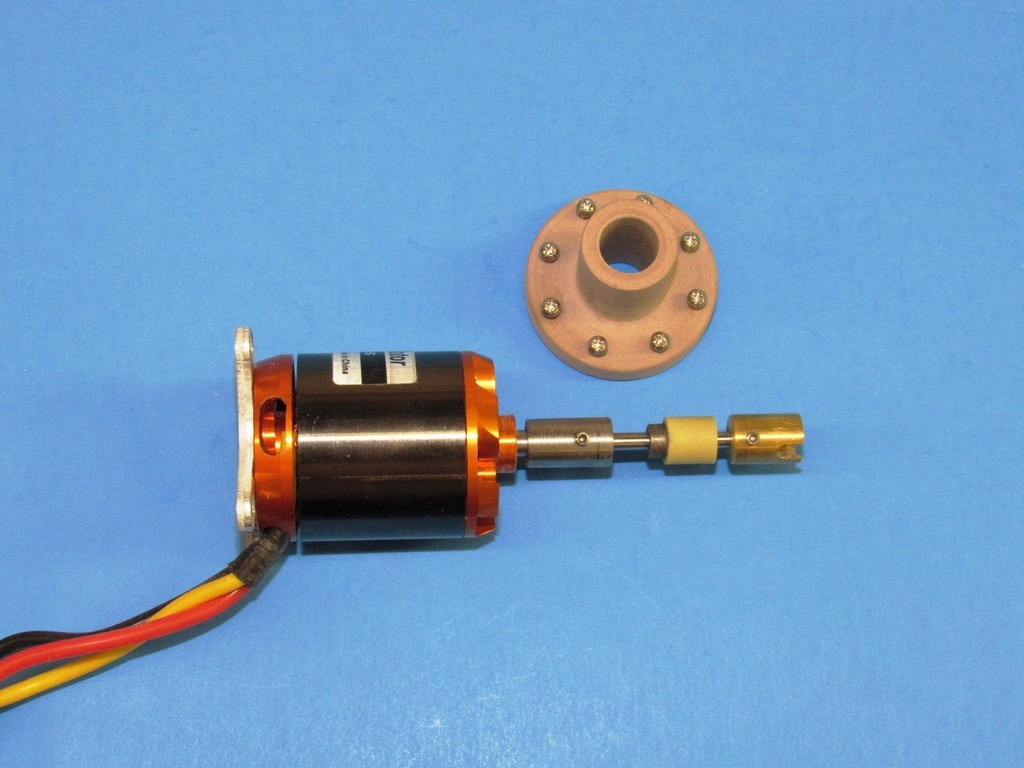
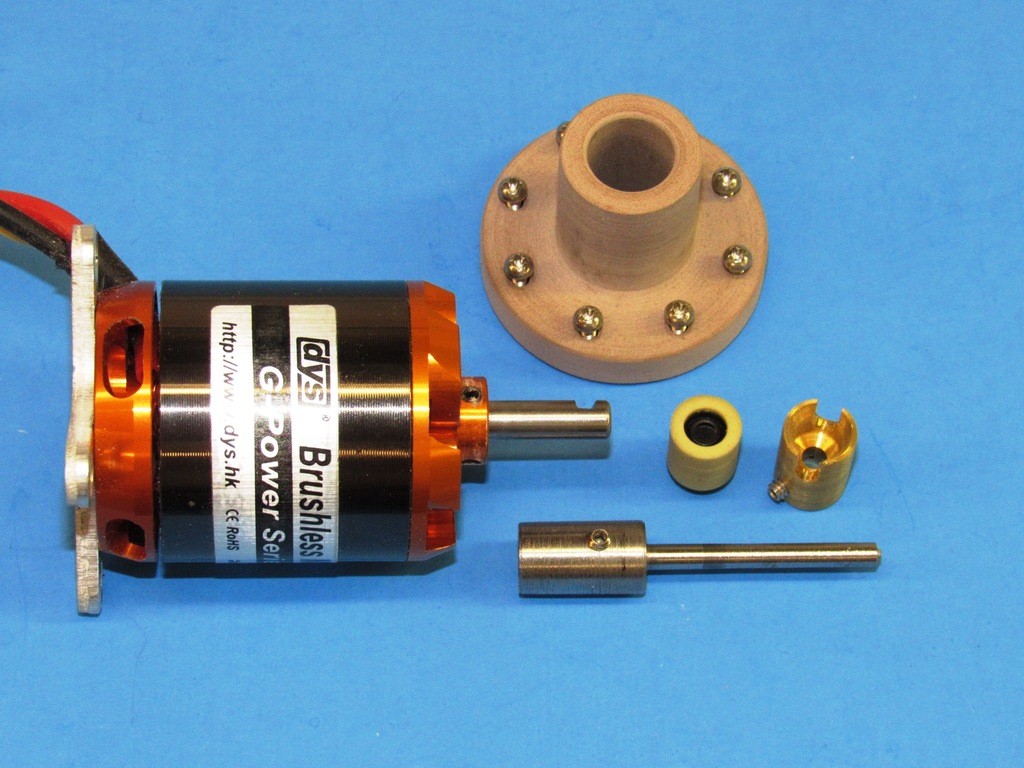
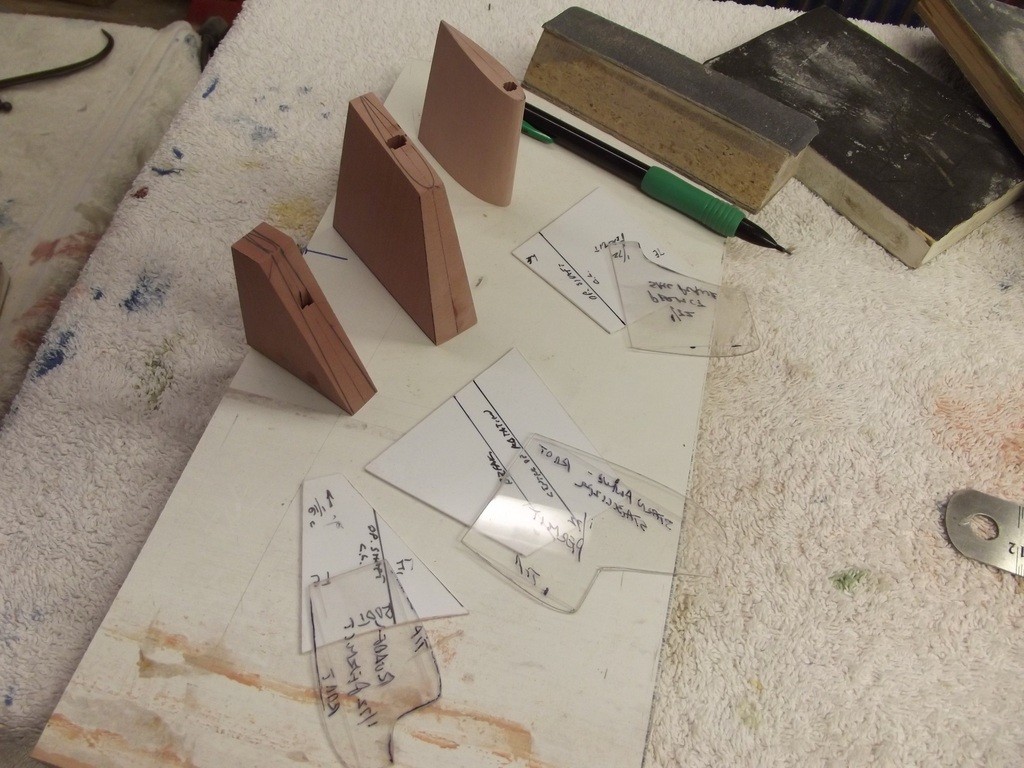
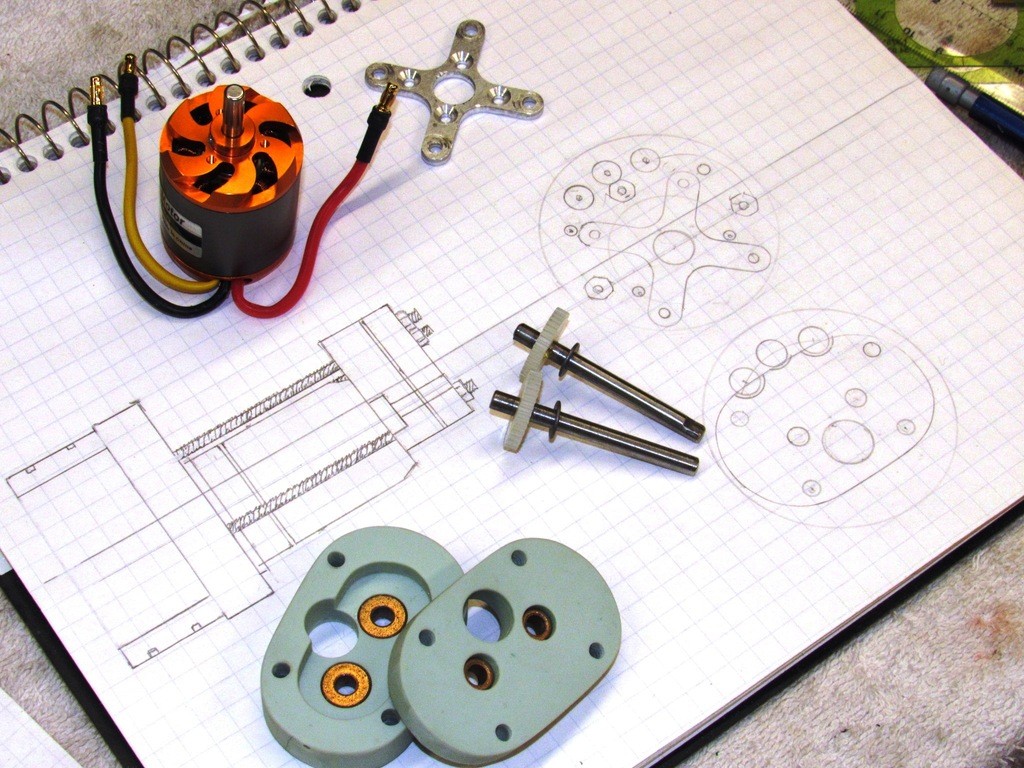
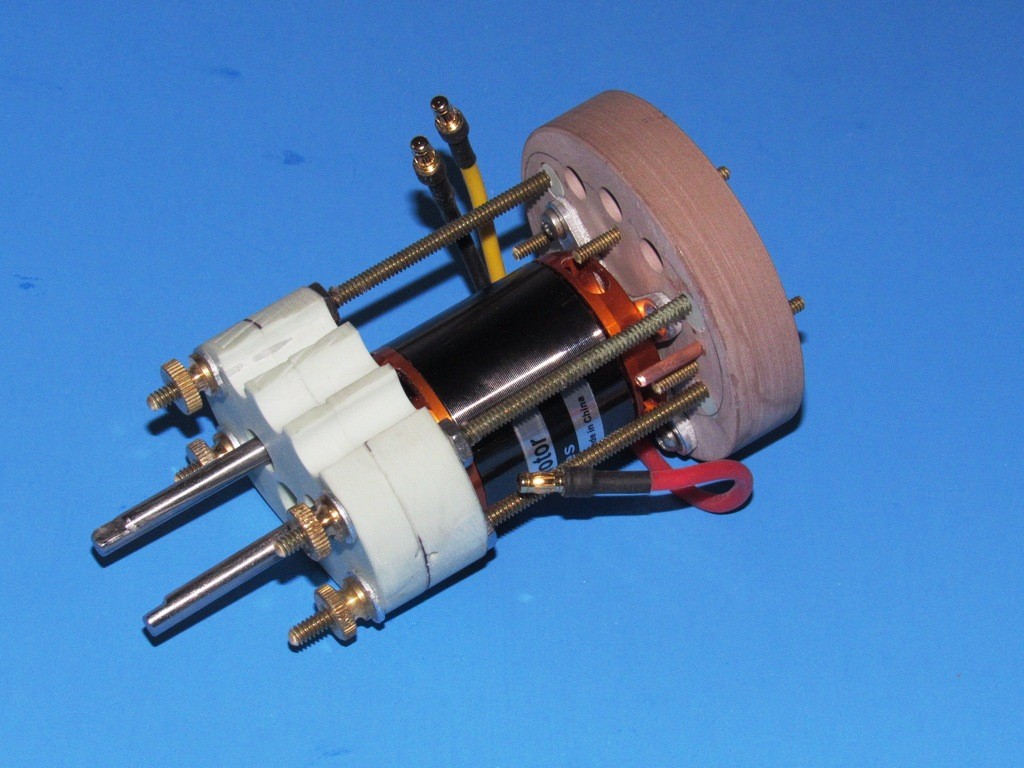
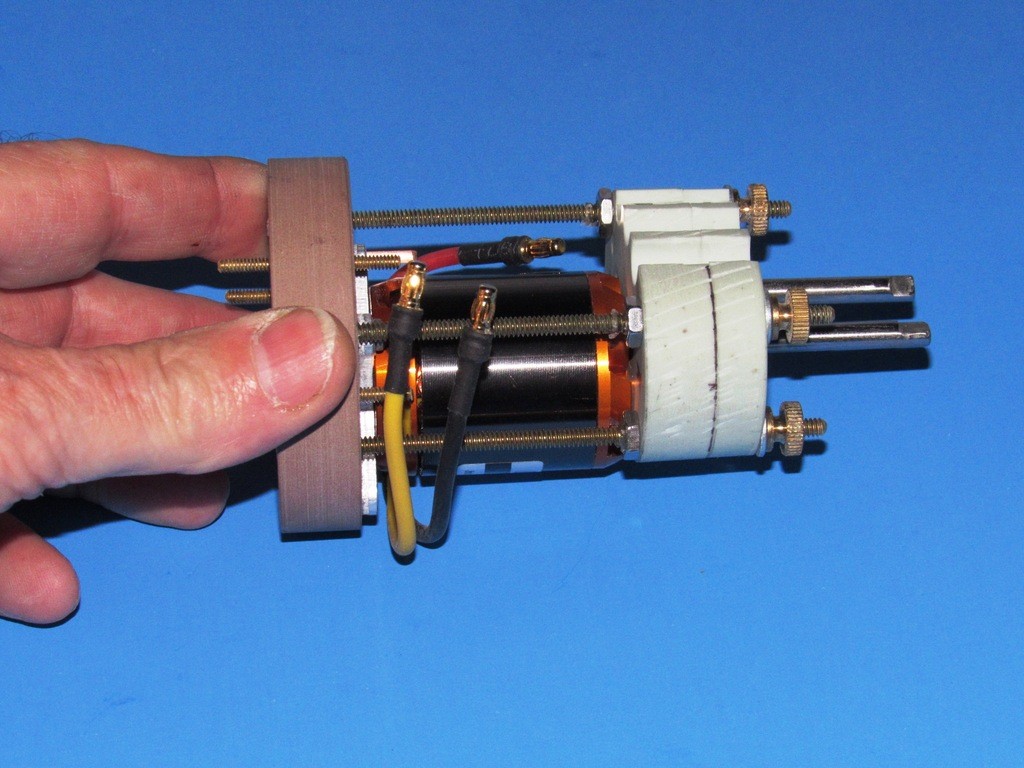
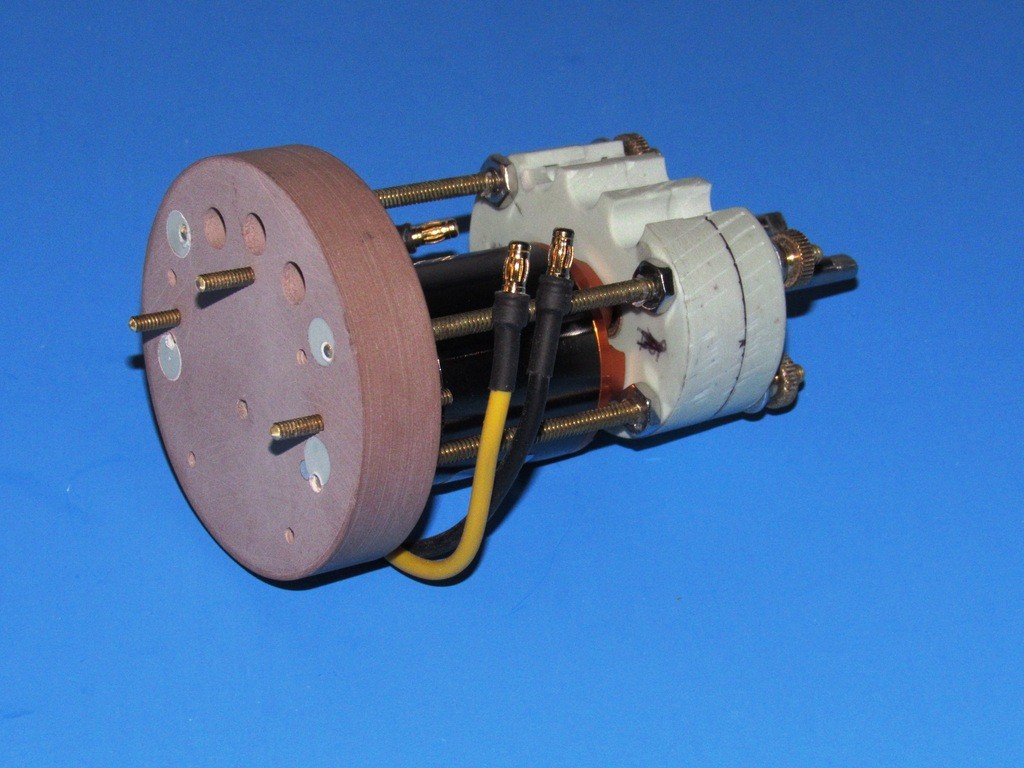
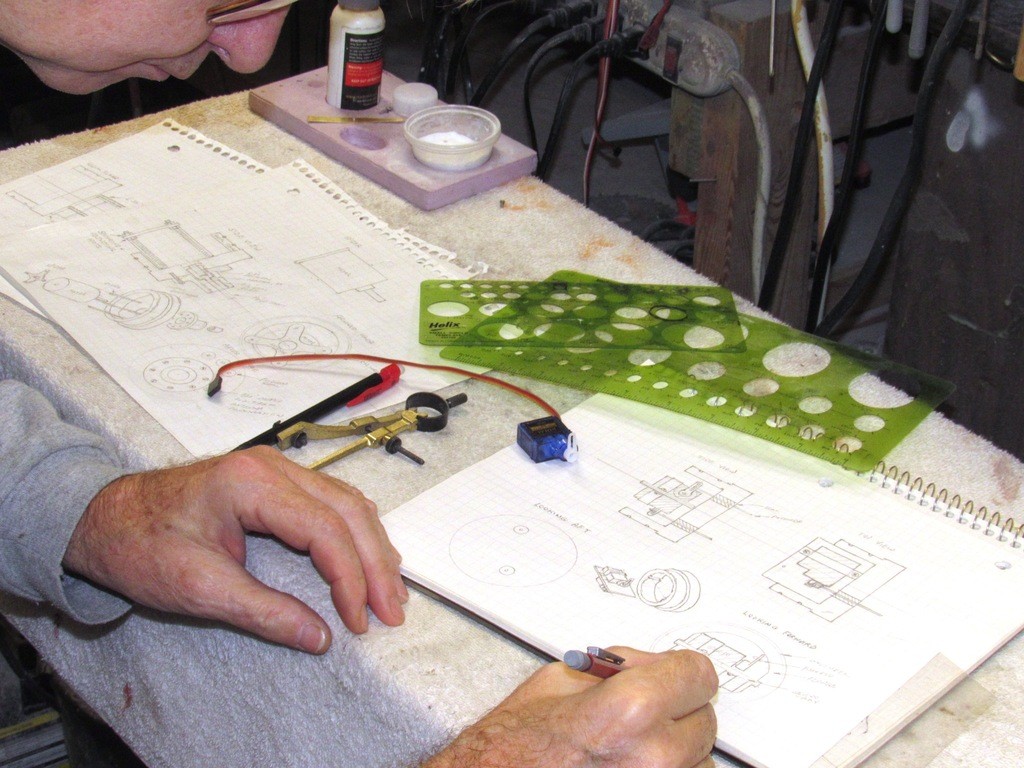
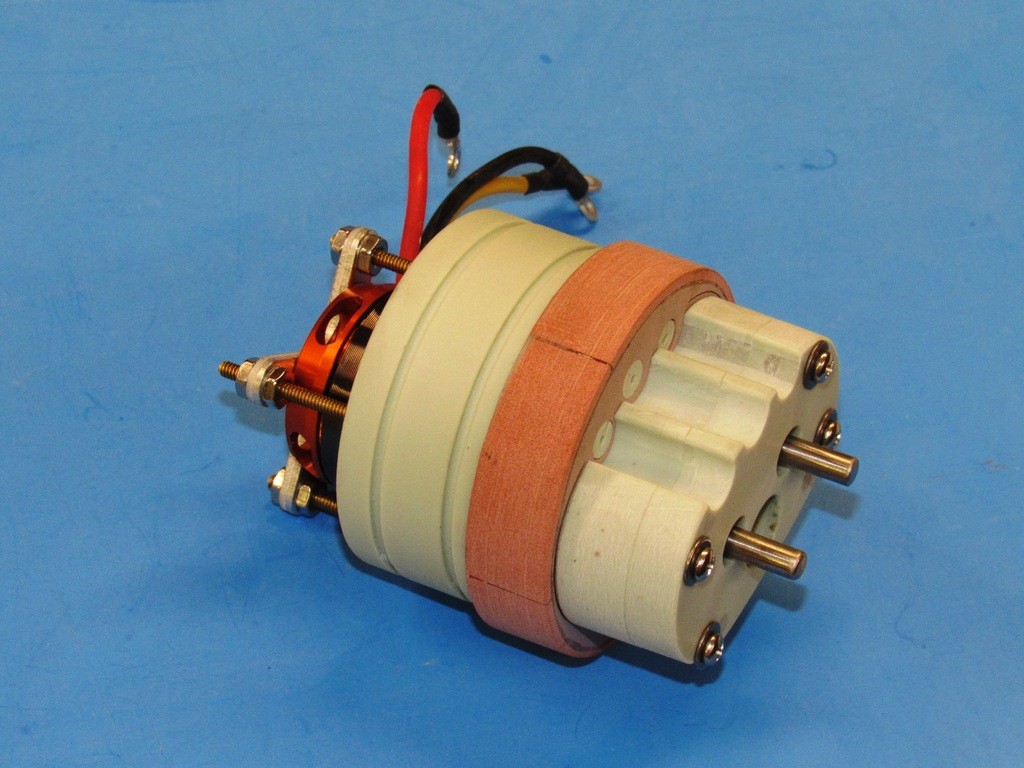
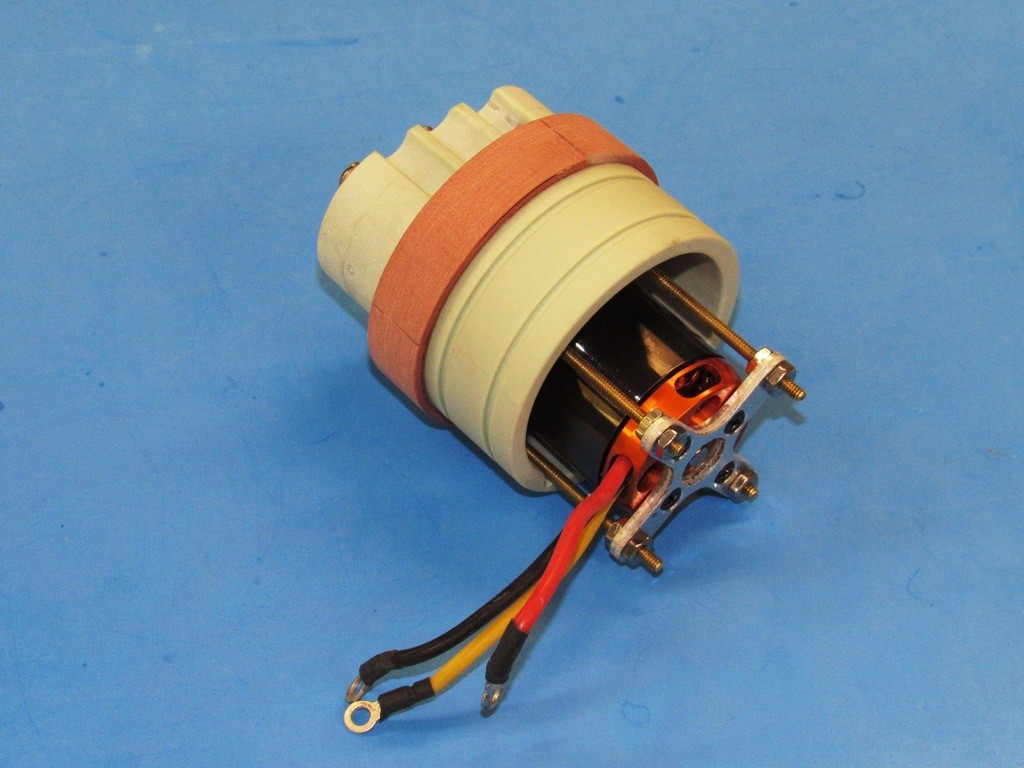
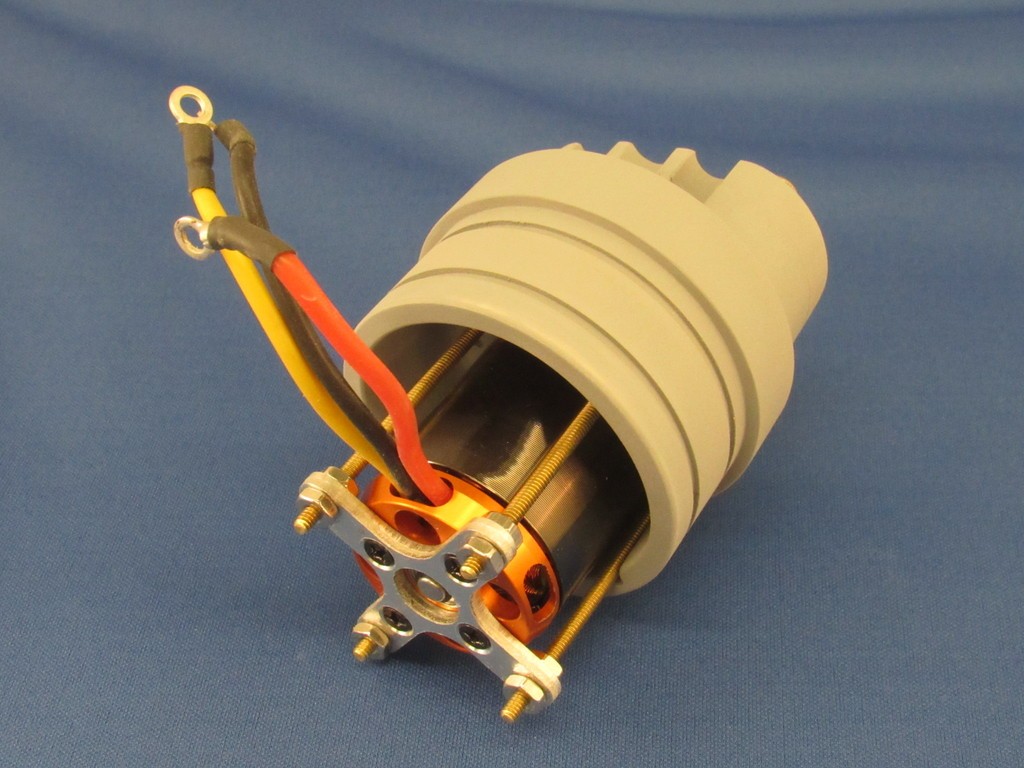
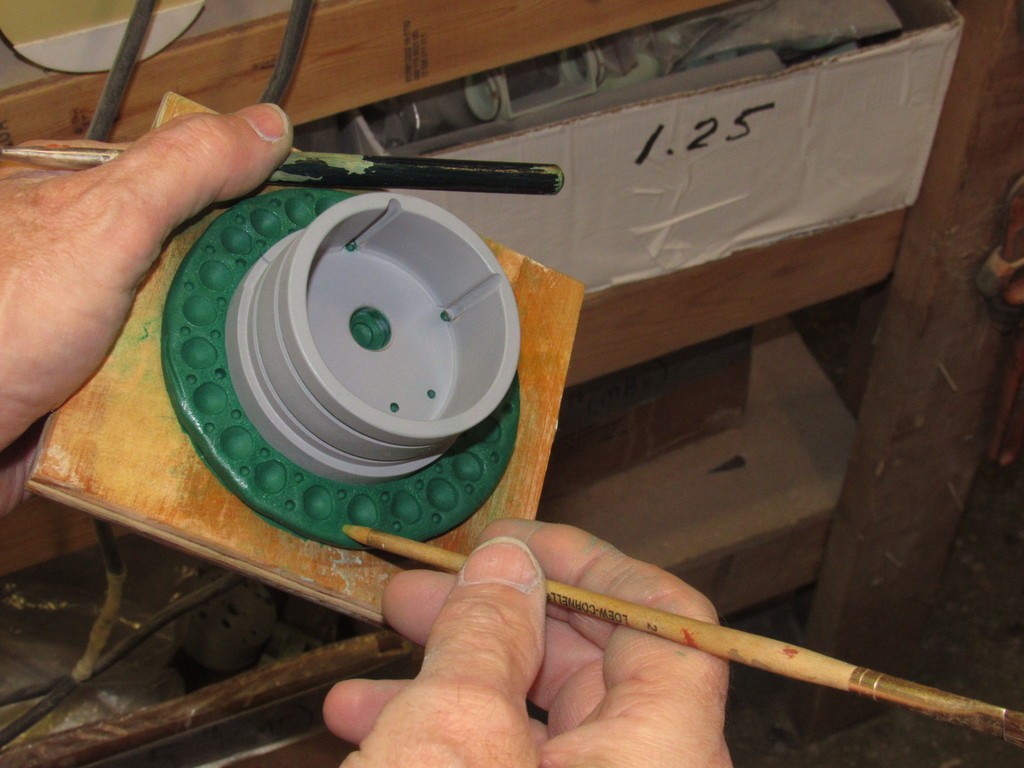
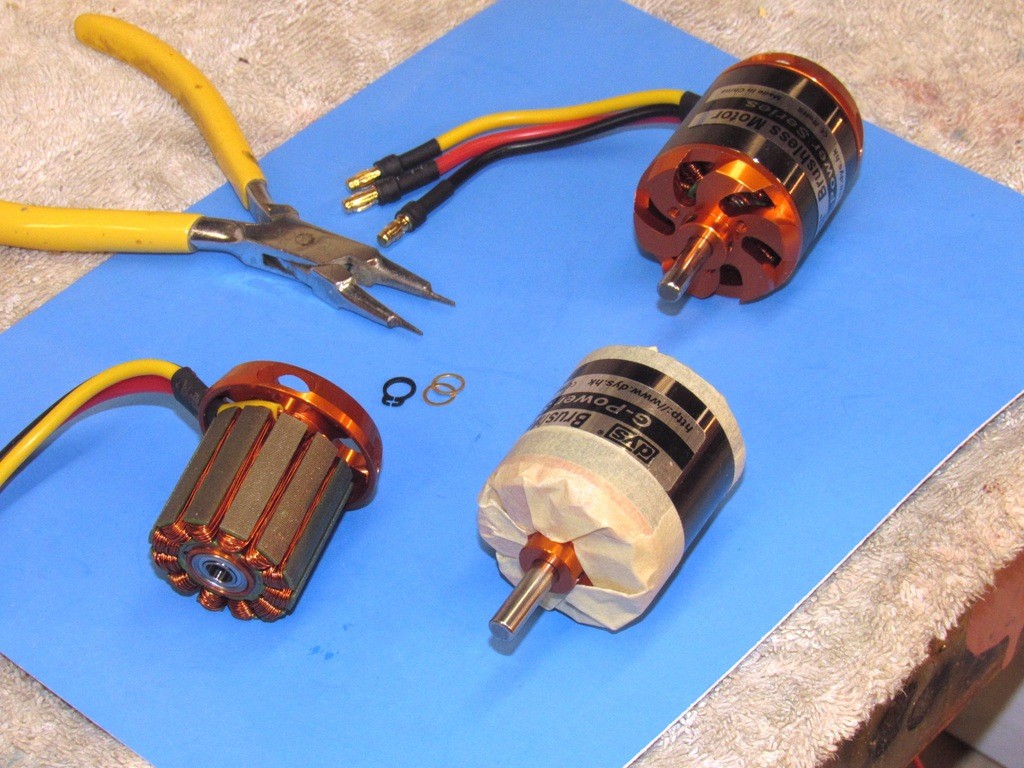
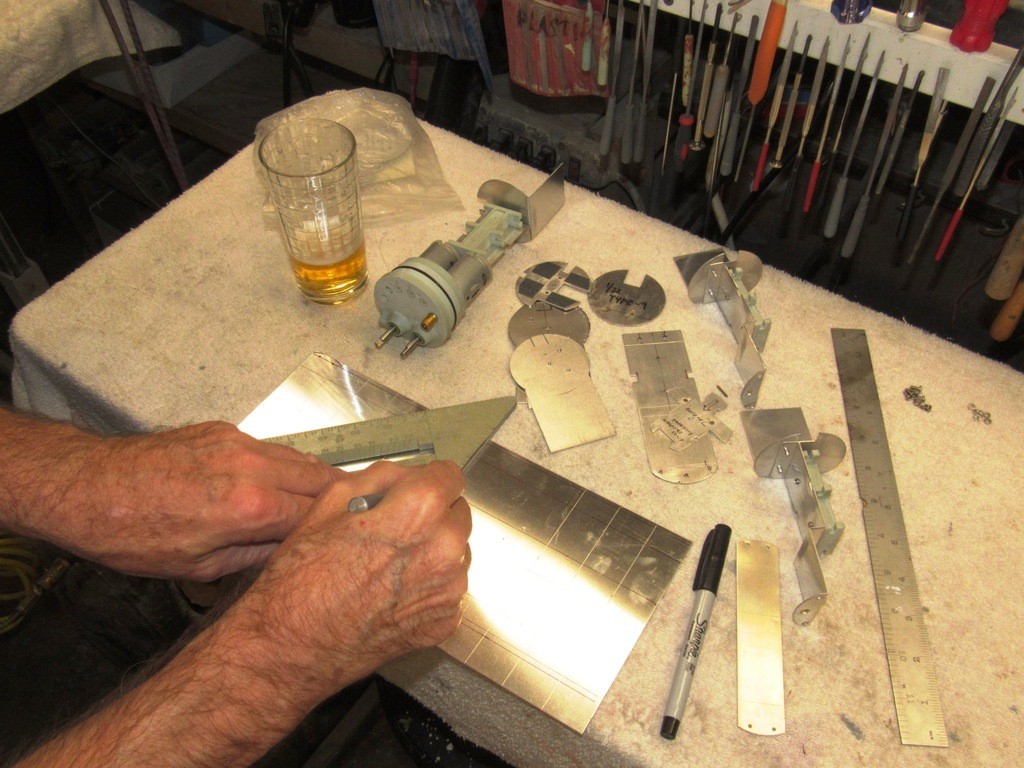
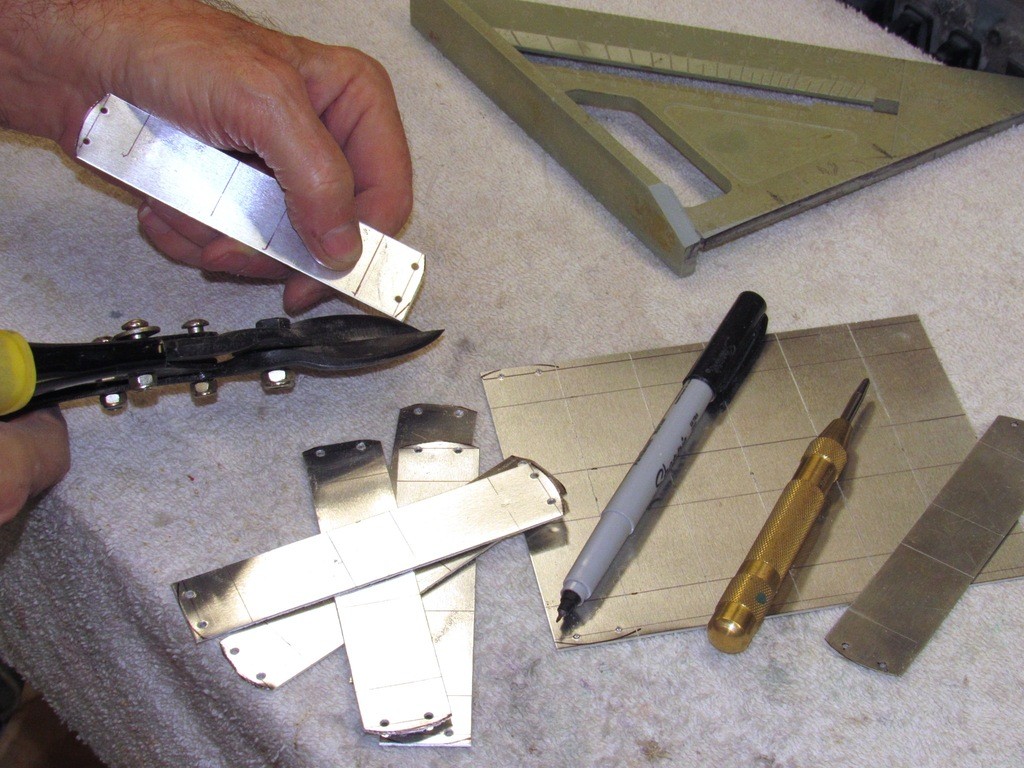
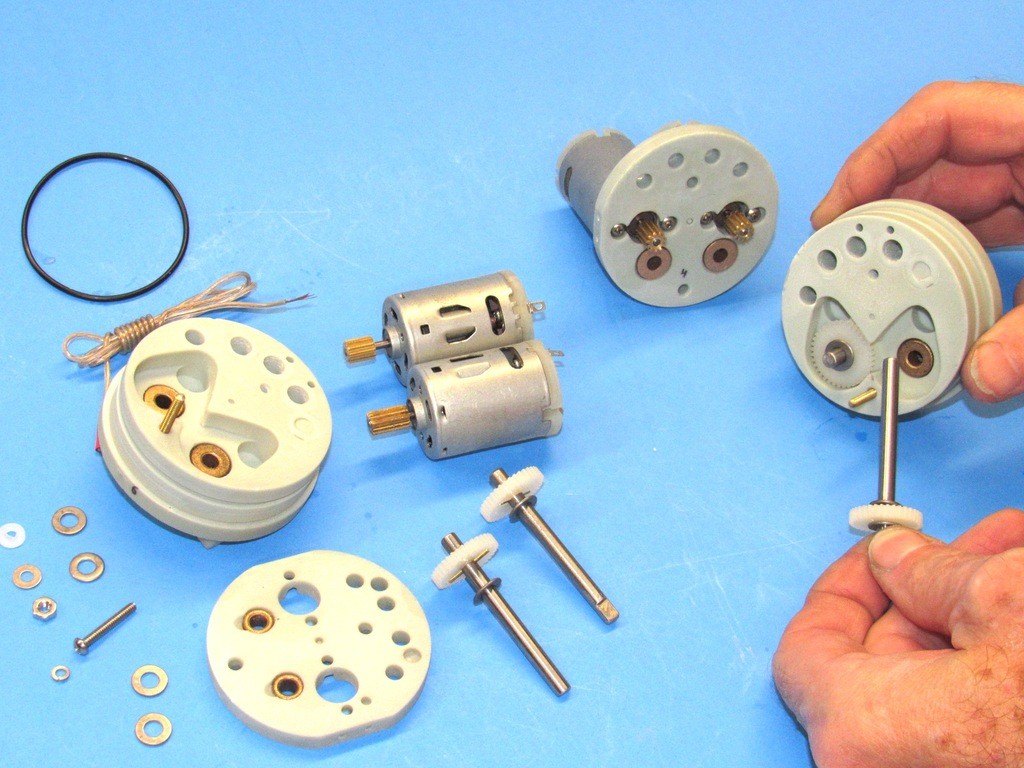
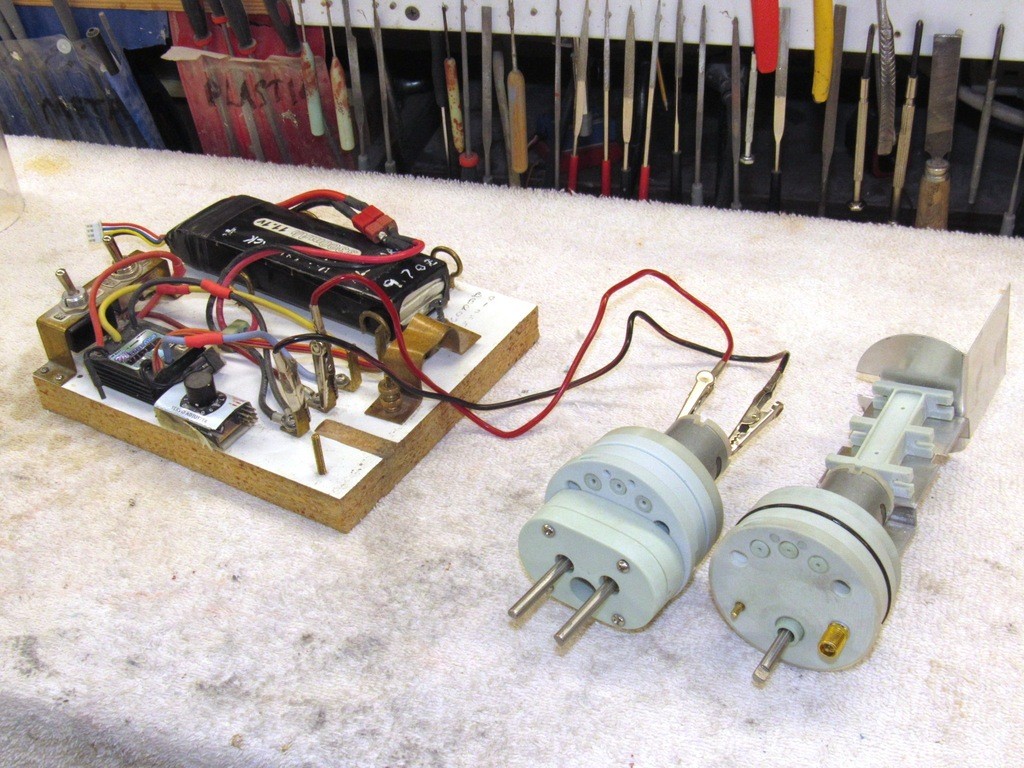
I'm in the process of joining the 21st Century: I'm switching from brushed to brushless motors. That has required some motor evaluation and development of new foundations to mount the motor(s) within the SubDriver. Here I'm mocking-up a motor-bulkhead master with motor and associated hardware. If it works in this form then it will work with the eventual cast resin pieces produced from the masters.
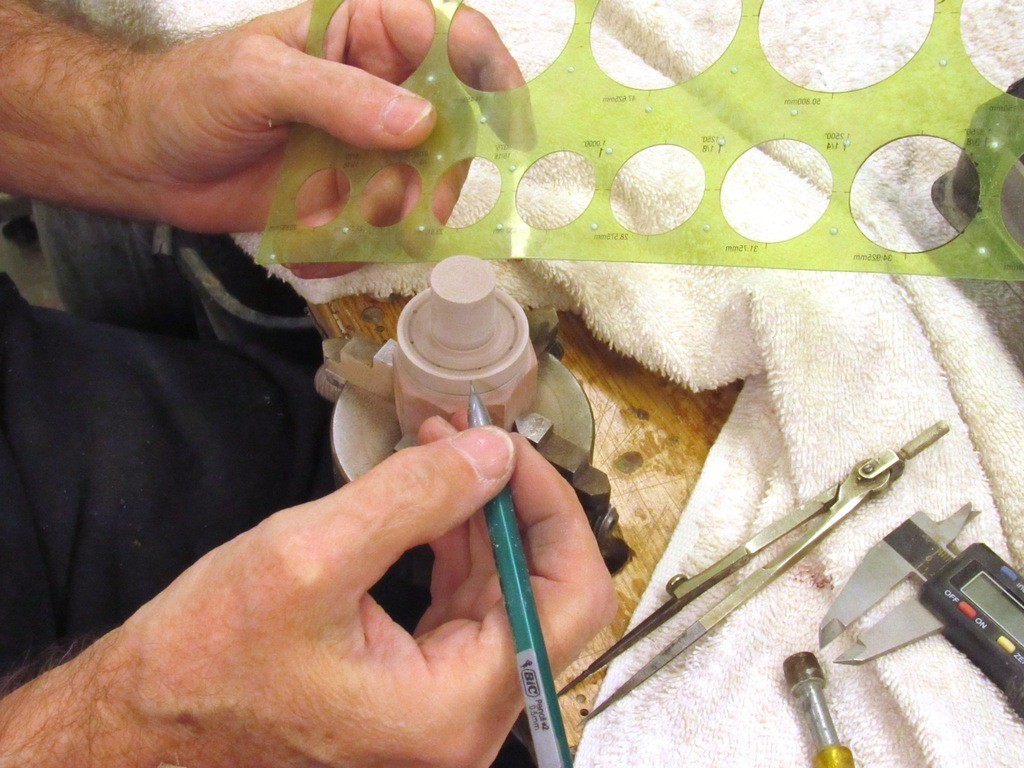
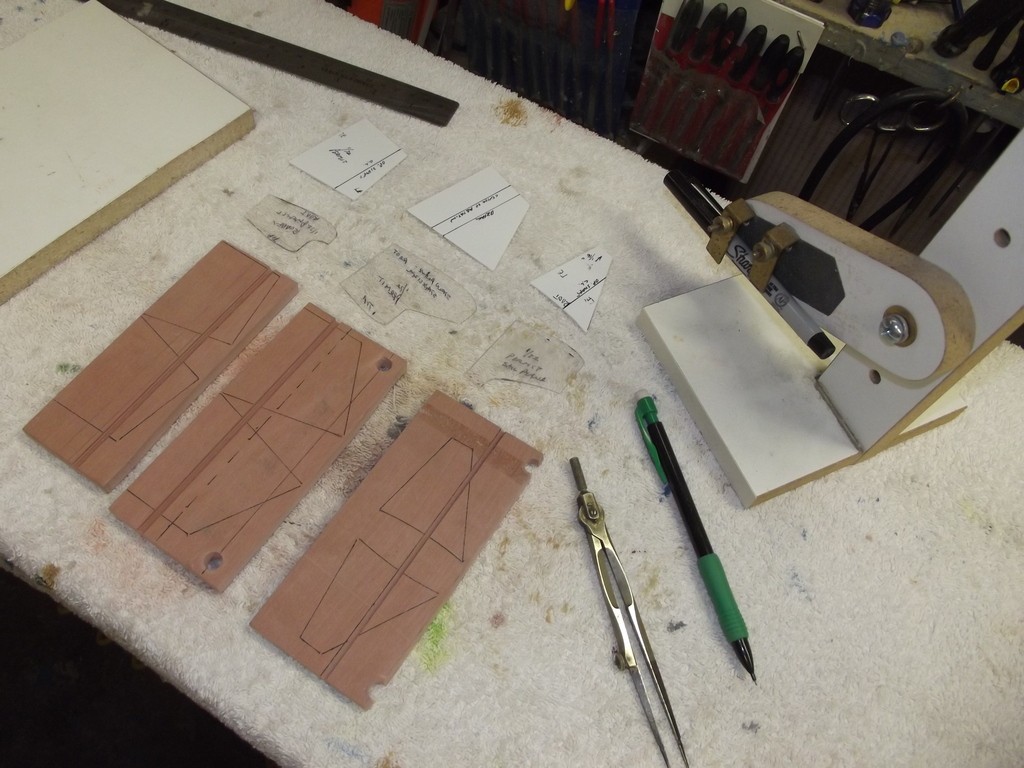
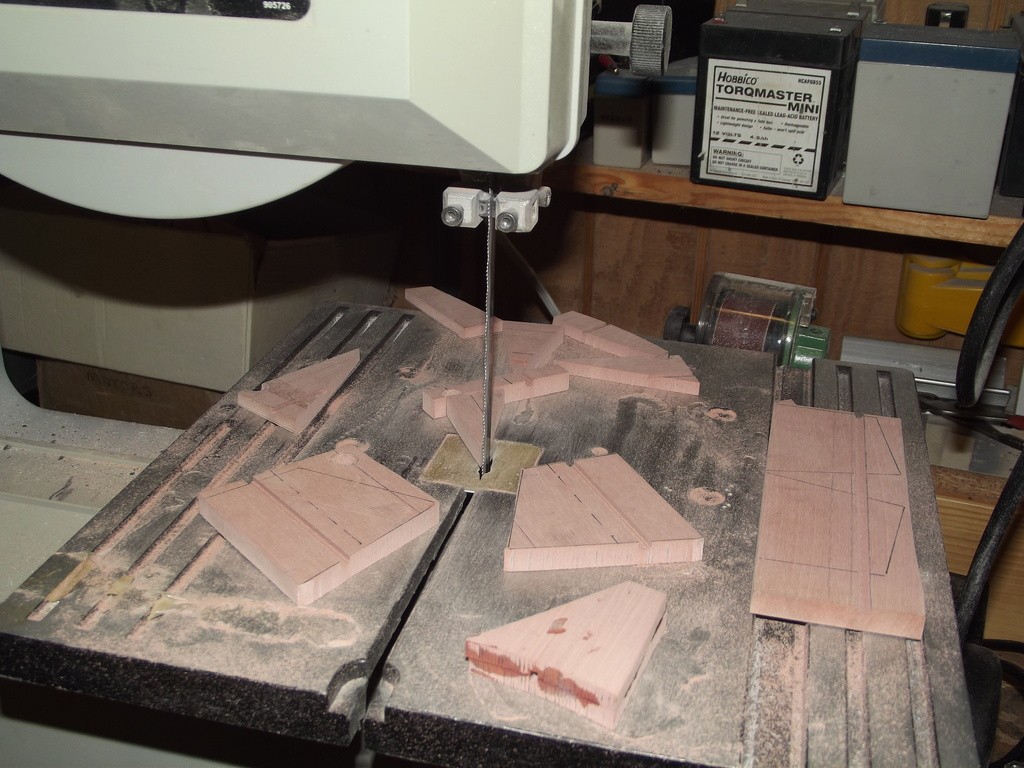
I've completed most of the grunt-work on the masters of a motor bulkhead that will mount a brushless propulsion motor for one of our SubDriver r/c submarine systems. I use the raw masters to check fit and operation in mock-up form. Once everything is working as planned (best laid plans … and all that happy horse-shit), I refine the finish of the masters and turn them into rubber tooling from which production items will be cast.
Looks like it, doesn't it? But, no. A very dense, closed-cell polyurethane foam. Has the density of hard balsa wood (I fear only old farts like us could make that correlation), but none of the liabilities of dead cellulous cells. No pitch, no grain, no water content to speak of. Will remain dimensionally stable far longer than the best kiln dried and seasoned pattern-makers wood.
The stuff is called RenShape and is available in a variety of densities. I favor the 40 pound-per-cubic-foot type seen here, but will use the 20 lbs. foam for bigger masters like hulls and the like.
Though classified as a thermosetting type plastic, RenShape does have some properties shared with the thermoplastics. Such as being a moderately good candidate for heat-forming which is what I'm doing here with the heat-gun and strips of RenShape. And the low pH of the stuff makes it most accommodating to adhesion with cyanoacrylate type adhesives.
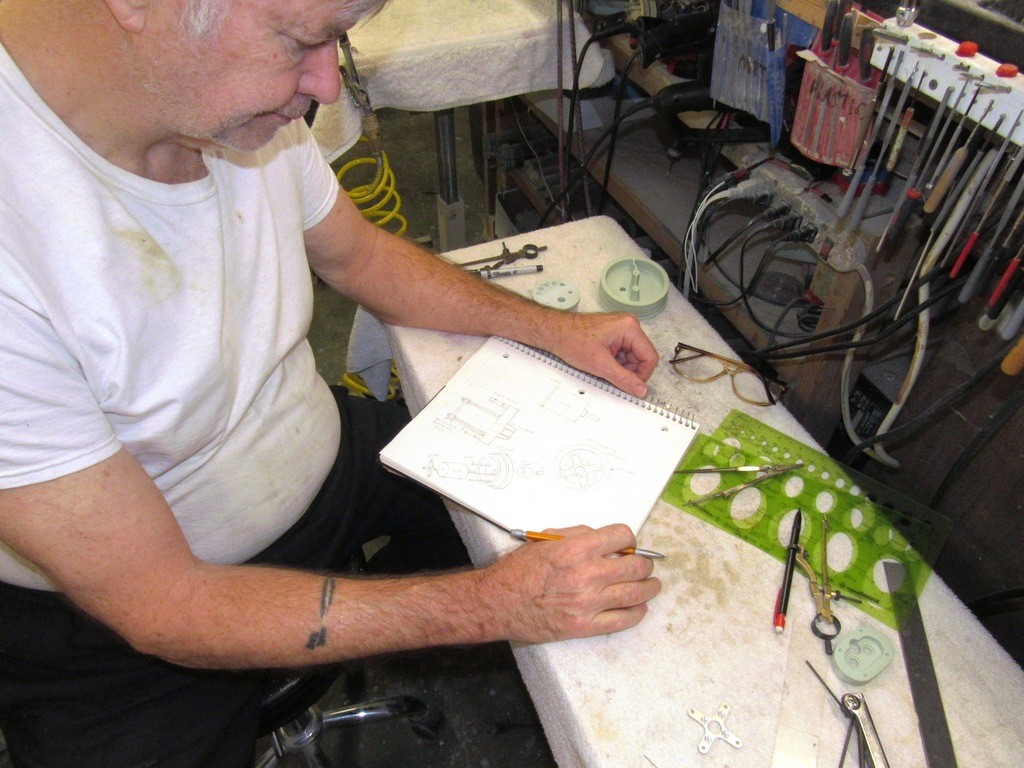
Here's the story on that: I had to increase the diameter of the motor bulkhead master I was working on. Seems I can't even read my own drawings correctly the first time. What a dumb ass!
In the industry this type material has replaced almost all of the traditional pattern making lumber. Here's where I get my RenShape:
Your great-great grand father and I share the same occupation. Different countries, maybe, but we did the same things, just separated by geography, ideology, and time.
I would very much appreciate seeing the model he constructed, Galgot.
Finally had the opportunity to take a picture of these copper torpedoes my Great grandfather did :
too bad the nose tip and some fins on the big one went missing over the years. But anyways, typical navy "trench art". nicely done, and heavy.
So according to my Grand-Mother , her father was a torpedo guy aboard french Navy sub Saphir class "Nautilus" (named after Jules Vernes sub). The "Rubis " being the most famous of the class. They had 550 mm and 400 mm torpedoes, so I suppose these are the ones he modeled.
Grand-Mother was very happy to talk about her father, we had some good laugh, he was a funny guy apparently.
Anyways sorry for off topic.
thanks for posting this impressive work merriman.
Your great-great grand father and I share the same occupation. Different countries, maybe, but we did the same things, just separated by geography, ideology, and time.
I would very much appreciate seeing the model he constructed, Galgot.
Finally had the opportunity to take a picture of these copper torpedoes my Great grandfather did : View attachment 623647
too bad the nose tip and some fins on the big one went missing over the years. But anyways, typical navy "trench art". nicely done, and heavy.
So according to my Grand-Mother , her father was a torpedo guy aboard french Navy sub Saphir class "Nautilus" (named after Jules Vernes sub). The "Rubis " being the most famous of the class. They had 550 mm and 400 mm torpedoes, so I suppose these are the ones he modeled.
Grand-Mother was very happy to talk about her father, we had some good laugh, he was a funny guy apparently.
Anyways sorry for off topic.
thanks for posting this impressive work merriman.
I would suggest having some sort of case or display box made for those, something that incorporates a written description such as you added here. Otherwise someday they may well become separated from anyone who knows their story.
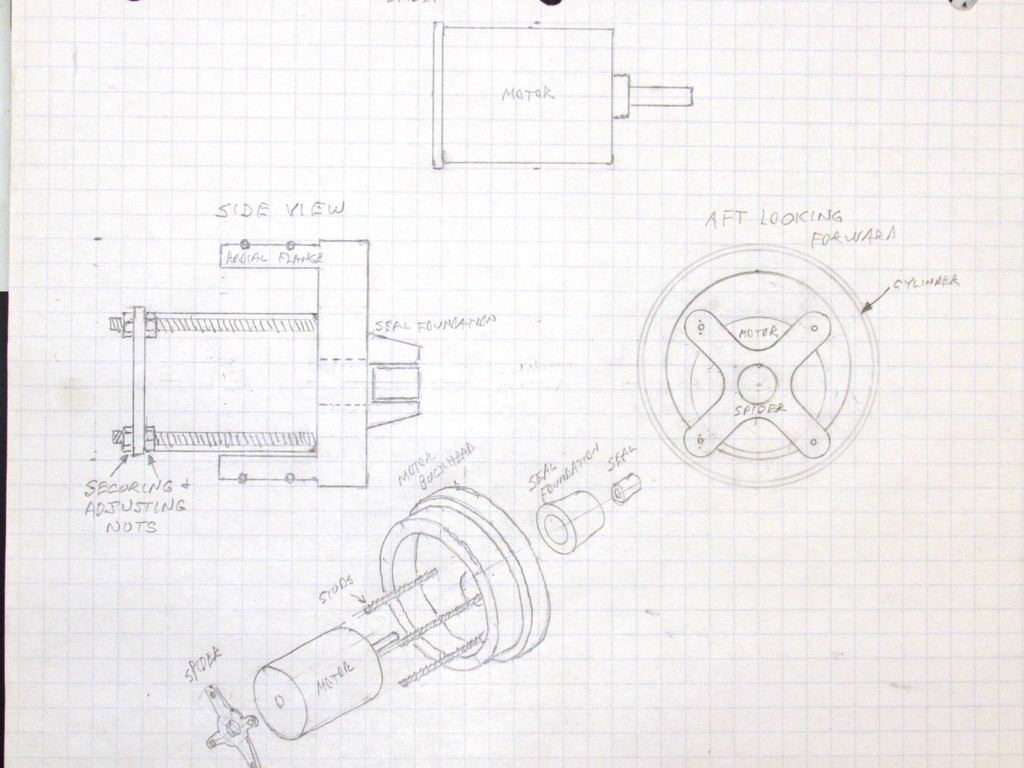
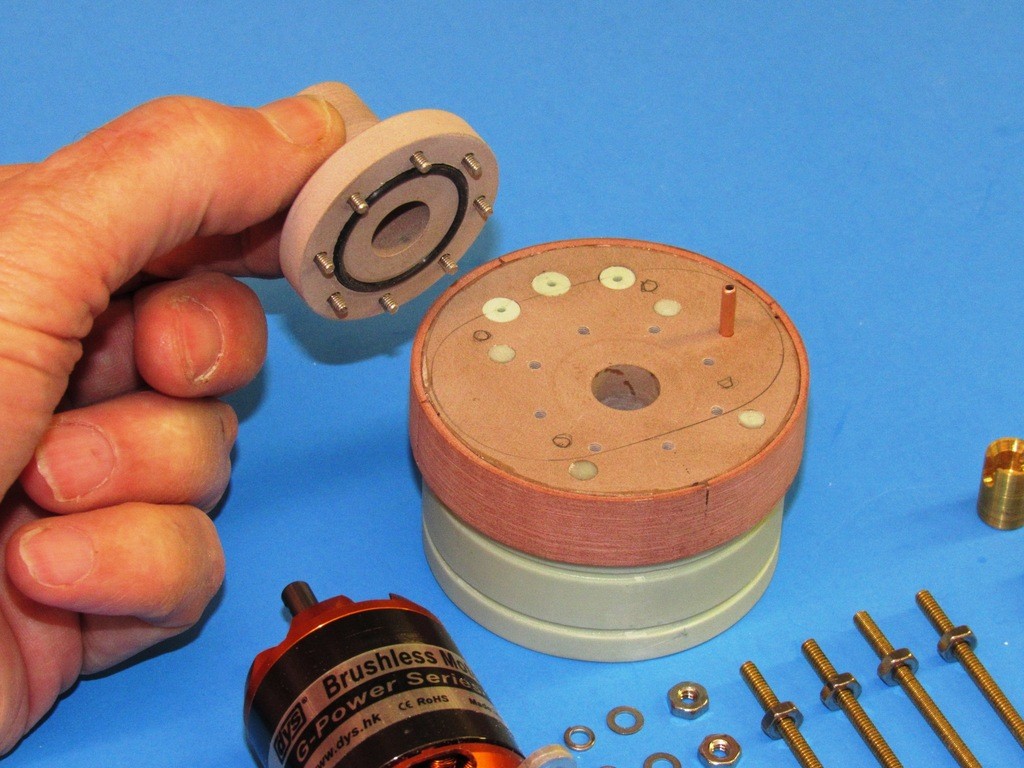
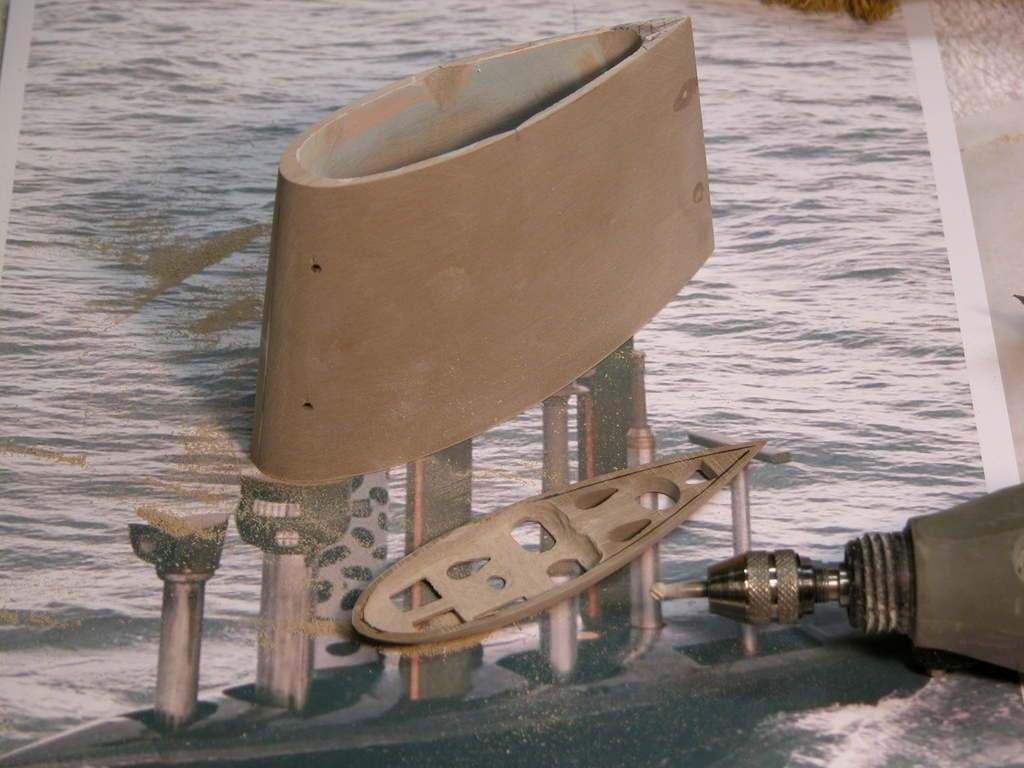
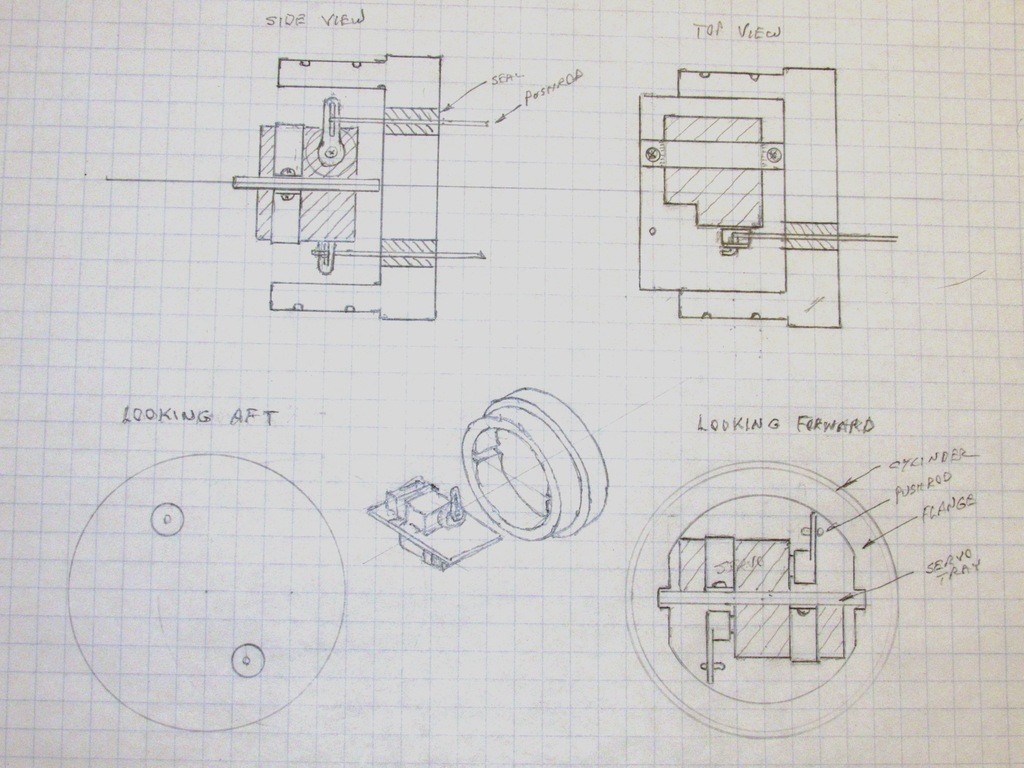
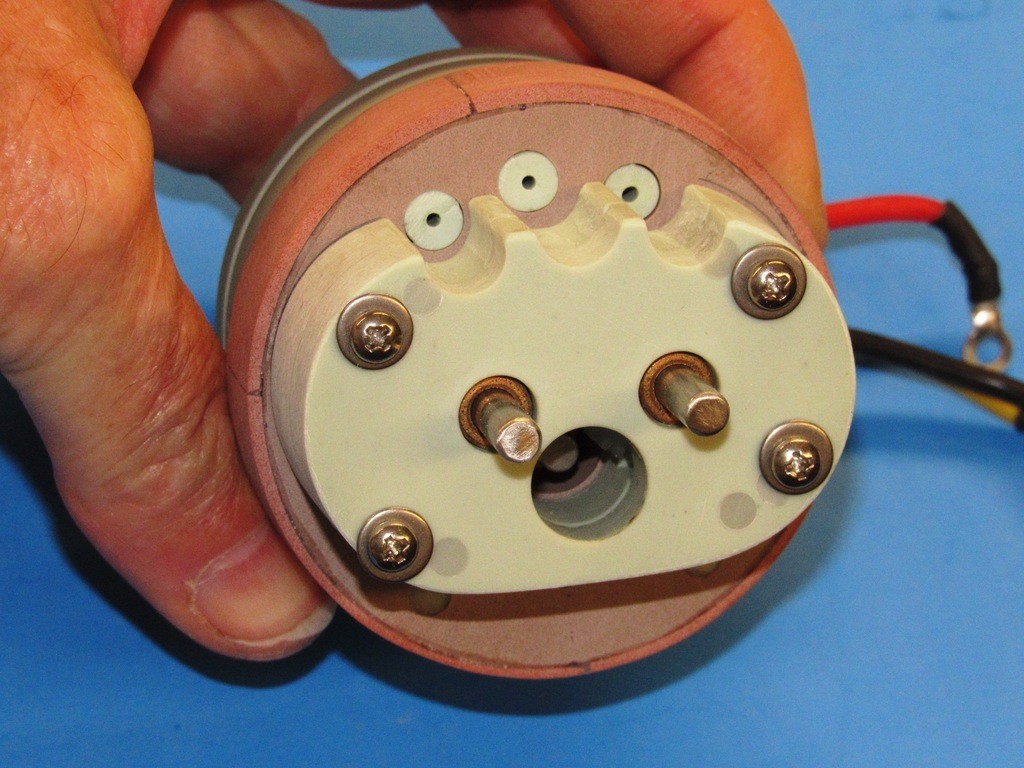
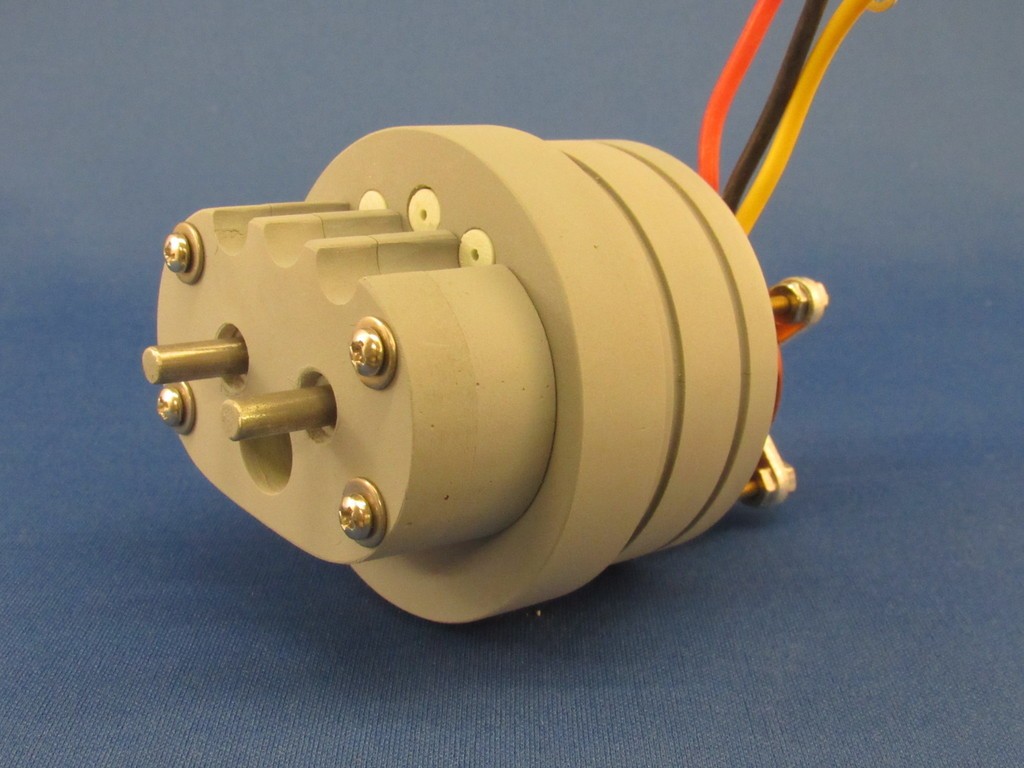
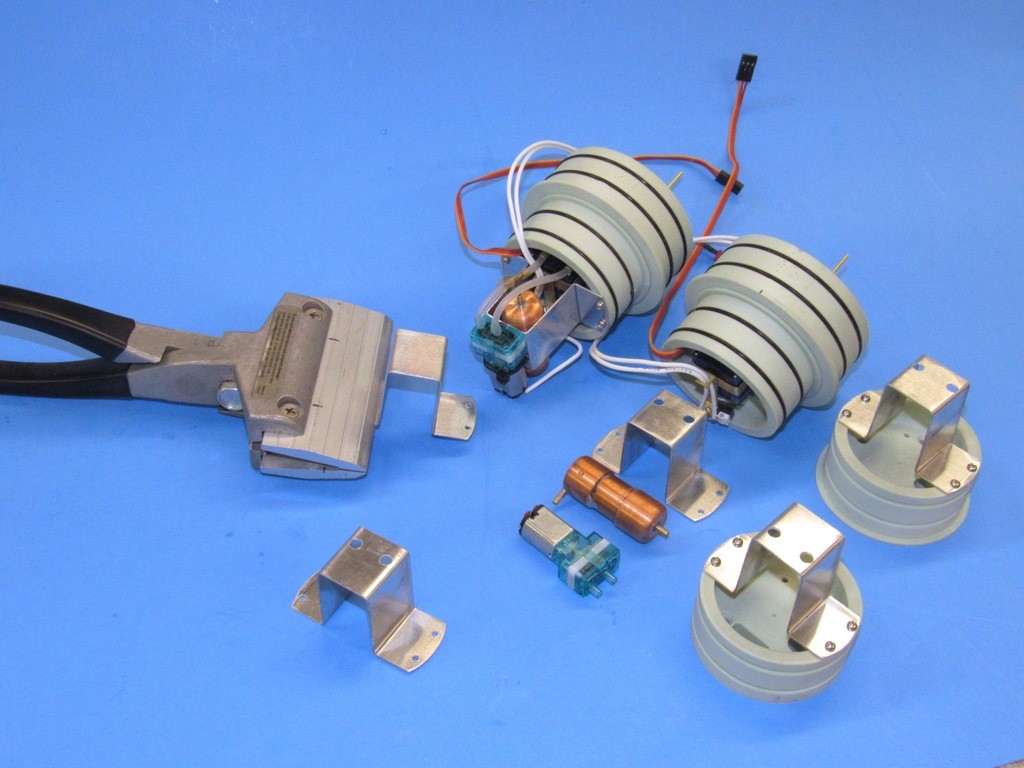
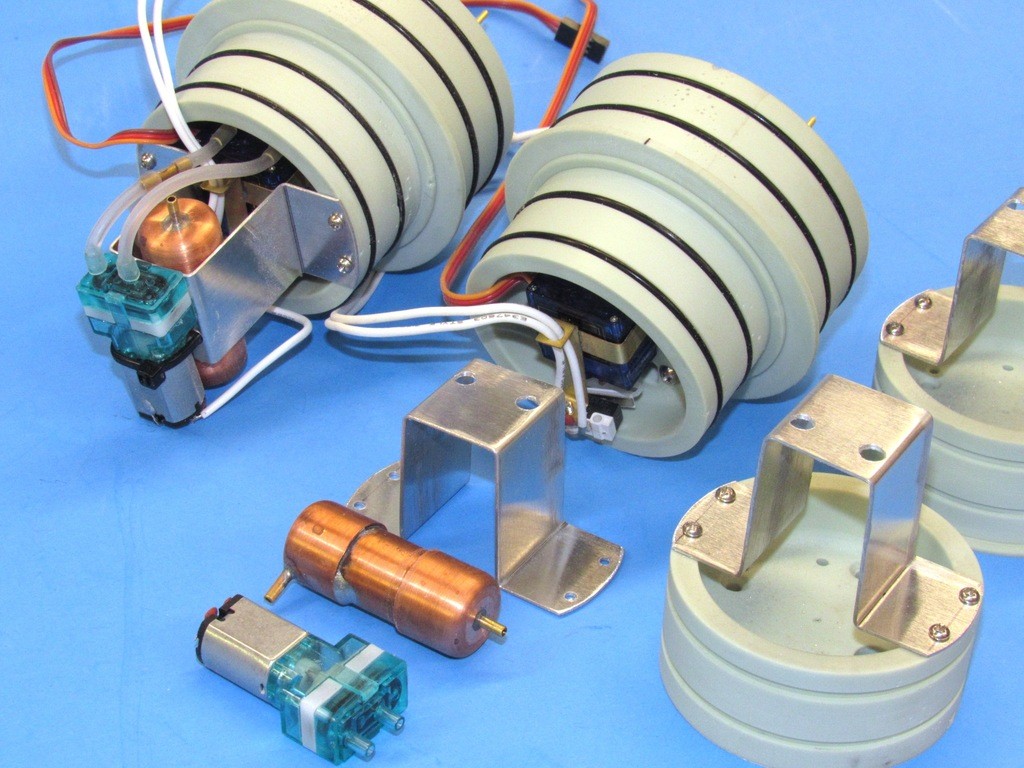
This version of the motor-bulkhead puts the motor in the water. Suspended aft of the motor is a gear splitter which outputs two counter-rotation shafts from the single motor input. This is still in the mock-up stage where I check fit and non-interference of the parts. I have yet to add the radial flange.
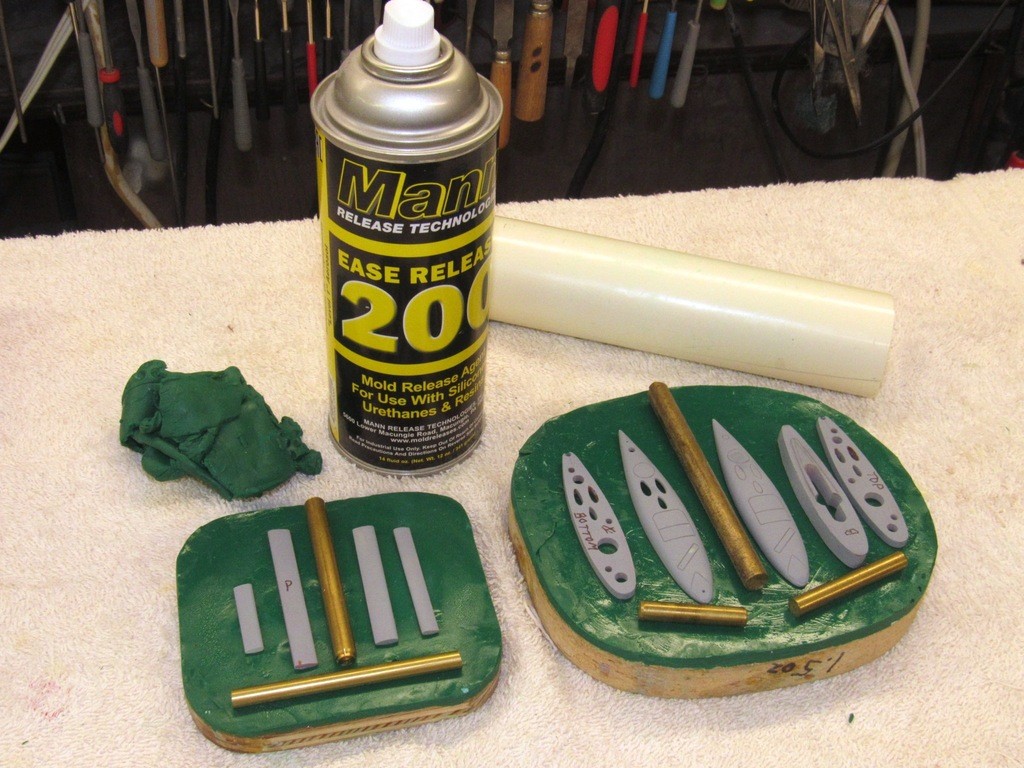
I'm just about ready to use these Modular SubDriver bulkhead masters to give form to the rubber tools from which cast resin production parts will be produced. Some last-minute machining, putty work, wet-sanding, primer, and things are now good to go. Fine with me, I'm sick of this grunt work, I want to get back to proper model-building, damnit! I use them to mock-up a practical demonstrator -- this is the stage where you want to find faults, not after you've committed to production tooling!
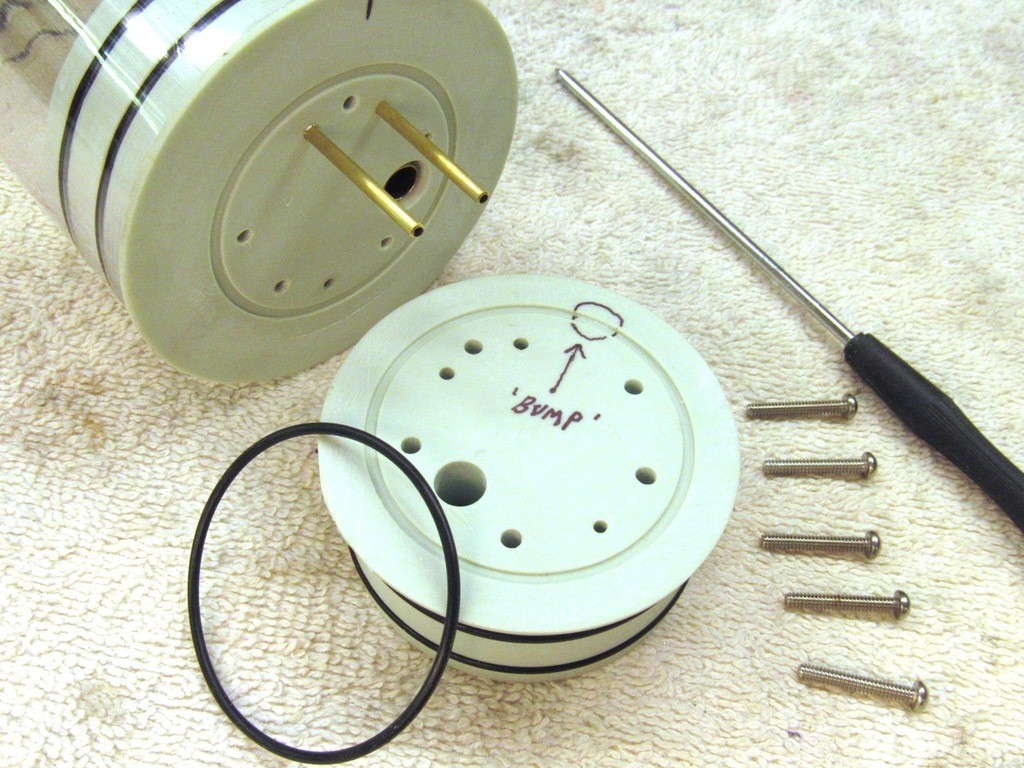
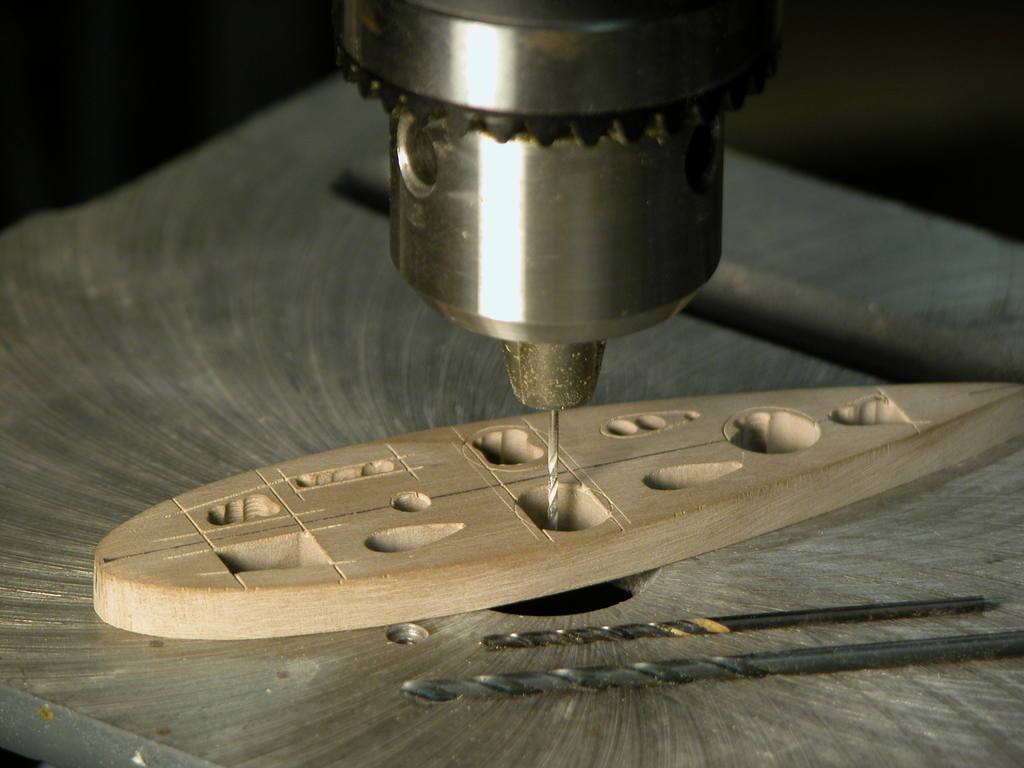
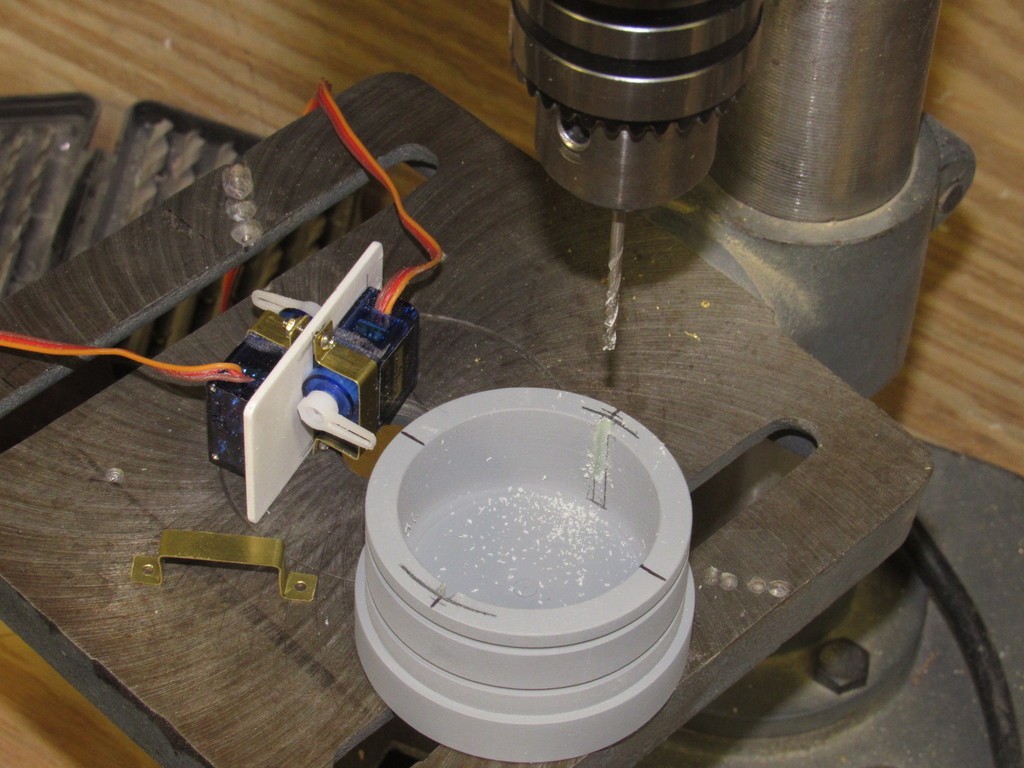
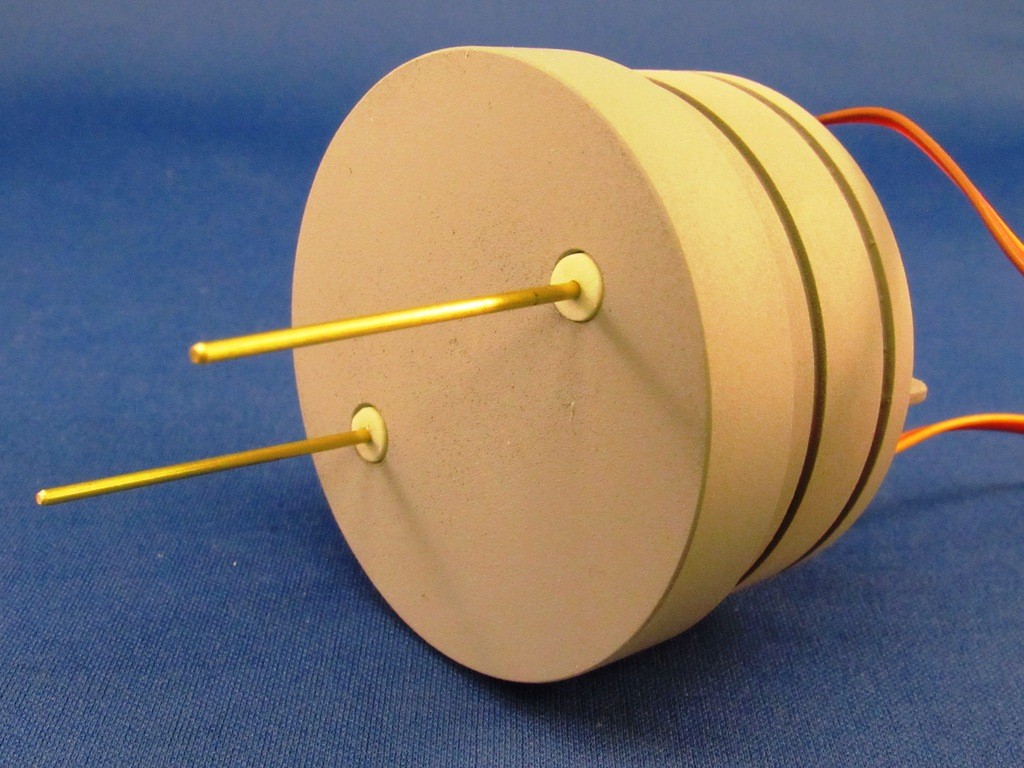
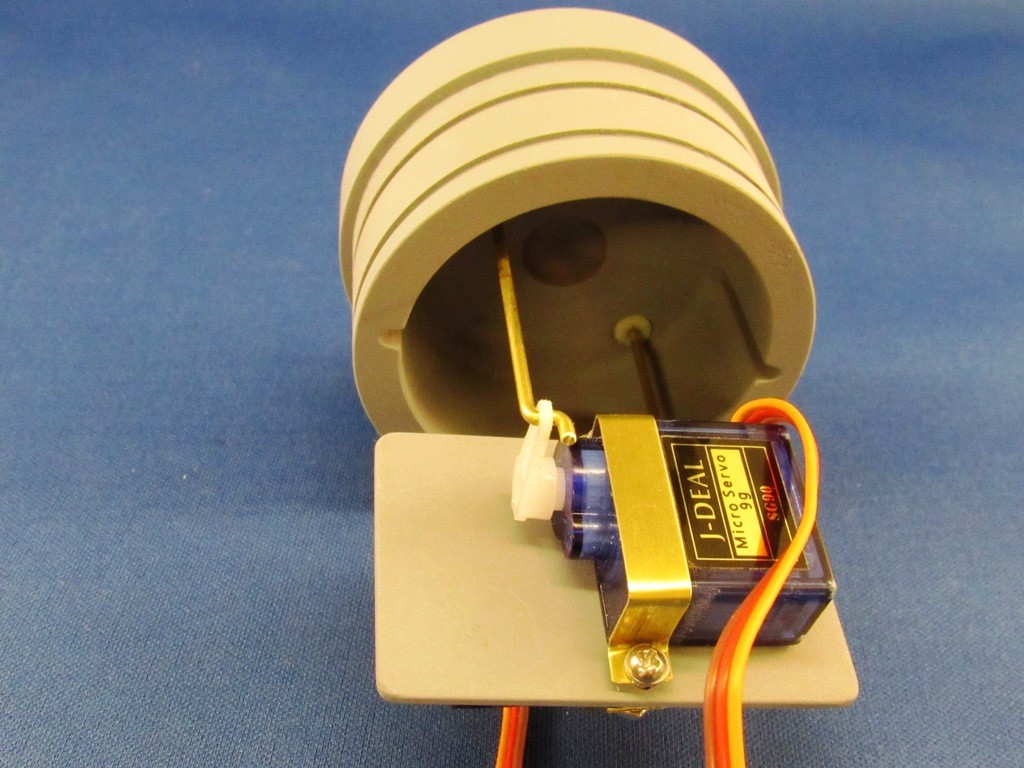
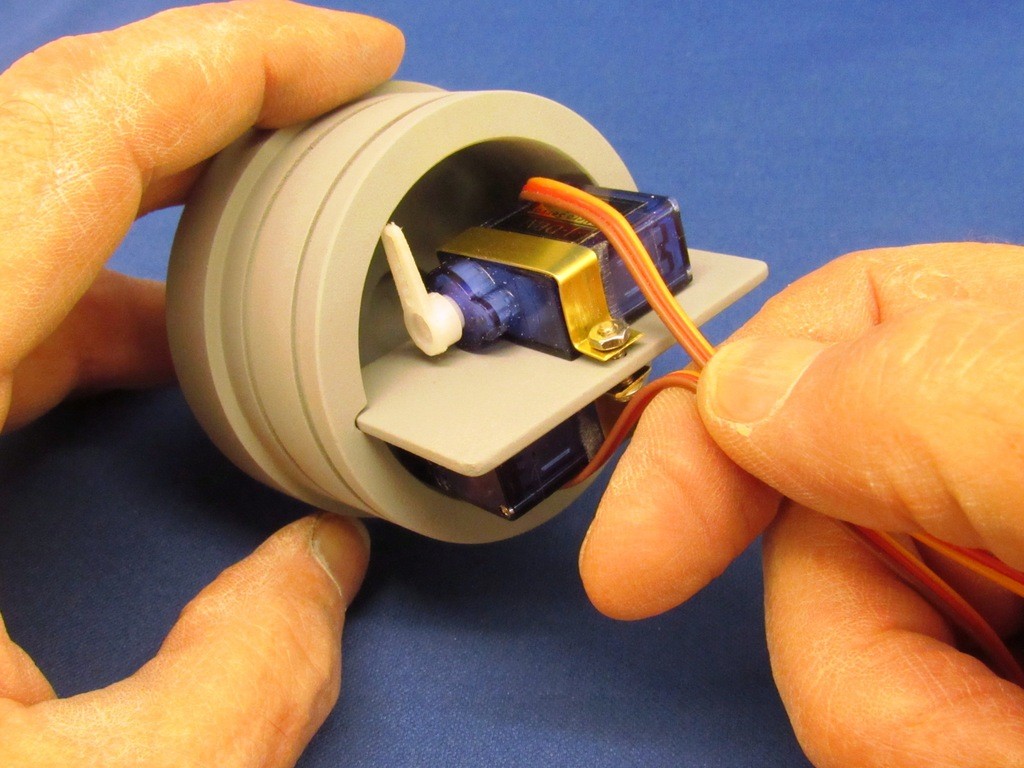
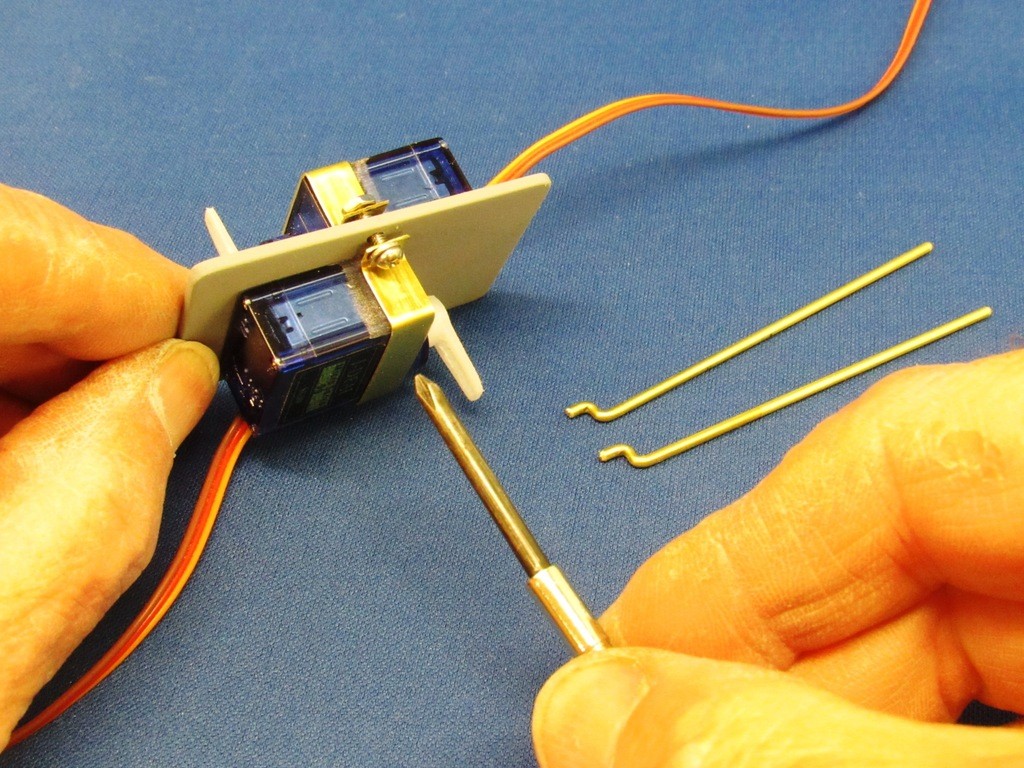
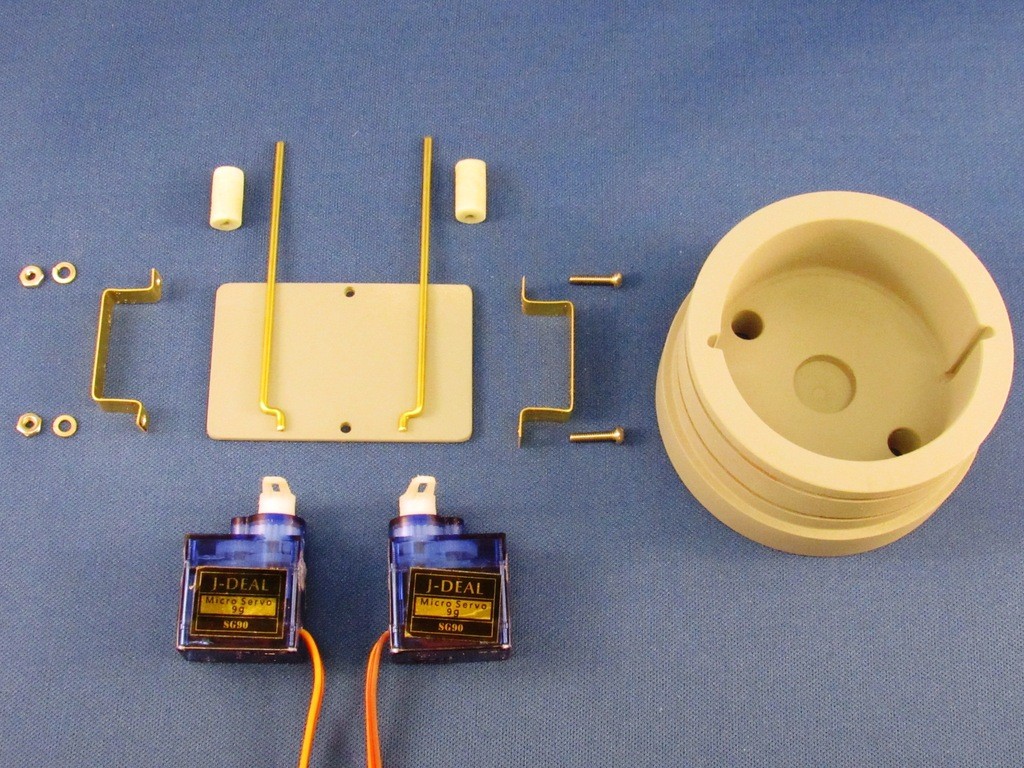
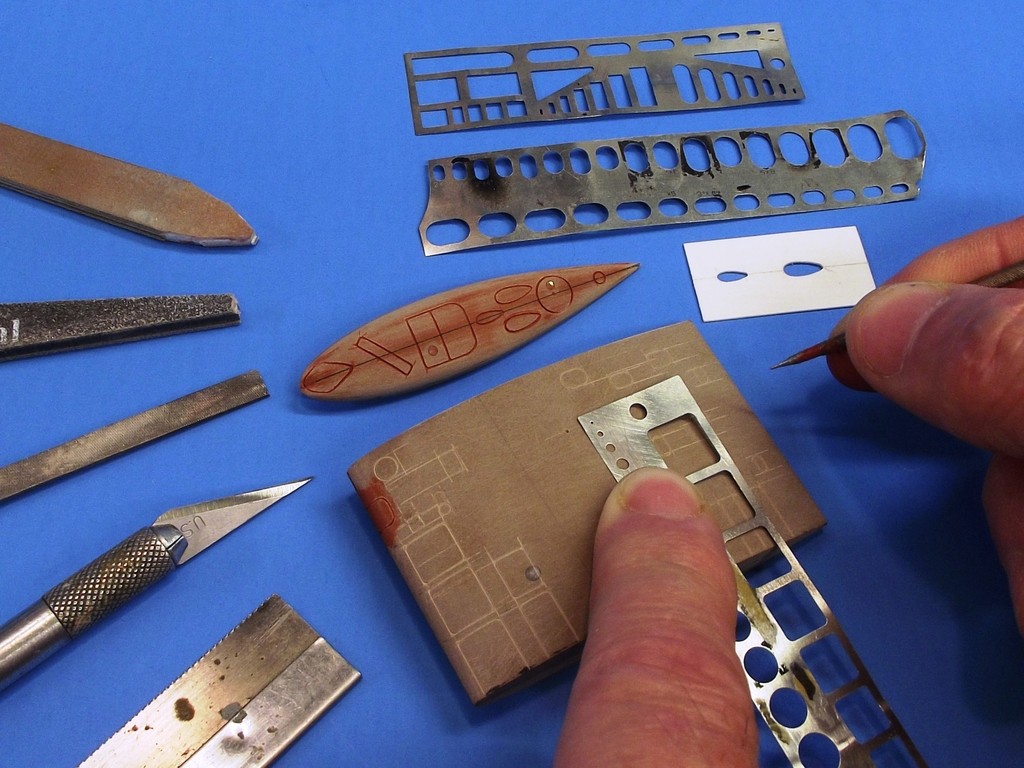
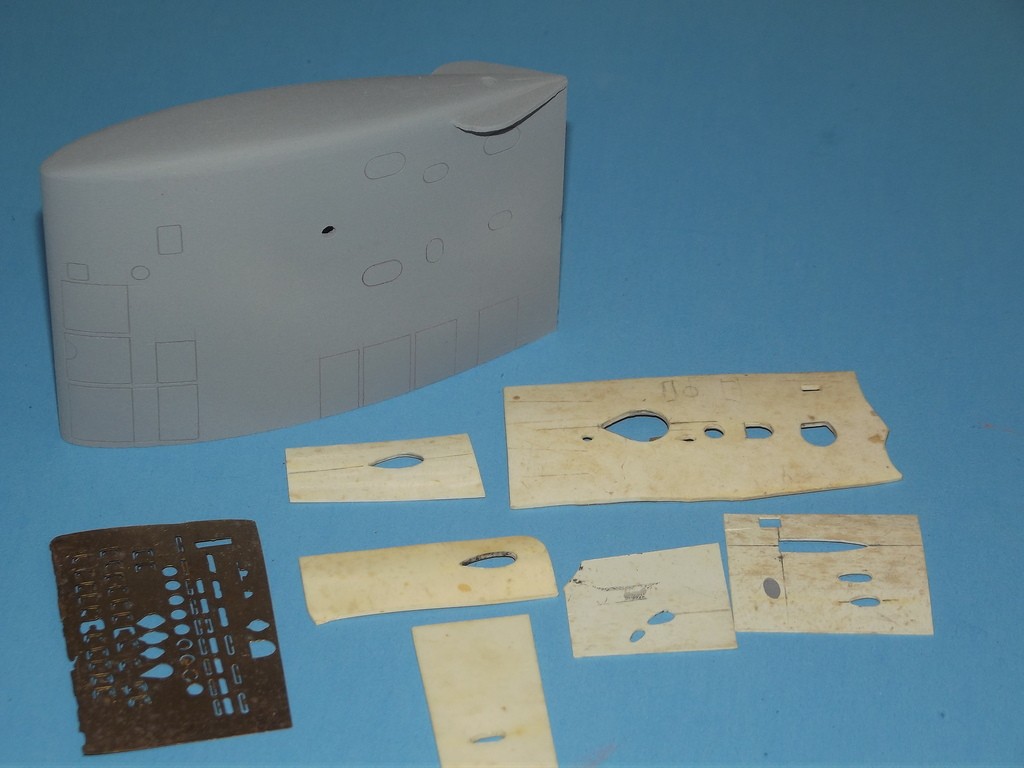
Last item on the MSD work list is this forward bulkhead used to give access to the forward dry space where the battery is stored. We wanted to provide the option of outfitting this bulkhead with two servos -- some customers would rather take the direct route with their linkages rather than run a long pushrod forward from the motor bulkhead mounted servos. Typical items needing r/c activation at the bow include bow plane, bow plane retract/deploy, anchor, and torpedo launching.
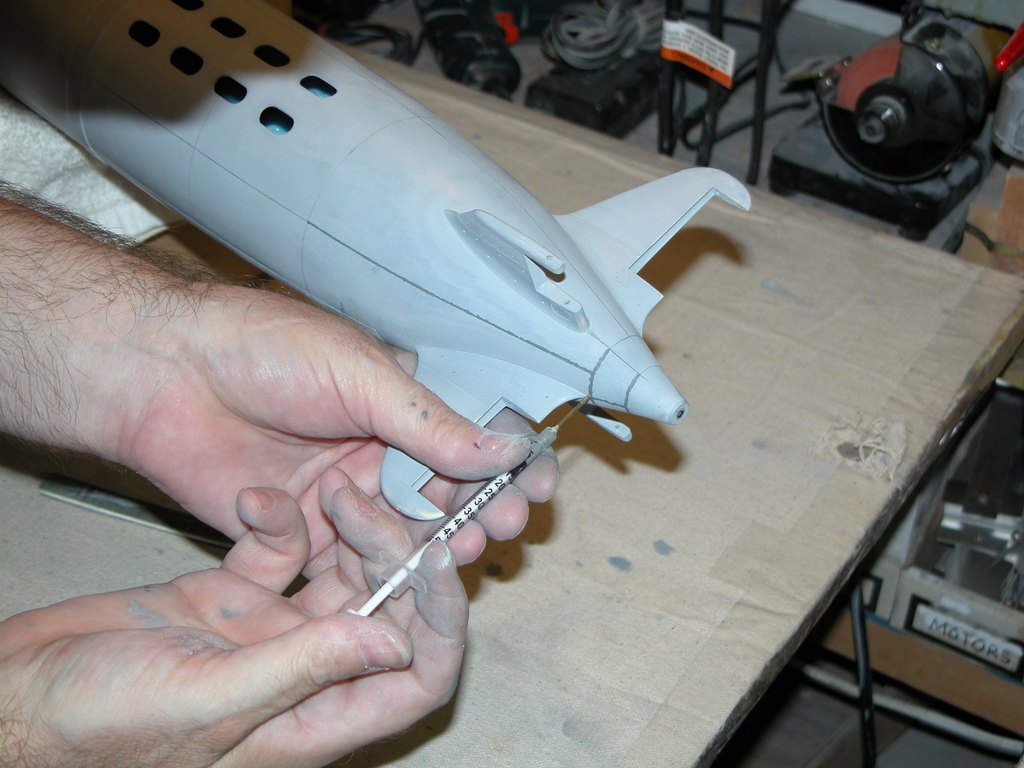
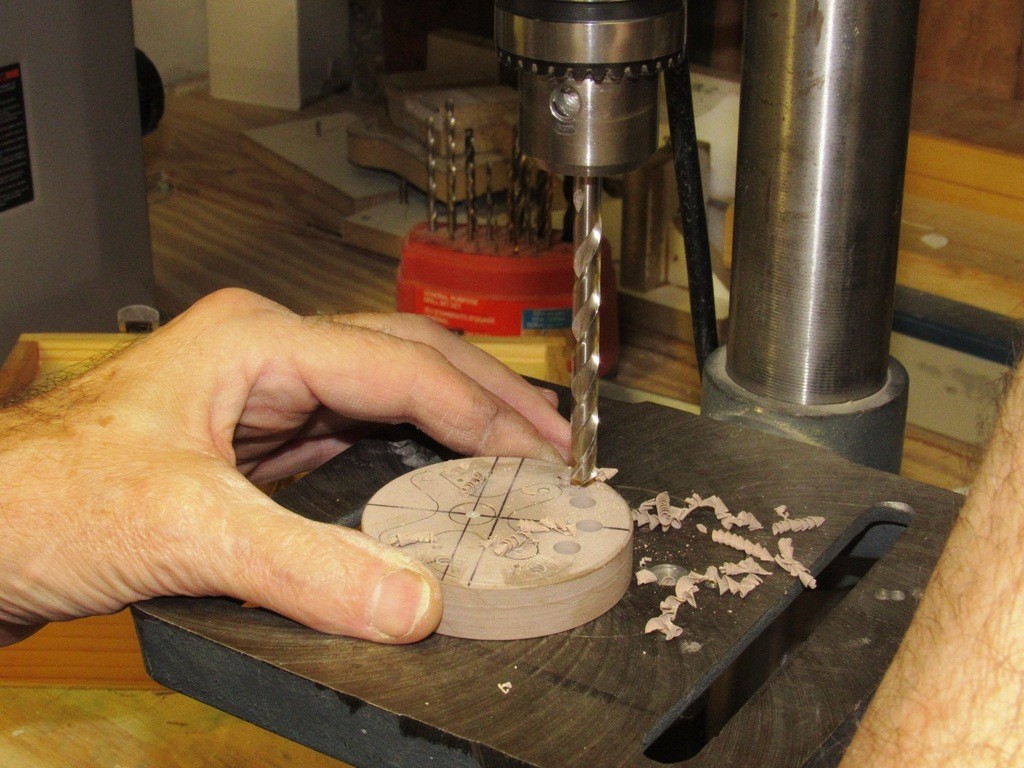
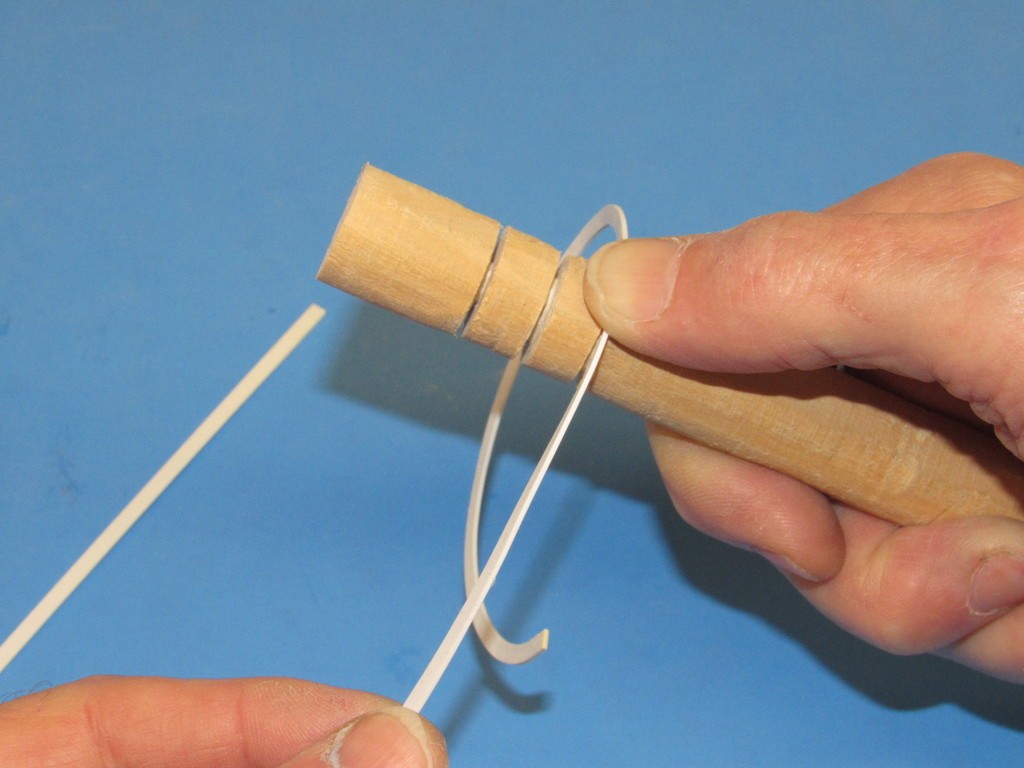
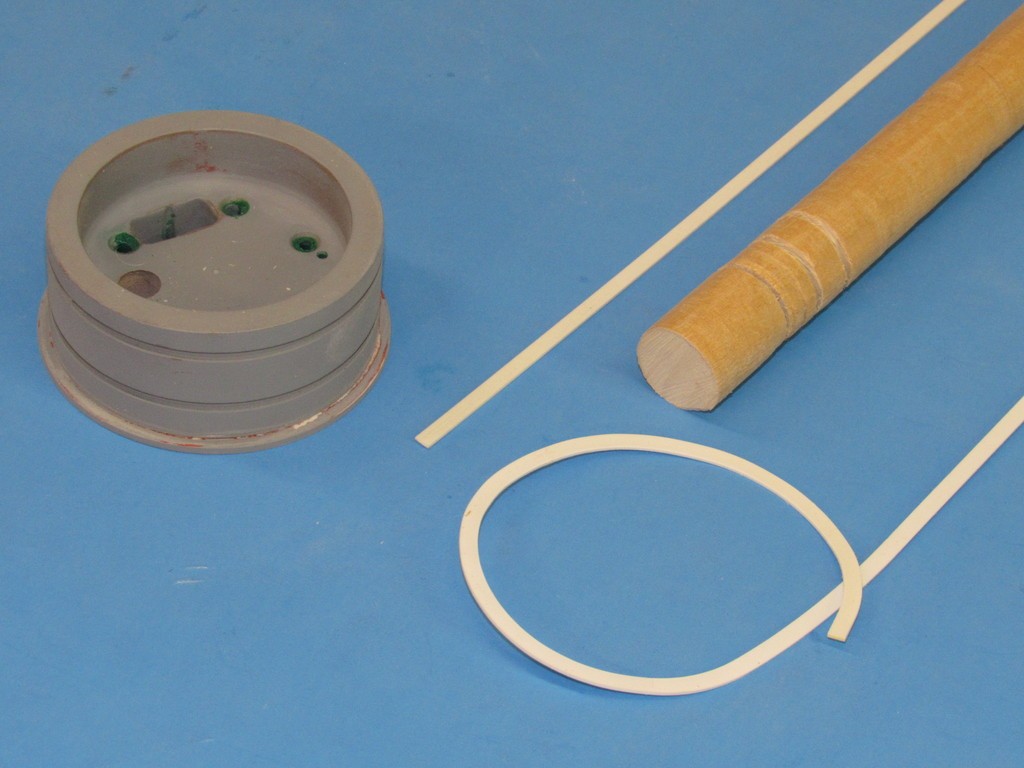
We’re familiar with the trick of bending a straight piece of plastic or soft metal rod, be it square, hexagonal, or other cross-section shape. You just pinch the rod between thumb and forefinger, and pull through with the other hand at an angle and so doing impart a constant radius curve to the rod; the more radical the angle, the tighter the radius. I wanted to fatten the flange on one of the masters and required a ‘circle’ of styrene strip that would be bonded to the existing flange.
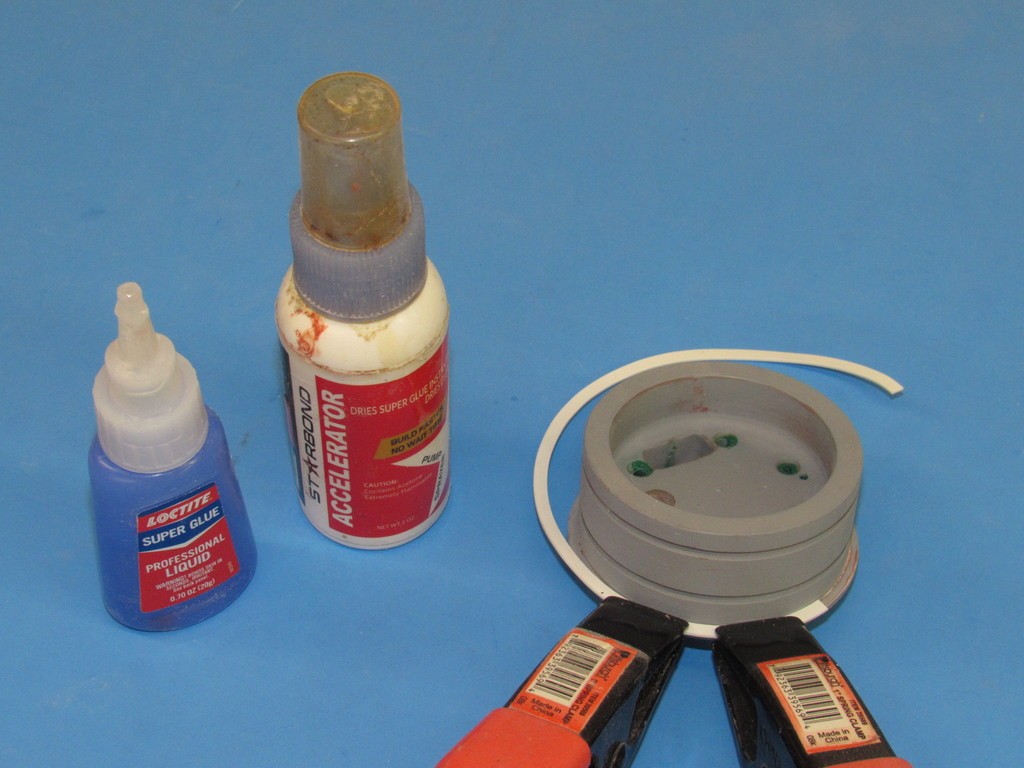
To keep the wide strip from twisting away from the desired curl I pulled it through a circular channel cut into a big wooden dowel. Three passes of the plastic strip and I had the circle required, which was then super glued to the flange, building it up to the desired thickness.
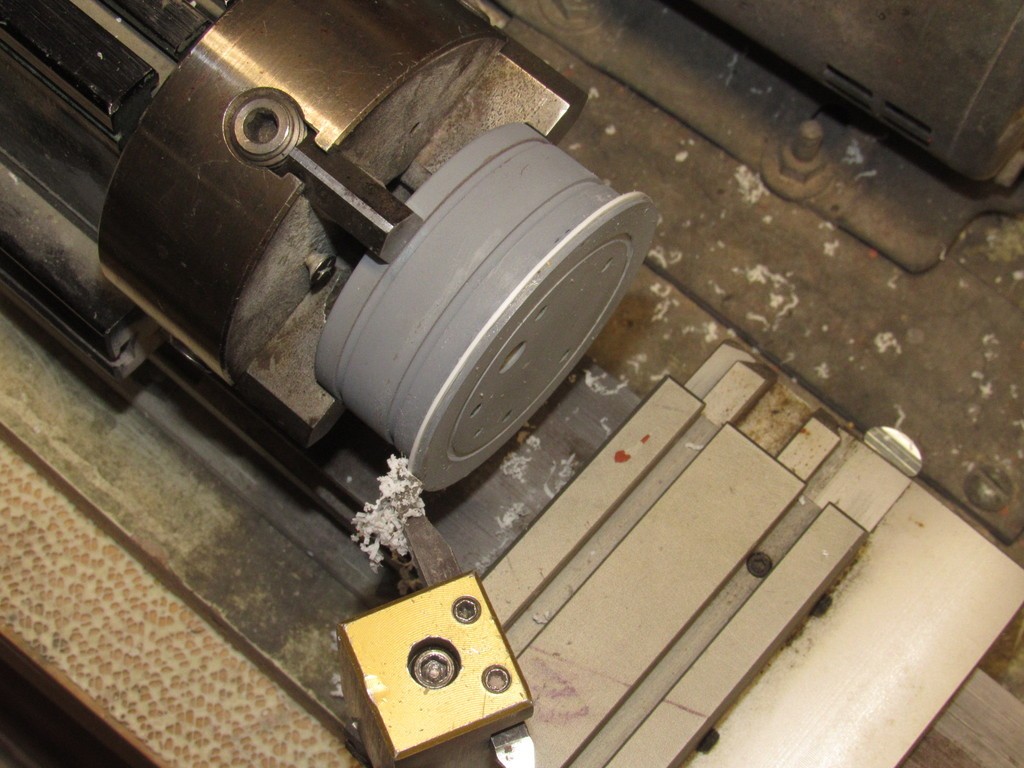
Clamps held the circular piece of strip to the flange as I applied the glue. As the added strip was a bit bigger in diameter than needed, I trimmed it back on the lathe.
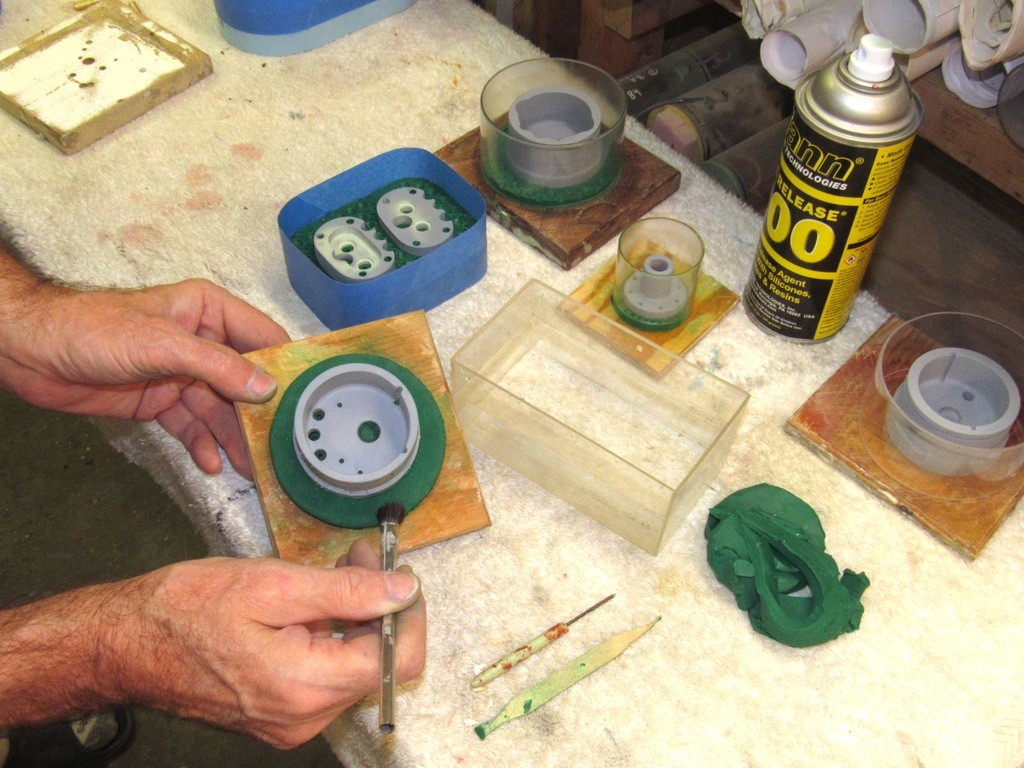
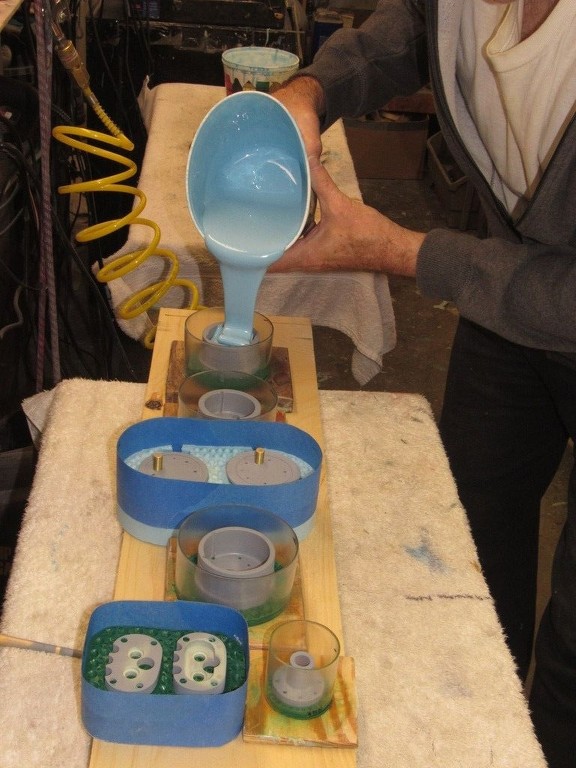
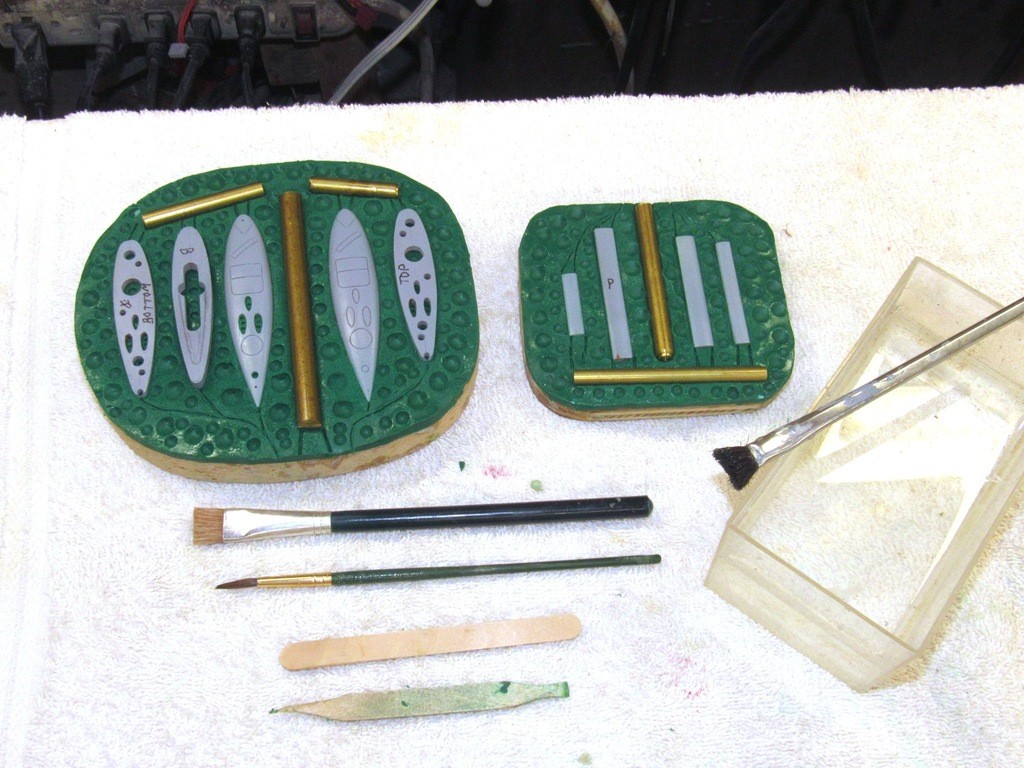
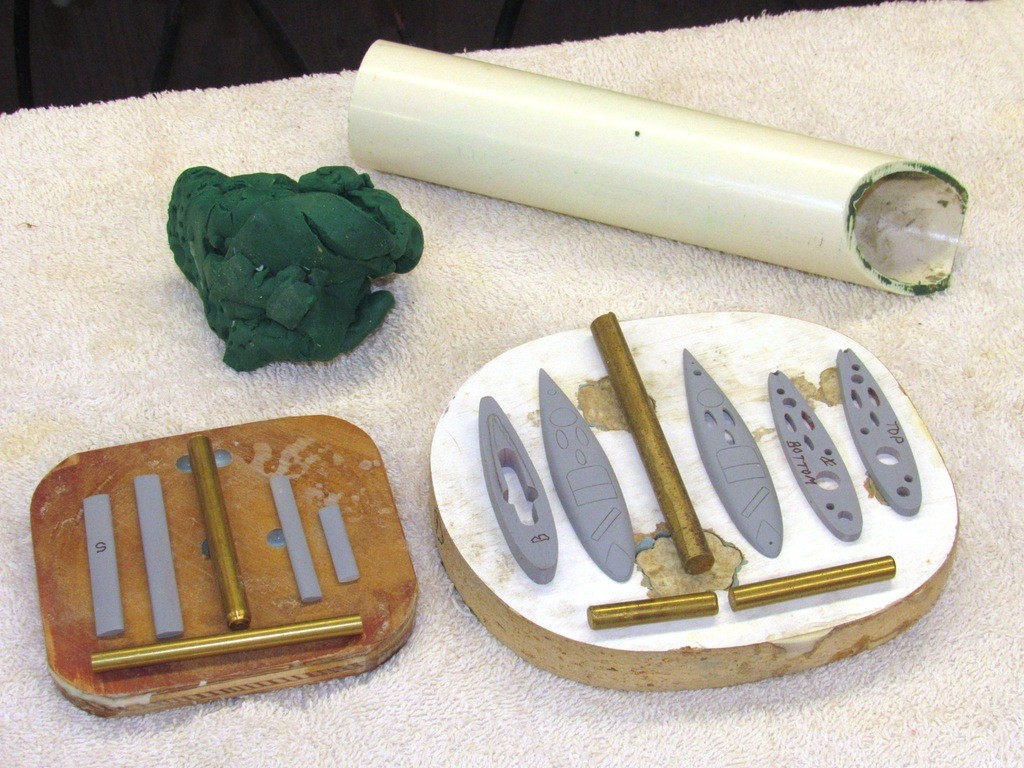
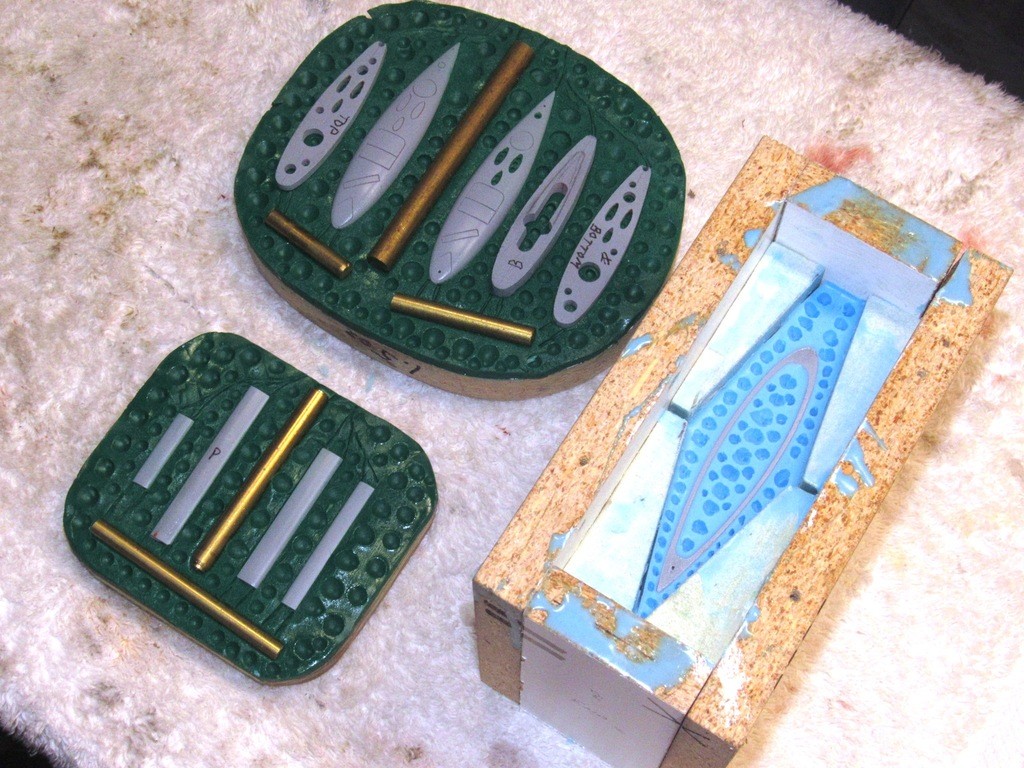
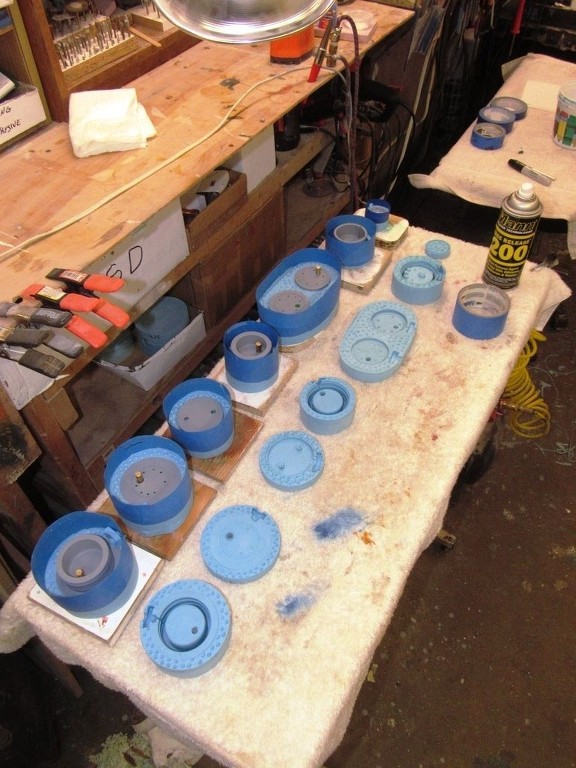
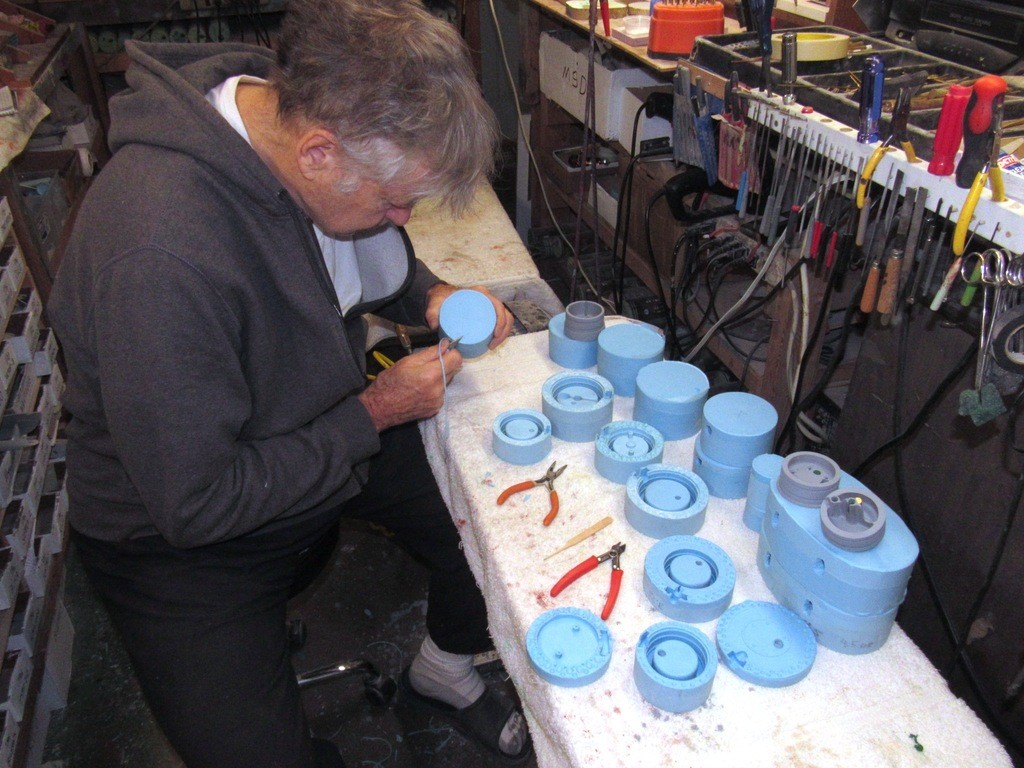
I spent the afternoon getting the modular SubDriver bulkheads, and gear-splitter masters ready for tool making. Some putty work, sanding, and setting each master in a clay backing.
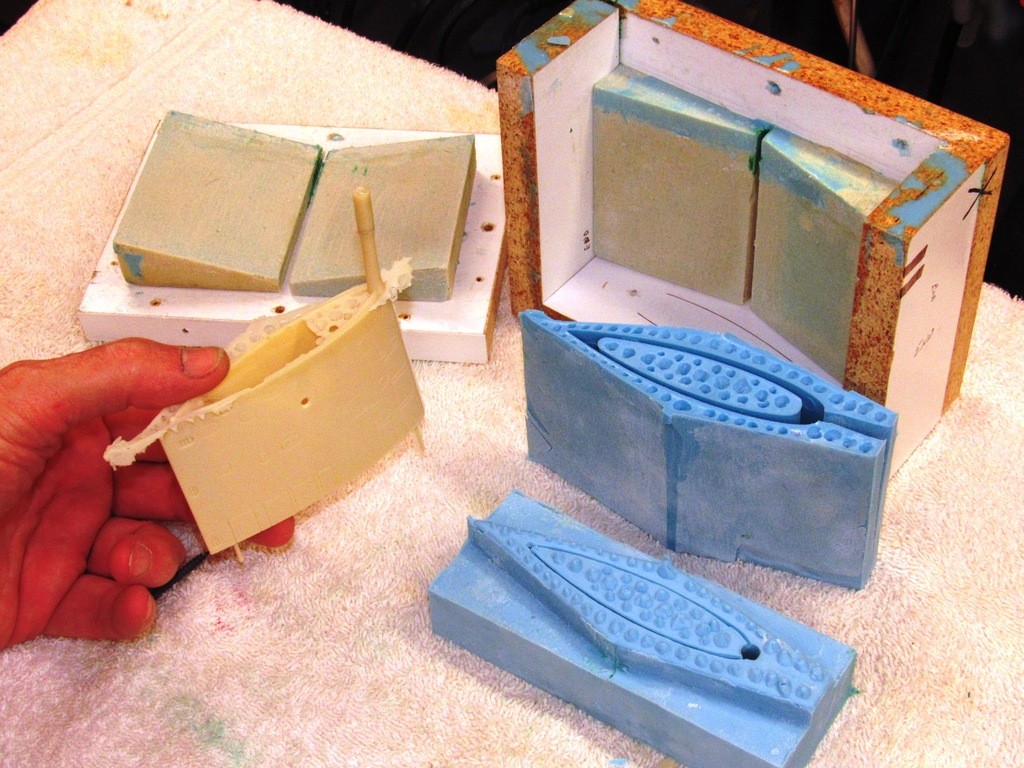
The clay creating the separation plane between the eventual two halves of the rubber tool used to make the cast resin parts. The face of the masking clay dimpled to form a network of registration keys in the rubber that would insure proper alignment of the tool halves. Containments (flasks) of Lexan cylinder and masking tape would hold the catalyzed rubber as it cured from liquid to solid.
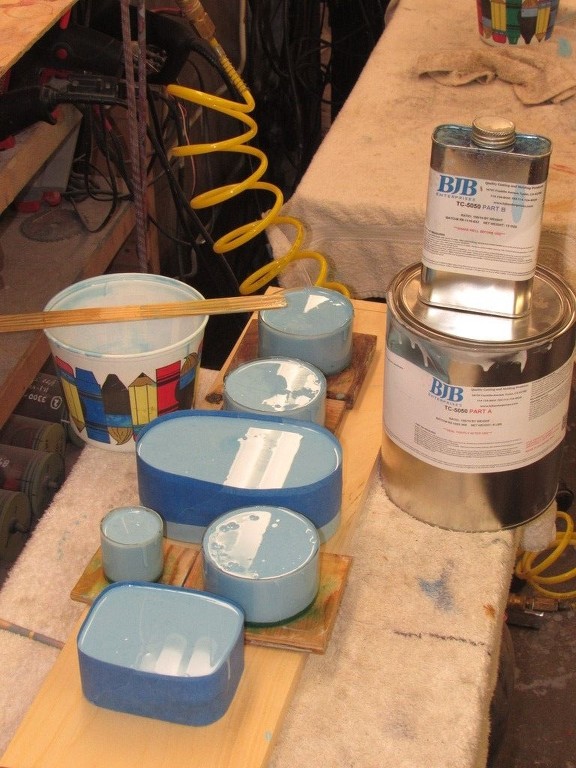
The last half of the two-part tools poured and cured, the masters were removed and placed into safe storage for possible future use. I then cut out the sprue and riser cavities, and the tools were ready for use.
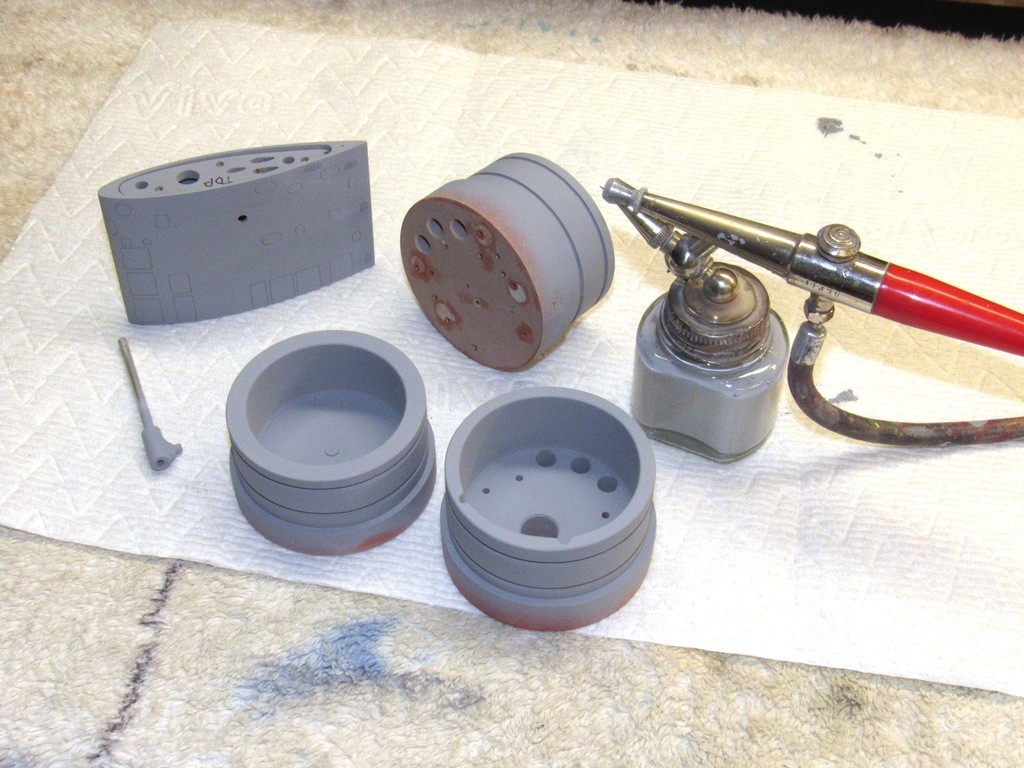
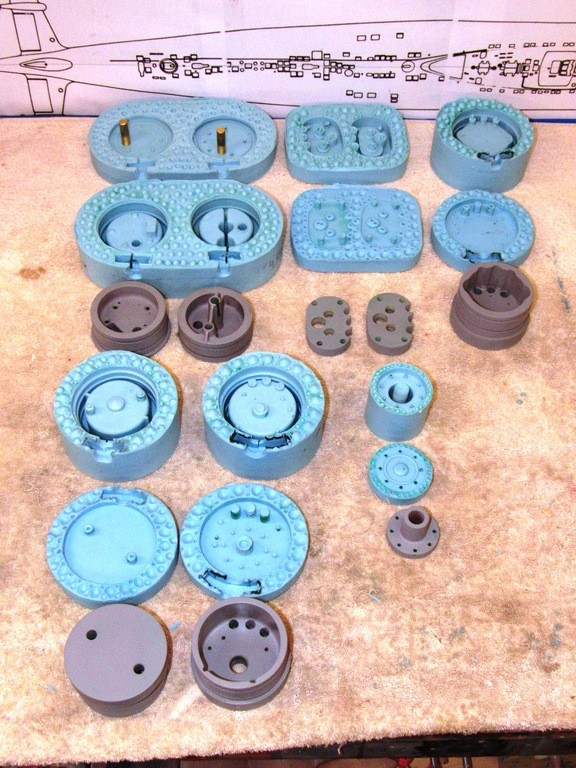
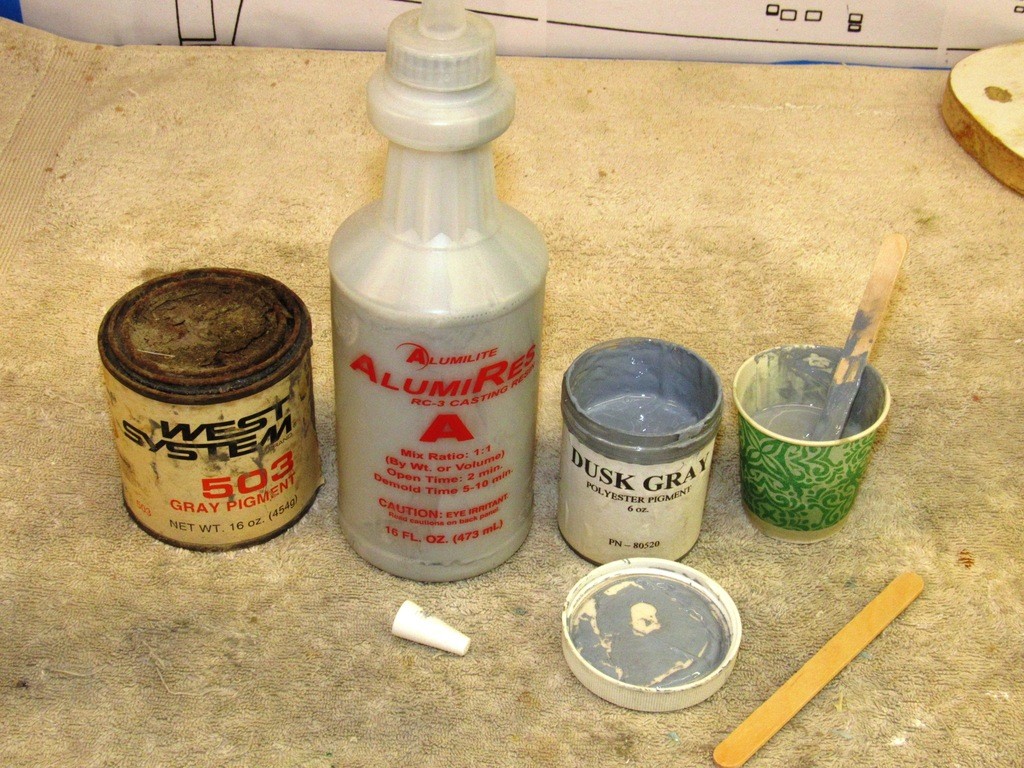
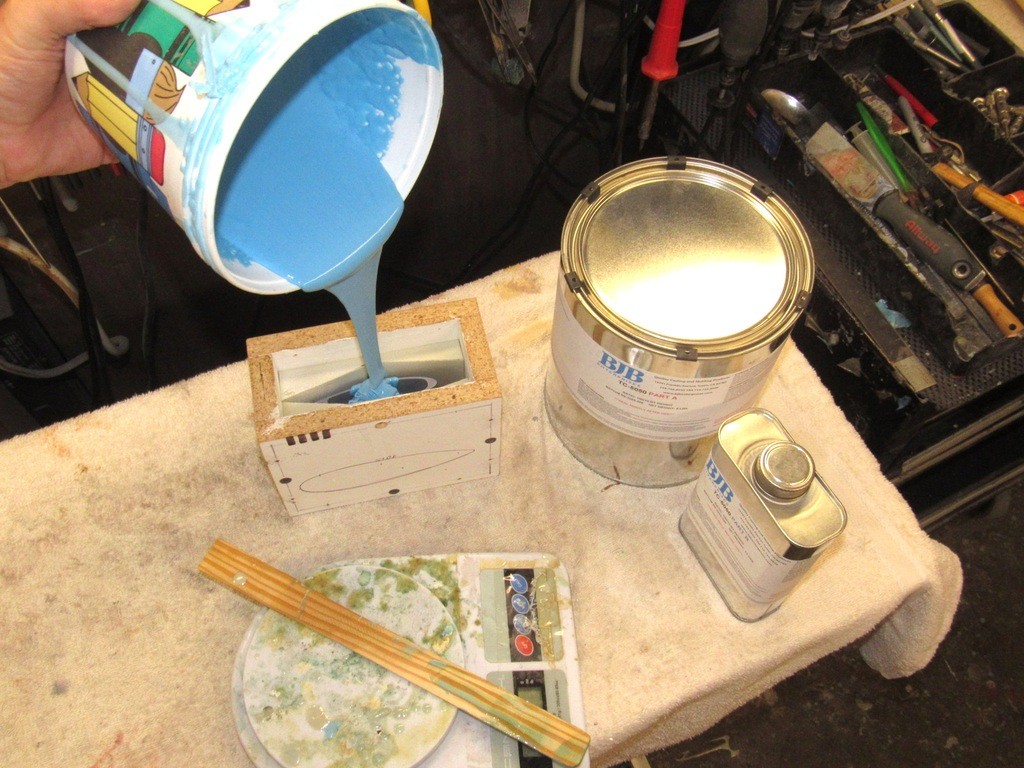
My client directed me to denote this new product with a proprietary color (or, if you will, no color at all), gray. Breaking out the tint I doped a sample quantity of my production resin and made the first shot of the new tools with this … ugh! … color. I dub thee, 'puke gray'!
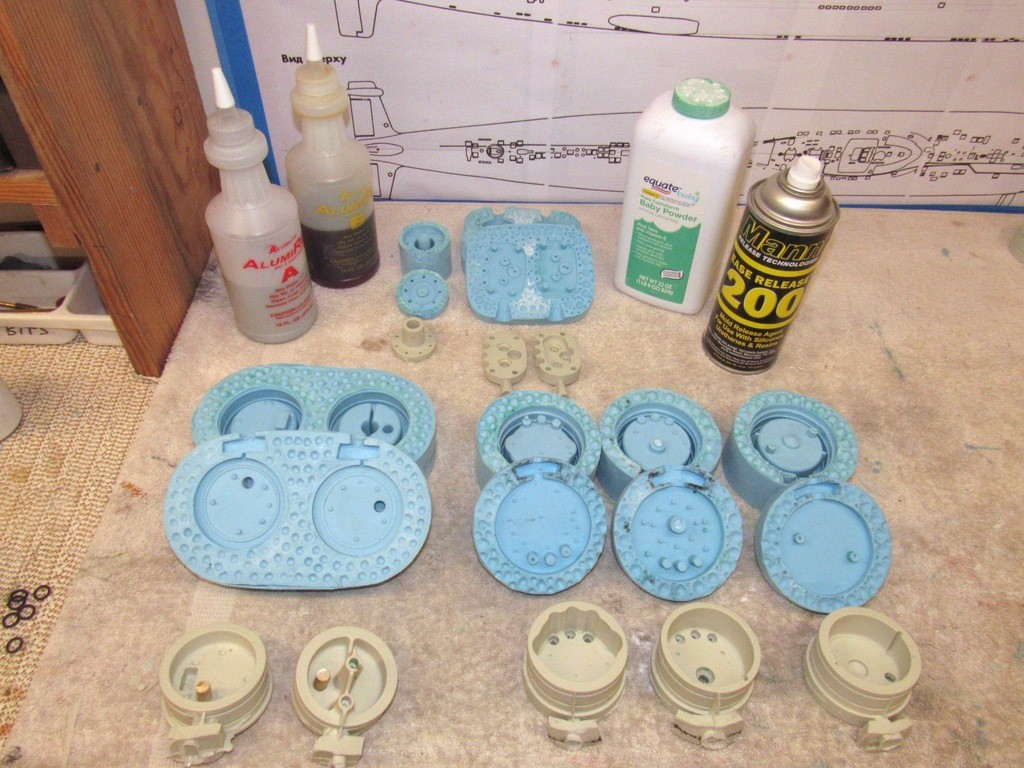
The tools were filled with catalyzed resin, pressurized, and once the castings were hard enough, they were extracted from their respective tools.
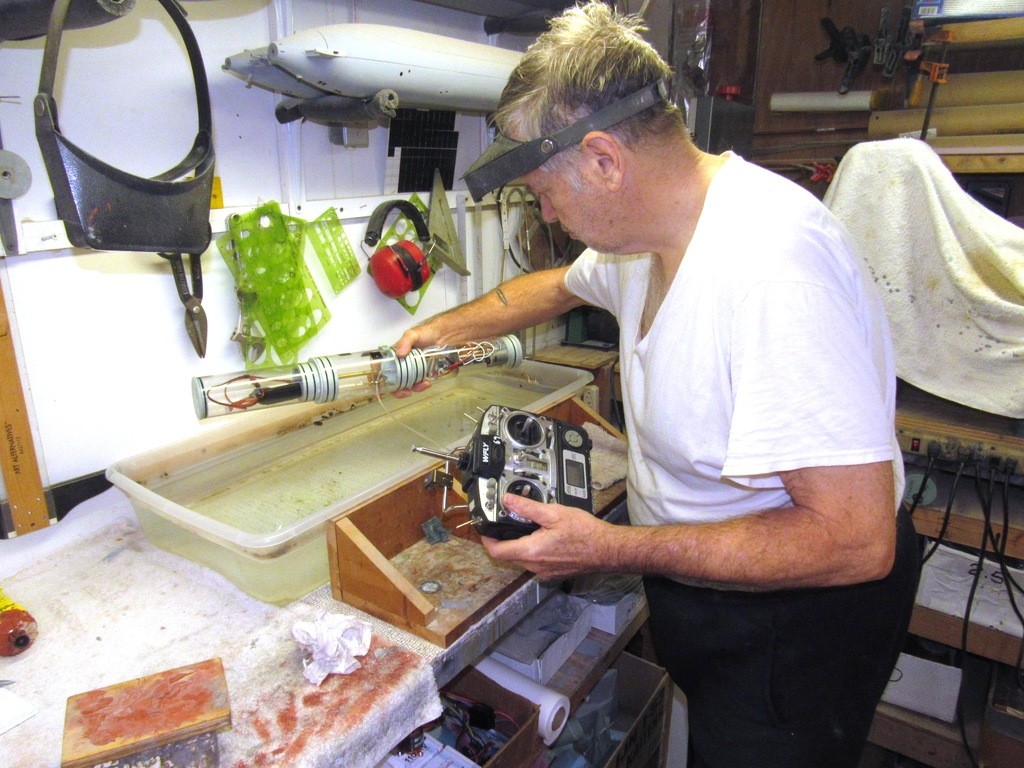
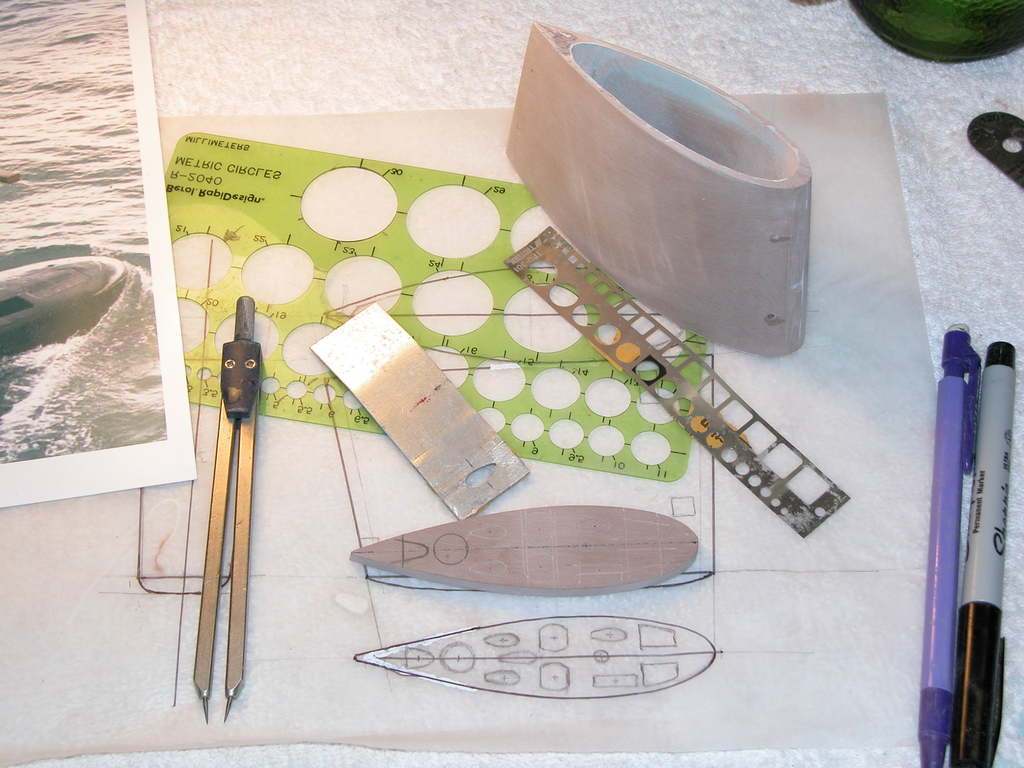
Time had come to find a model submarine to serve as a test-mule for this new type SubDriver.
I selected a nearly completed 1/72 scale THRESHER class model that has been sitting on the wall for a few years waiting for me to finish it. Now was the time.
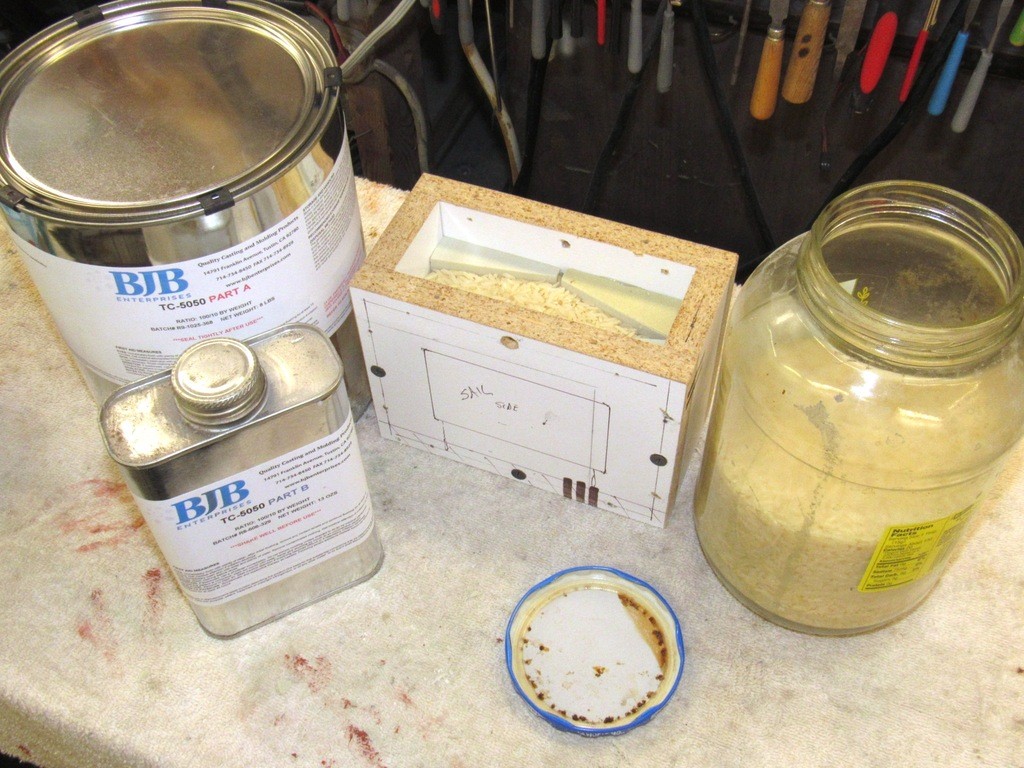
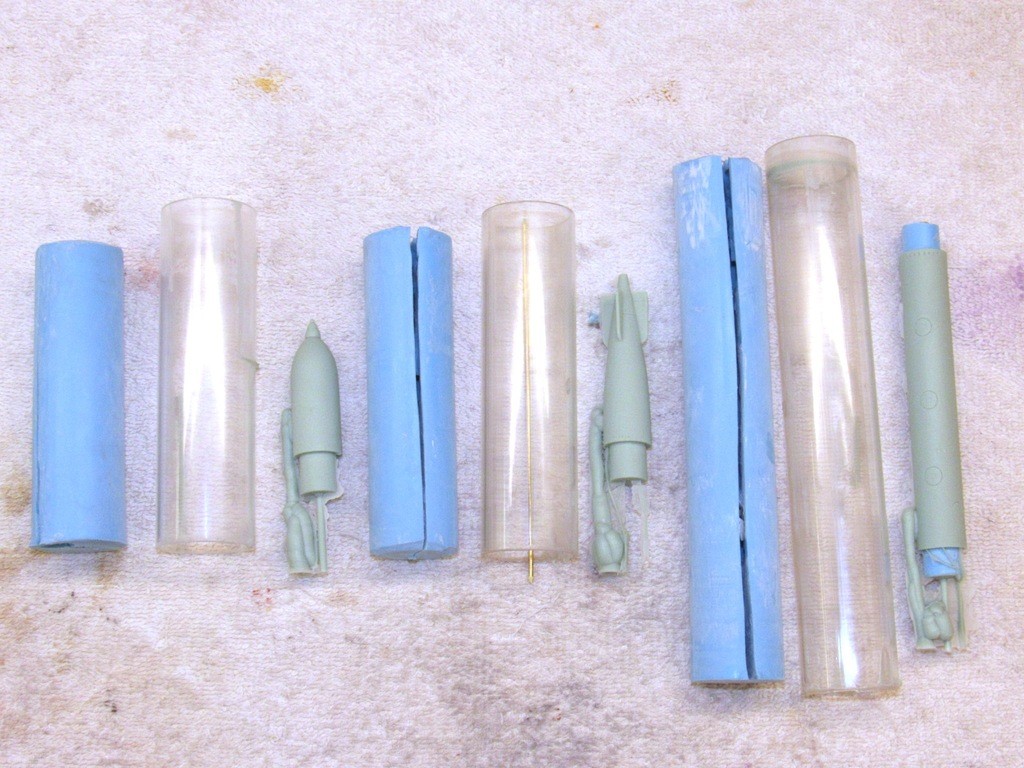
Here I'm preparing the sail master by fitting it inside a flask. The job of the flask is to contain the rubber that forms the tool (mold) and give it rigidity during the eventual casting process. The trick is to make the flask stout, but of a geometry that will prevent excessive use of the expensive tool making rubber.
The best way I've found of determining how much rubber to prepare is to first pour rice into the flask, with master in place, to the desired level, then pour the rice into the rubber mixing pail and mark the level of the rice. That tells me how much rubber to use. Neat trick I got from a local chapter of the Nautical Research Guild. A rather stuffy group of old farts, but populated by some real sharp model-builders.
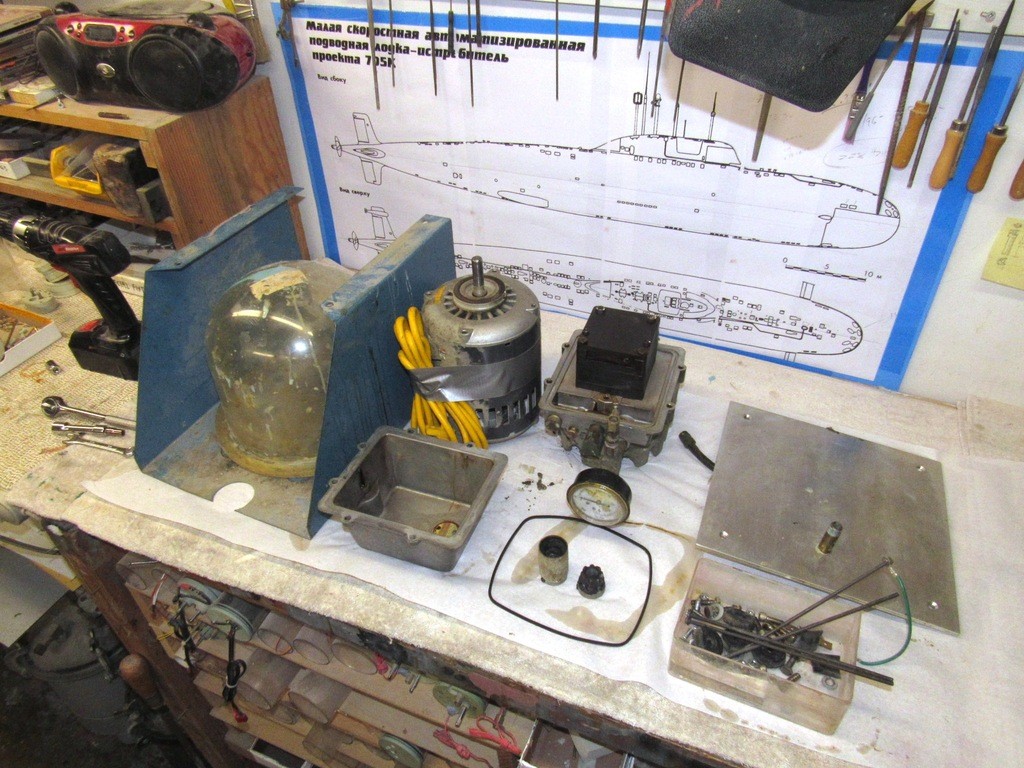
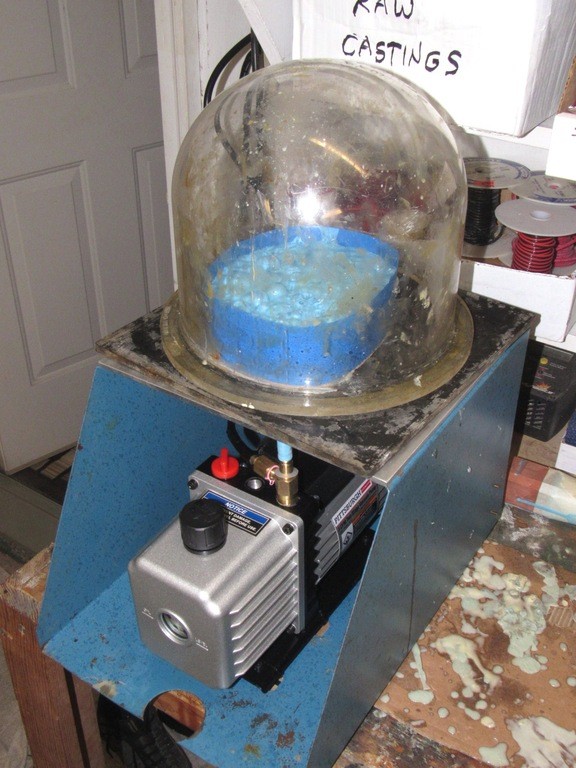
And this is when the wheels came off!
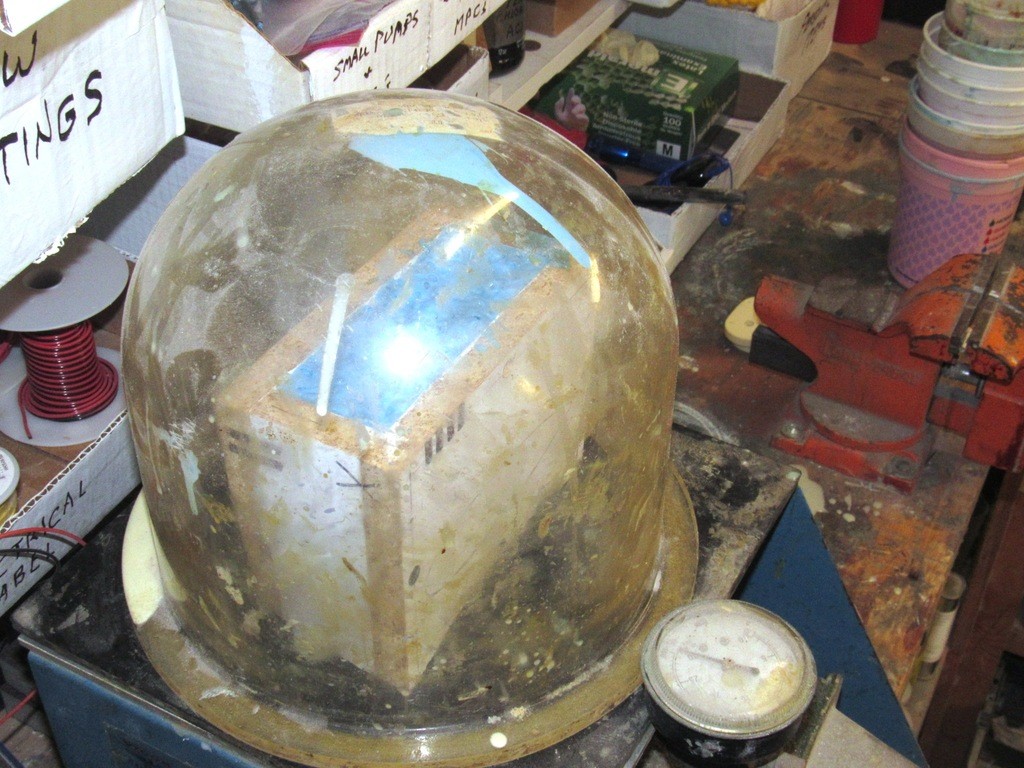
My over forty-year-old Vigor (they make machines and tools for the Jewelry trade) vacuum de-airing machine shit-the-bed! One use of this vital shop tools is to deair entrapped bubbles in the thick rubber mix before pouring it into a flask. Failure to do so will result in entrapped bubbles in the hardened rubber, which will evidence as positive dimples on the surface of a pressure cast resin piece. Can't have that! Must fix … must fix now!
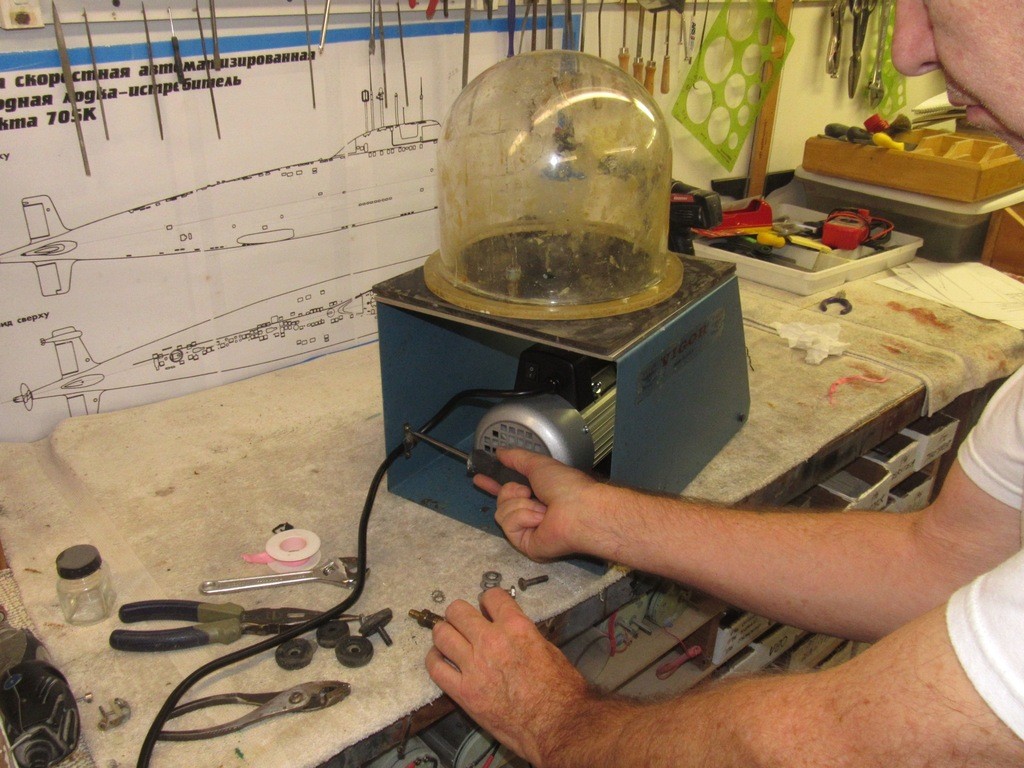
I took the machine apart and found that the coupler between vacuum pump and motor had stripped out. I've ordered replacement parts, but can't wait. I've got jobs to get out of here! So, I ran over to Harbor Freight -- I LOVE HARBOR FREIGHT! -- bought a cheapy low CFM vacuum pump and pressed it into service using the old Vigor's table, plumbing, and bell-jar.
Back in business!
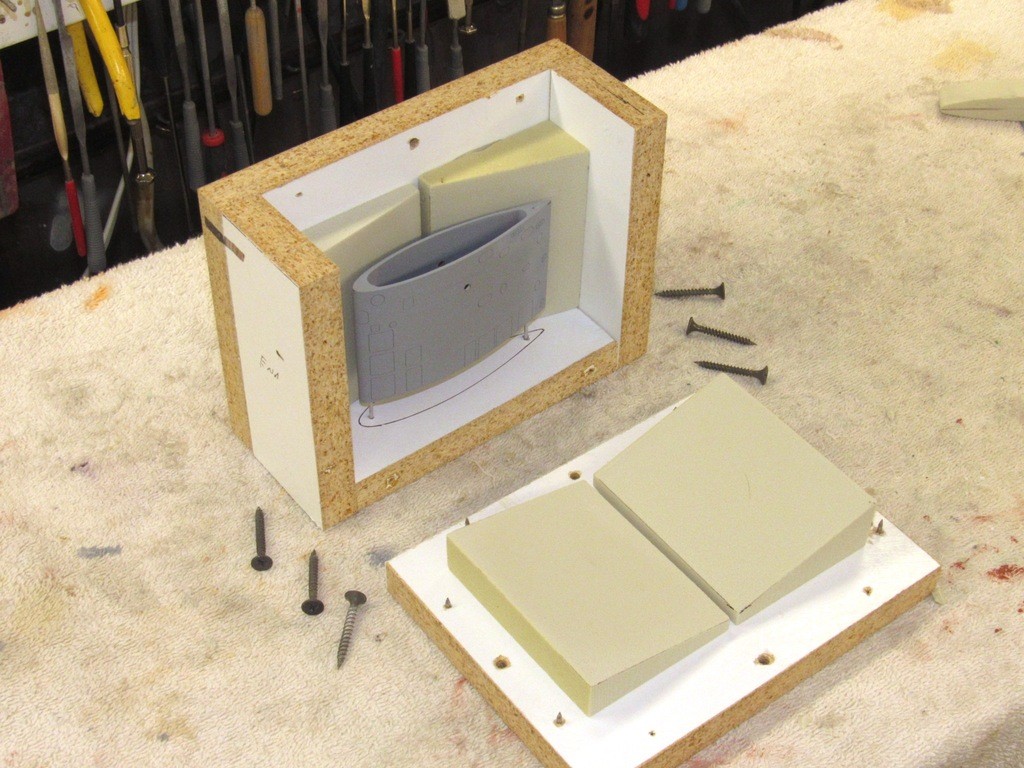
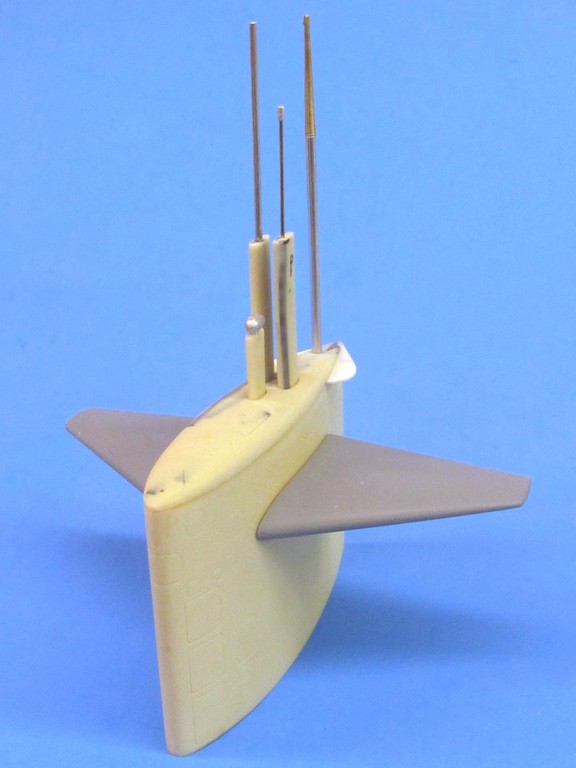
All fixy-poo, I went on to finish the THRESHER sail tooling by claying up the smaller sail masters. One sail top representing retracted masts, the other sail top representing extended masts; internal platforms; and masts. I'll pour the rubber to complete the sail tooling tomorrow, I'm dead tired and its getting late.
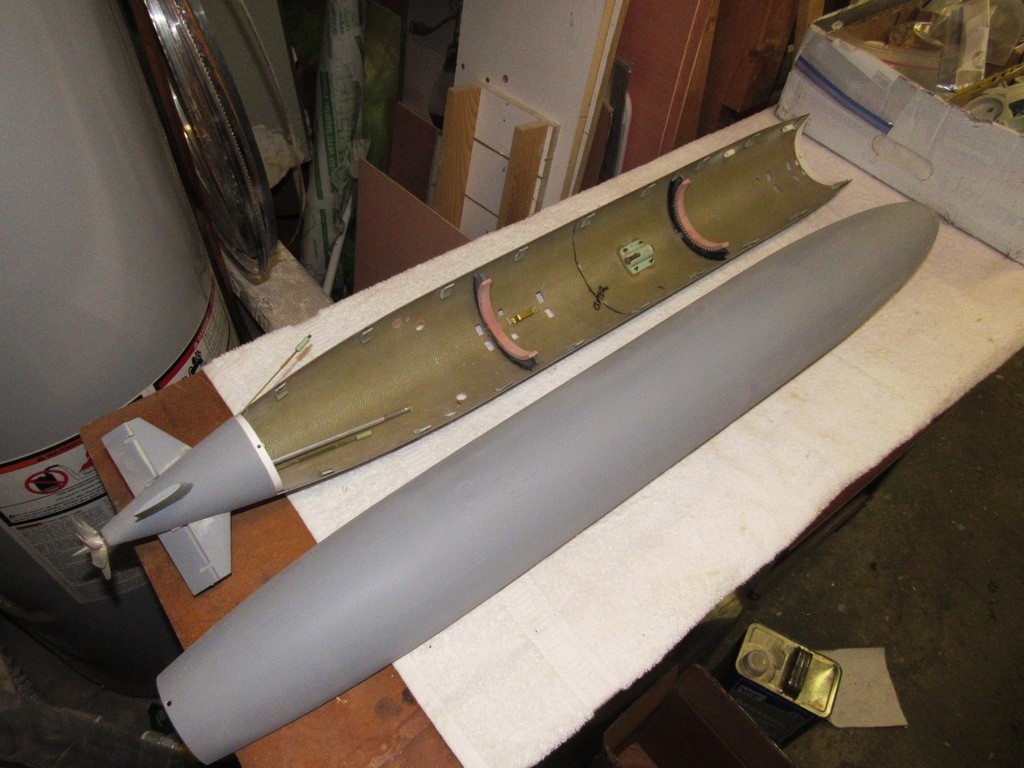
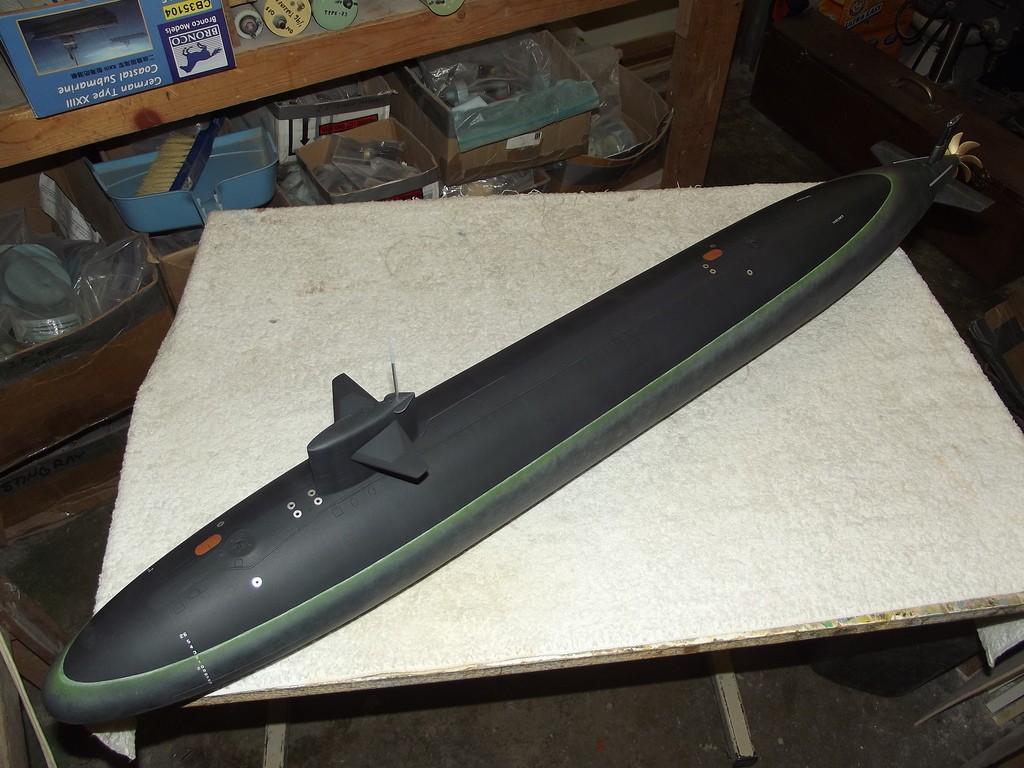
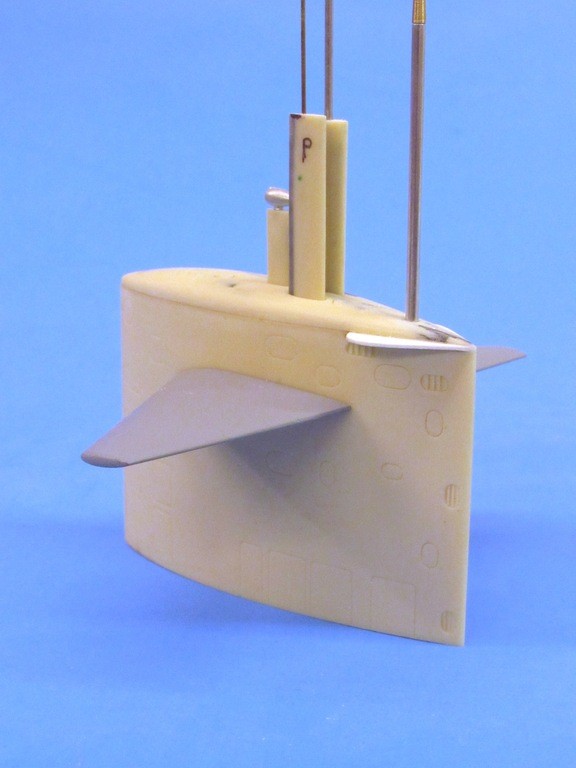
The test-mule for the new modular SubDriver will be this 1/72 THRESHER class model that has been sitting idle for a few years. I'm now working to complete it to the point where it will be water ready and outfitted with the MSD for a proper evaluation of the system. I've also included a shot of a previously completed model to show you what it will eventually look like.
My model is based on the HMK Creations kit produced by Joel Stadnick. Though it's not currently in production there is talk of it being re-introduced to the market with new features.
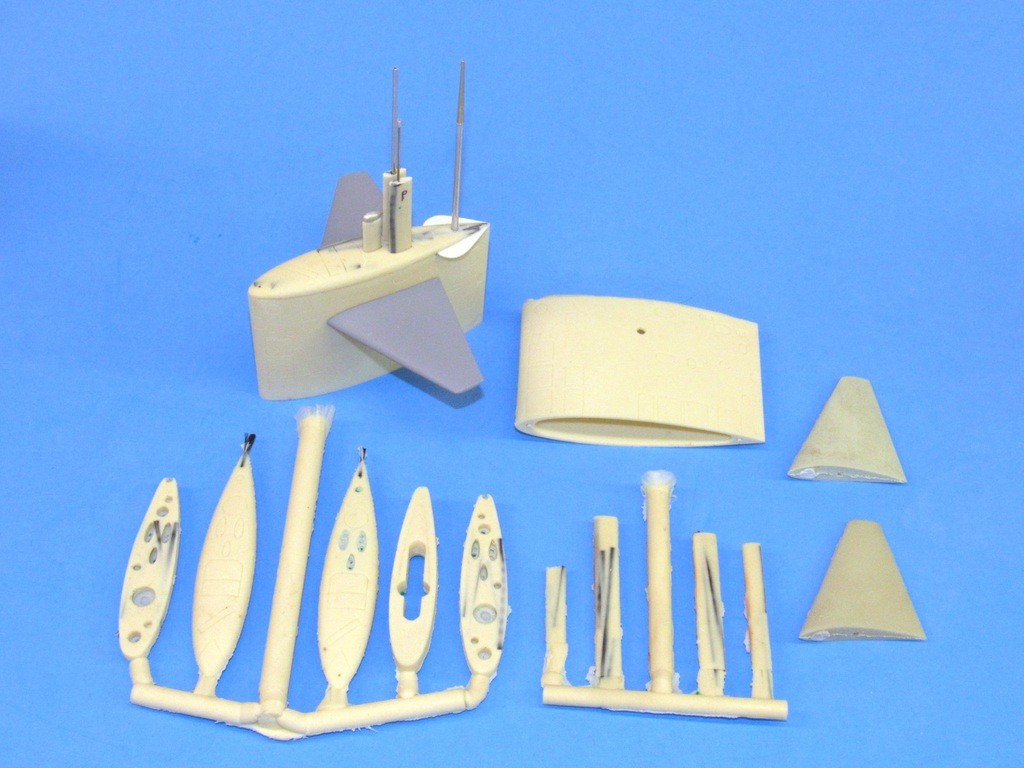
I spent the last two days finishing up the tooling for all the parts that make up the 'improved' sail structure. And from that I produced the cast resin parts, just a few hours ago. Tomorrow I assemble a sail unit and integrate it with the hull.
I took the cast resin sail parts and stuck them together. Assembly was straight forward: the three internal platforms were glued within the sail, the sail top piece (the one with the openings through which the raised mast fairings project) glued atop the main structure, and two holes drilled and tapped at the bottom platform to accept the screws that would pass up through the upper hull to secure the sail in place.
A simple poster-board alignment jig insured I sanded the base of the sail so it would sit level atop the upper hull. Any significant gaps between sail top and sail proper were filled with CA and flashed to hardness with either a sprinkling of baking soda or a good wetting with 'accelerator', followed by careful file work.
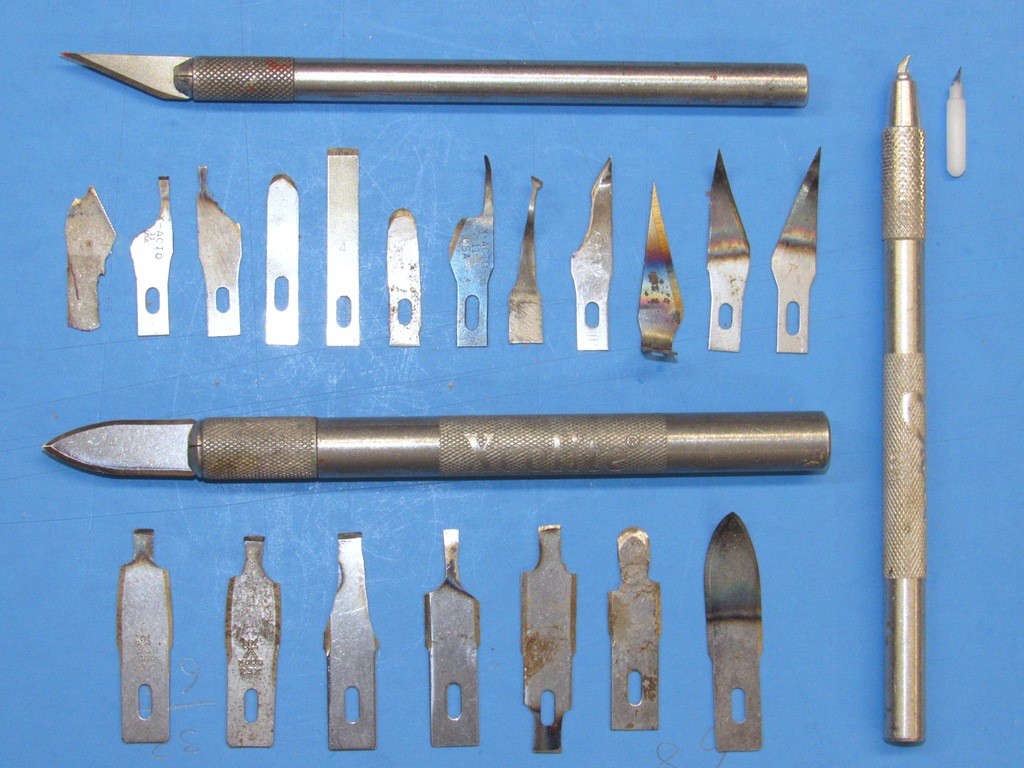
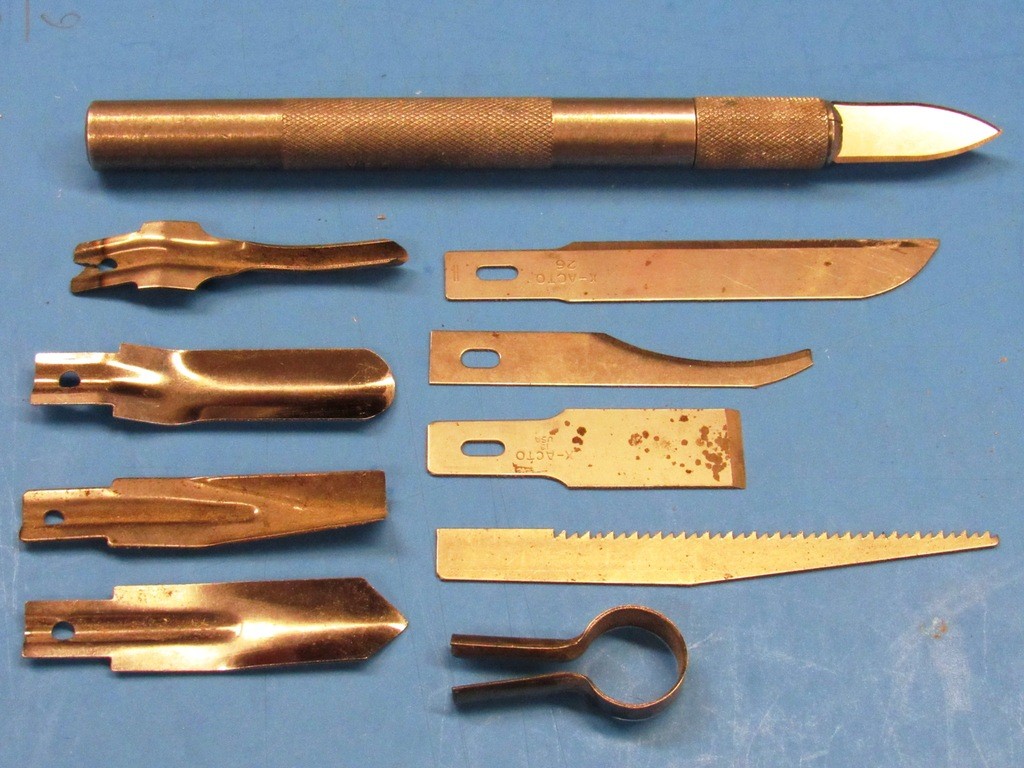
The engraved lines on the kits upper hull were not up to my standard: though an appreciated attempt the hull featured both non-skid and waterline cheat-lines -- these were way too deep and had to be filled to the point were once the model is painted, those cheat-lines will be barely perceptible. I spent the entire day using circular cutters and scratch awls to dress up the original work. Lots of putty to fill dings errors and overly aggressive cheat-lines. Once dry the excess putty was knocked down through some spot wet-sanding, followed by careful re-scribing.
Spent the better part of the weekend building duplicate tools so I could get into series production of the Modular SubDriver parts.
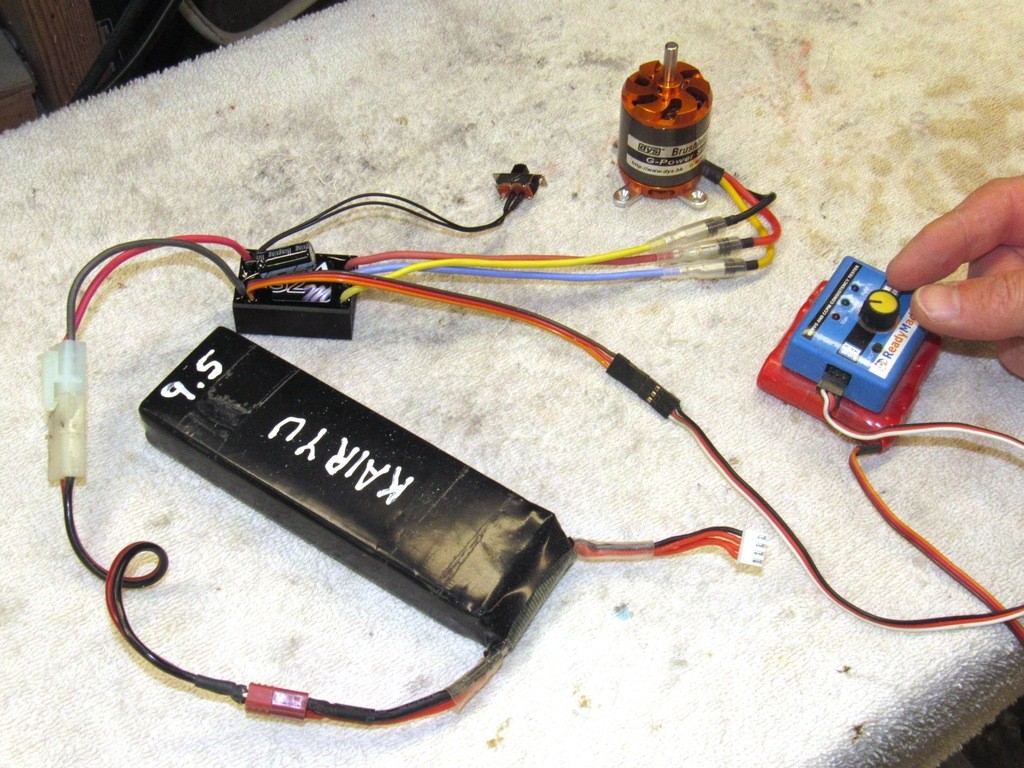
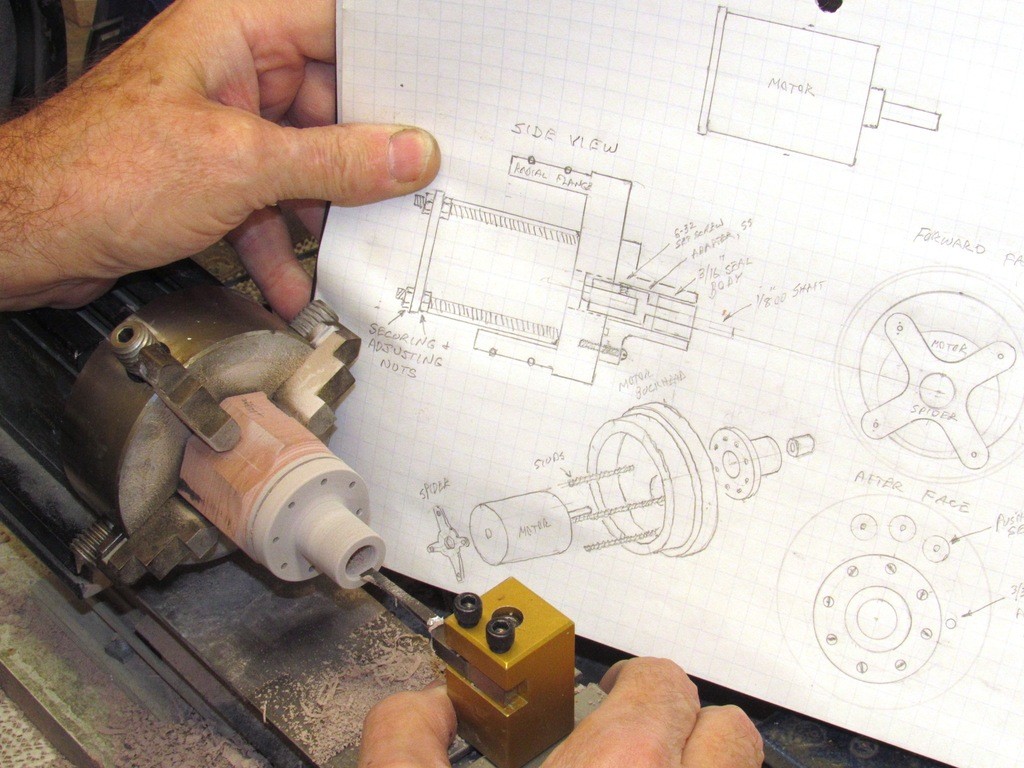
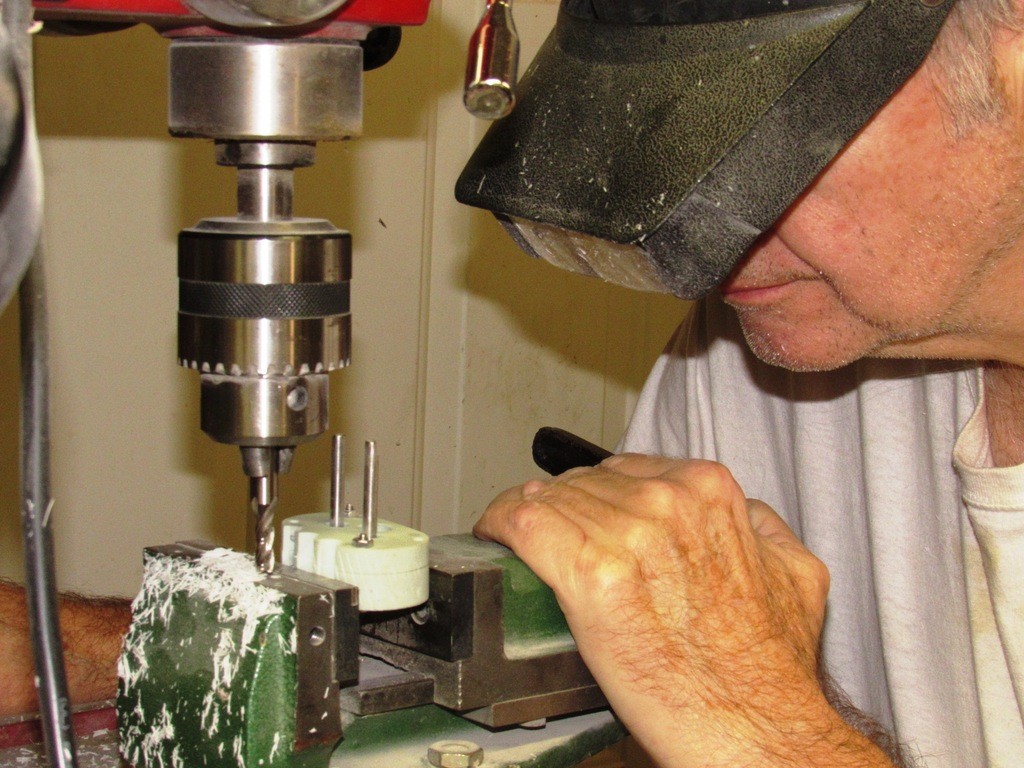
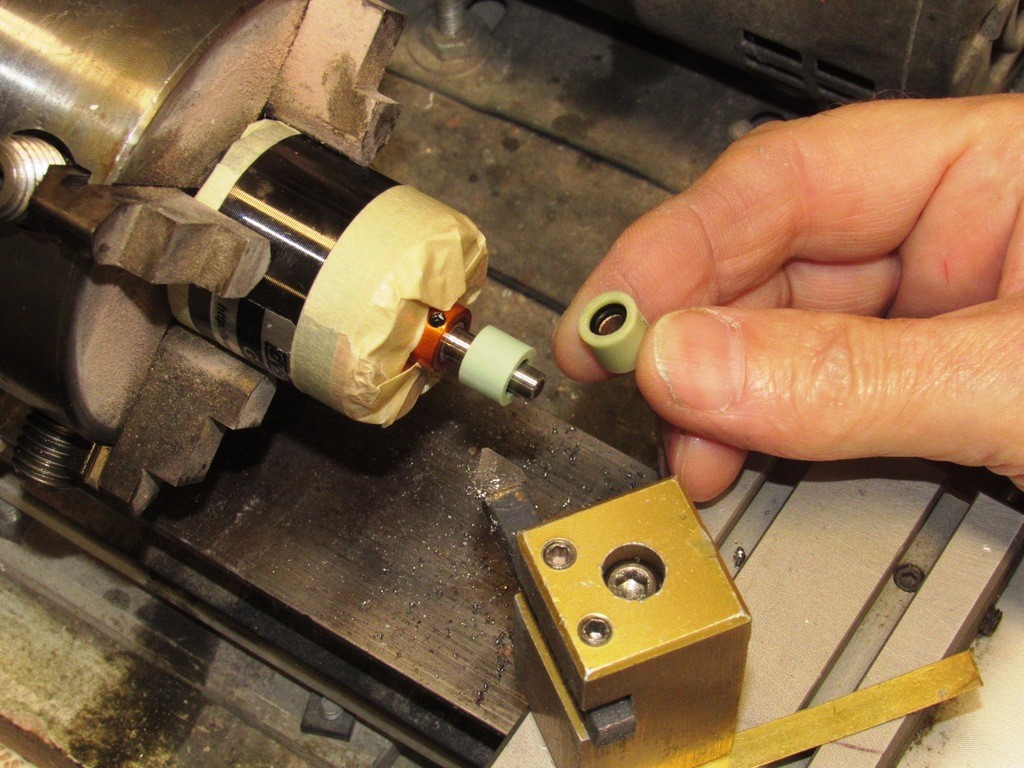
While waiting for the new rubber tools to cure I streamlined the methodology of reducing the diameter of my demonic metric brushless motor shafts to God's own Imperil standard of shaft size. In this case reducing the useless 5mm to a more rational 3/16" diameter. Gotta love tungsten tipped cutting tools! The masking tape keeps the metal chips away from the rotors internal magnets as I shaved down the stainless steel shaft. The object of the exercise was to match the motors shaft to my standard drive-shaft watertight seal.
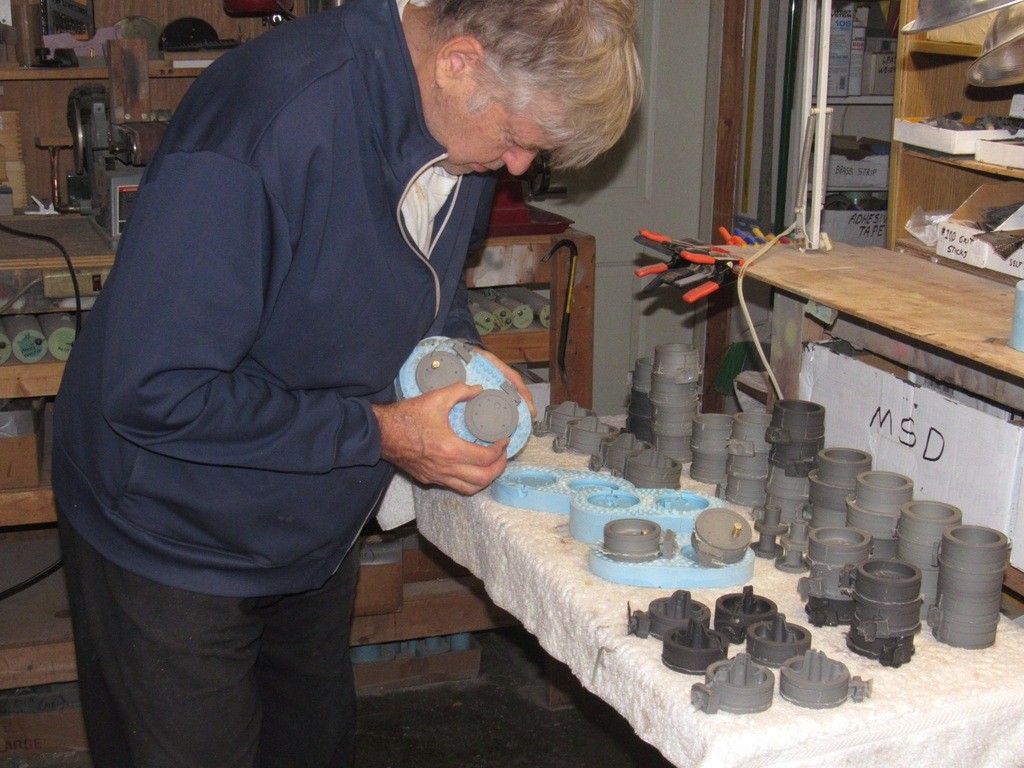
Most of today was spent casting resin parts from the tools. I'll spend this week machining these bulkheads to fit Lexan cylinder and then integrate things into proper MSD's for my customer, Nautilus Drydocks. They wanted me to adopt a proprietary 'color' for this new product. We agreed on gray. you'll note that I played with various shades of gray to give my boss a choice.
This site uses cookies to help personalise content, tailor your experience and to keep you logged in if you register.
By continuing to use this site, you are consenting to our use of cookies.


")