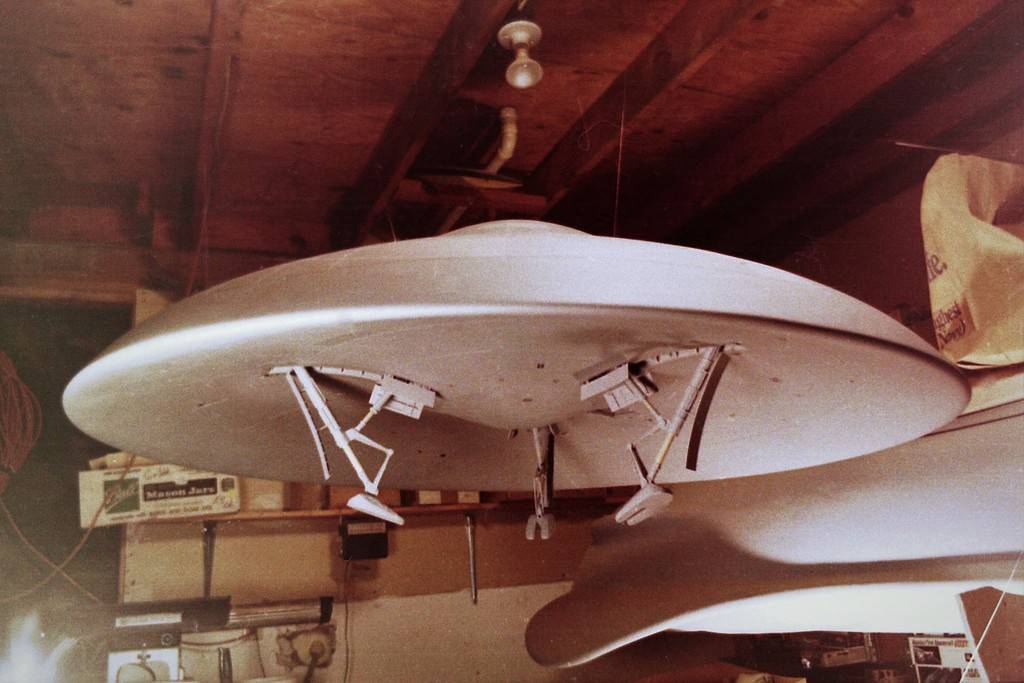
Bob Martin (the RCSubGuy - https://www.rc-submarine.com/ ) has been commissioned by Ken Dowd to light his beautifully crafted 7' Nautilus with full interior. Here Ken & Bob take us on a fascinating tour of this lovingly hand crafted, masterful replica; that's been 20 years in the making.
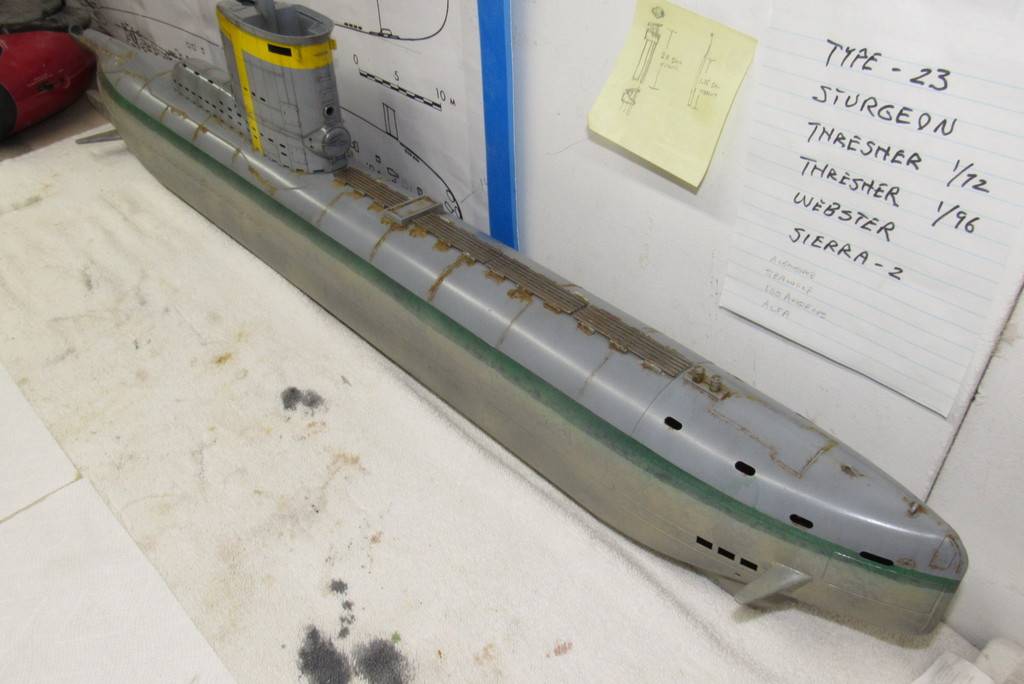
While awaiting some iron filings, from which to make some 'rust paint' to further weather the 1/35 Bronco Type-23 model, I've shifted my evil attentions to two 1/96 scale cold-war submarine models I started to assemble over four months ago.
These to replace the KILO and BLUEBACK kits I gave away to a friend. The two cold-war boats I'm currently putting together are slated to join my fleet a month-and-a-half from now at the big all-submarine SubFest event at the Red Clay Resort outside pool in Cohutta, Georgia.
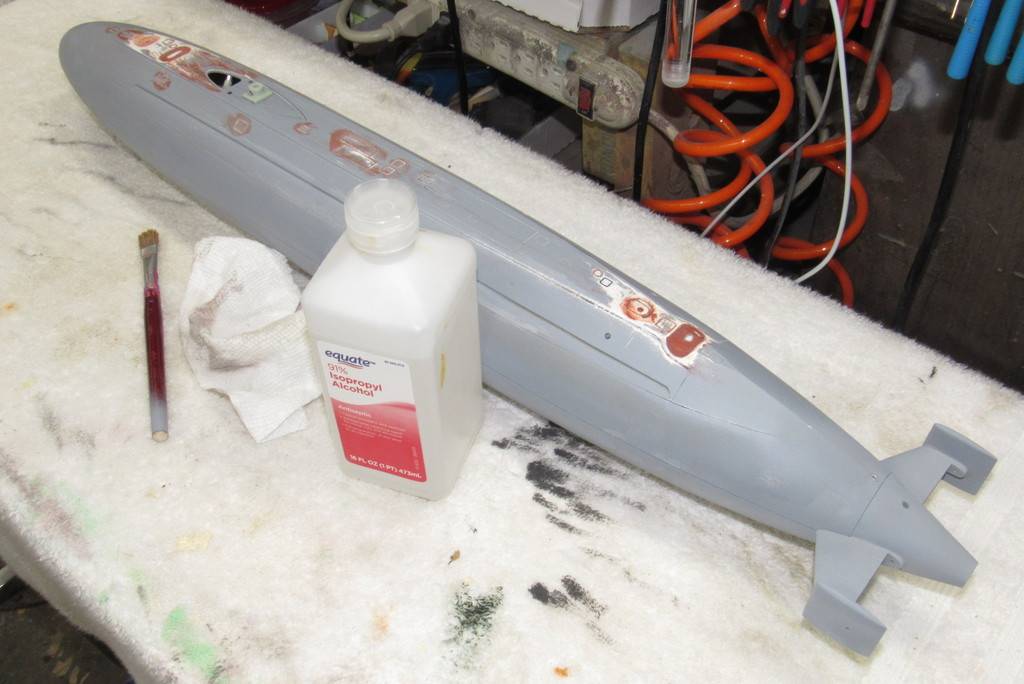
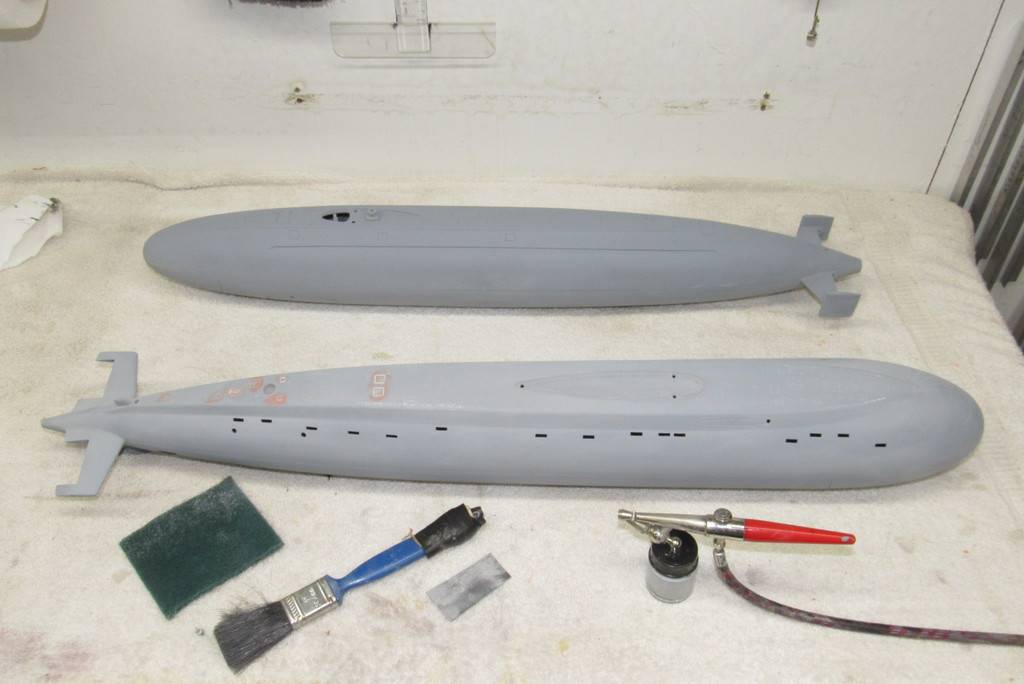
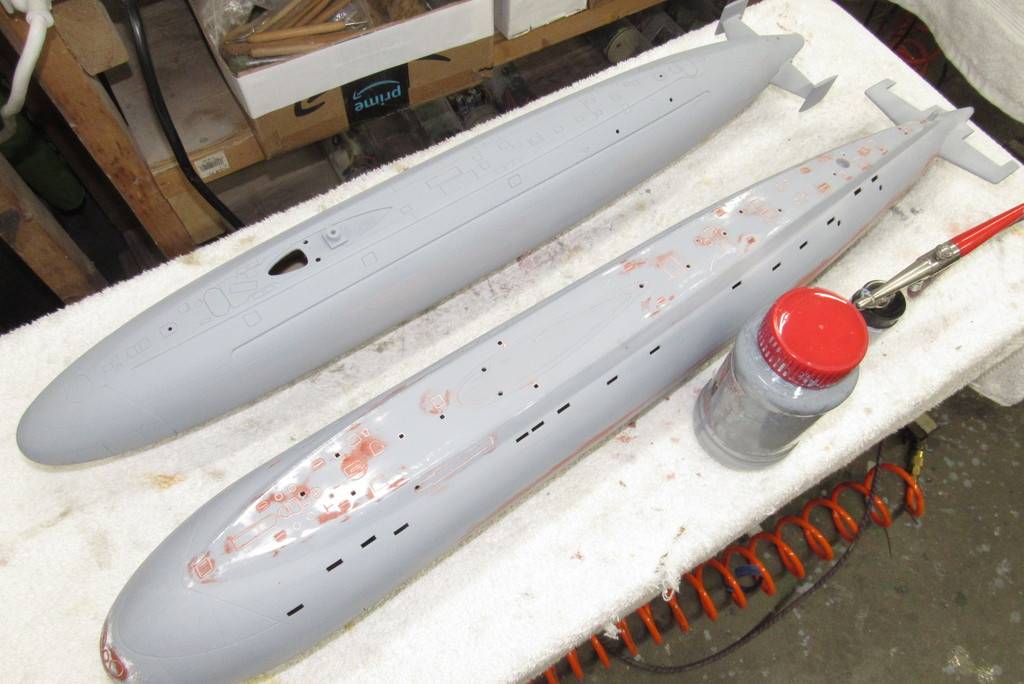
But before any new work was started on these two long-suffering projects, I scrubbed all model exterior surfaces with a Scotch scratch-pad soaked with isopropyl alcohol. This to ensure that the substrate of all parts will be free of gunk that would otherwise impede a tight bond between them and new applications of adhesives, filler, putty, primer and paint.
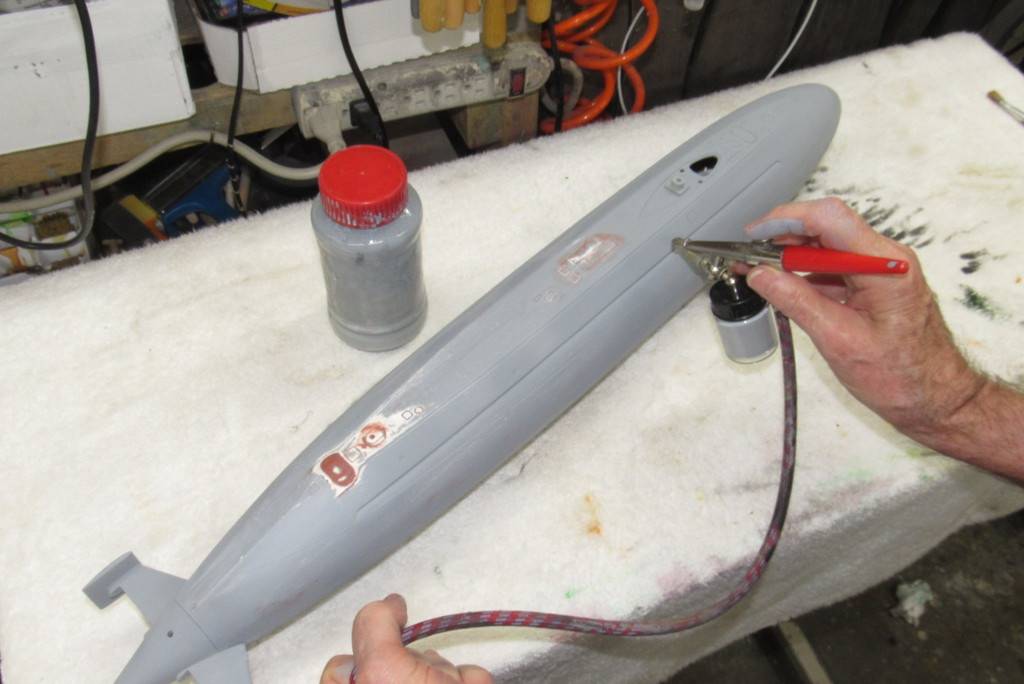
First thing after preparing the surfaces, was to cover previous puttied areas with gray primer to pick out scratch-marks and other imperfections. The neutral gray also serves to make less confusing the surfaces still requiring scribing and scratch removal tasks.
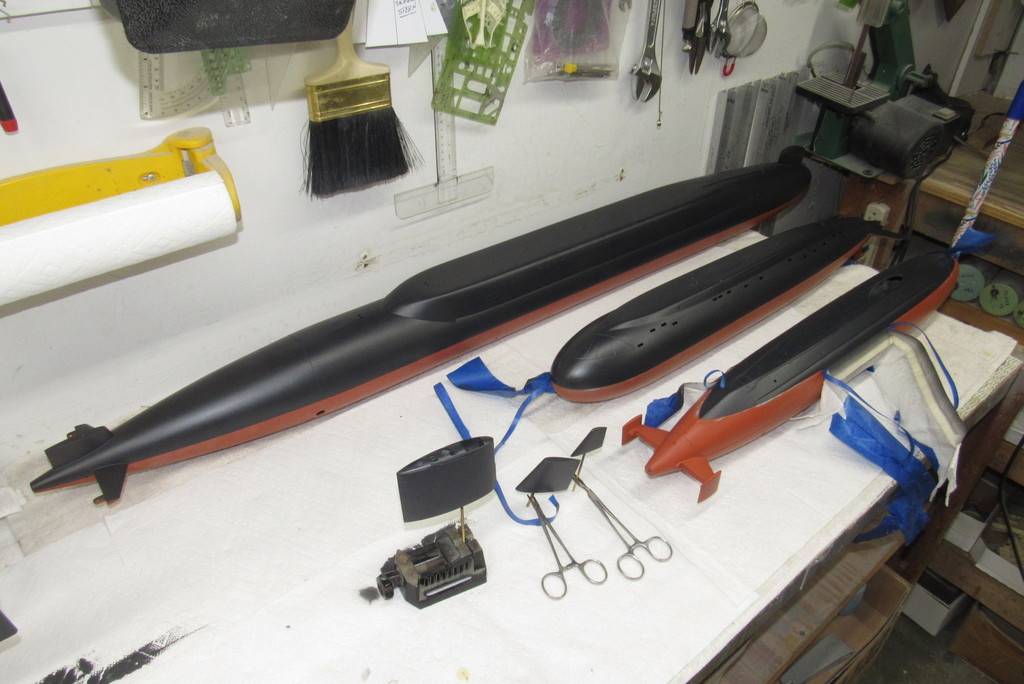
I worked both the KILO and BLUEBACK at the same time; each specific task done on the second boat right after the first – to capitalize on the simplicity of only once gathering the tools and consumables needed to do the same work on two boats – the efficiency of the production-line on display!
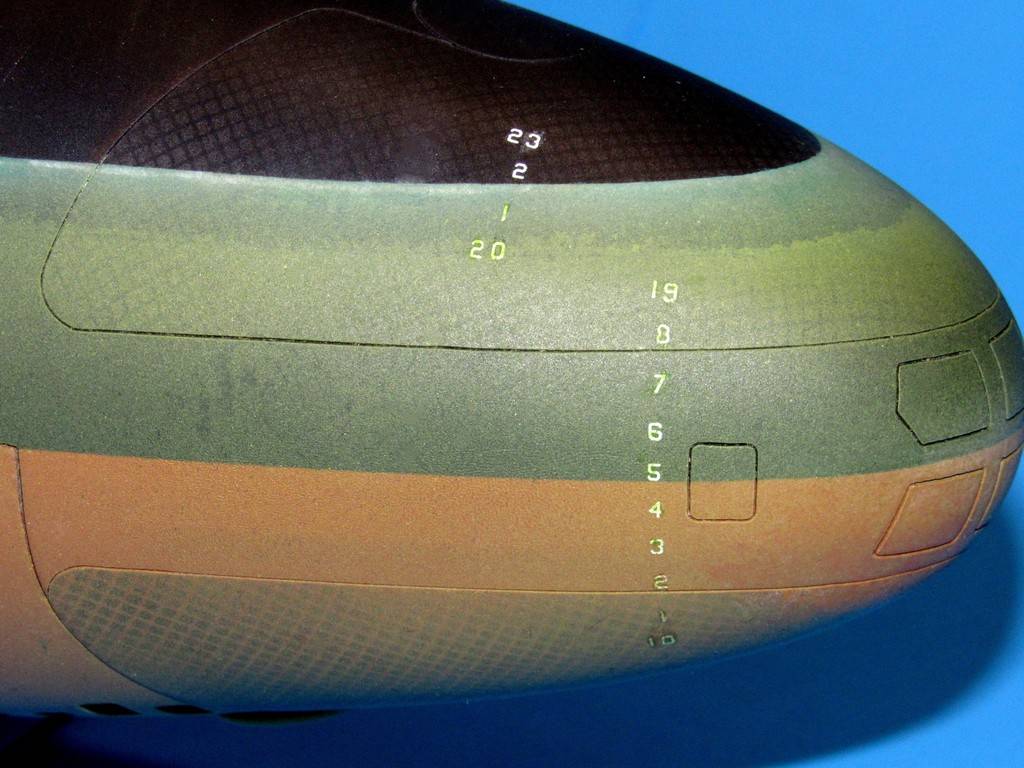
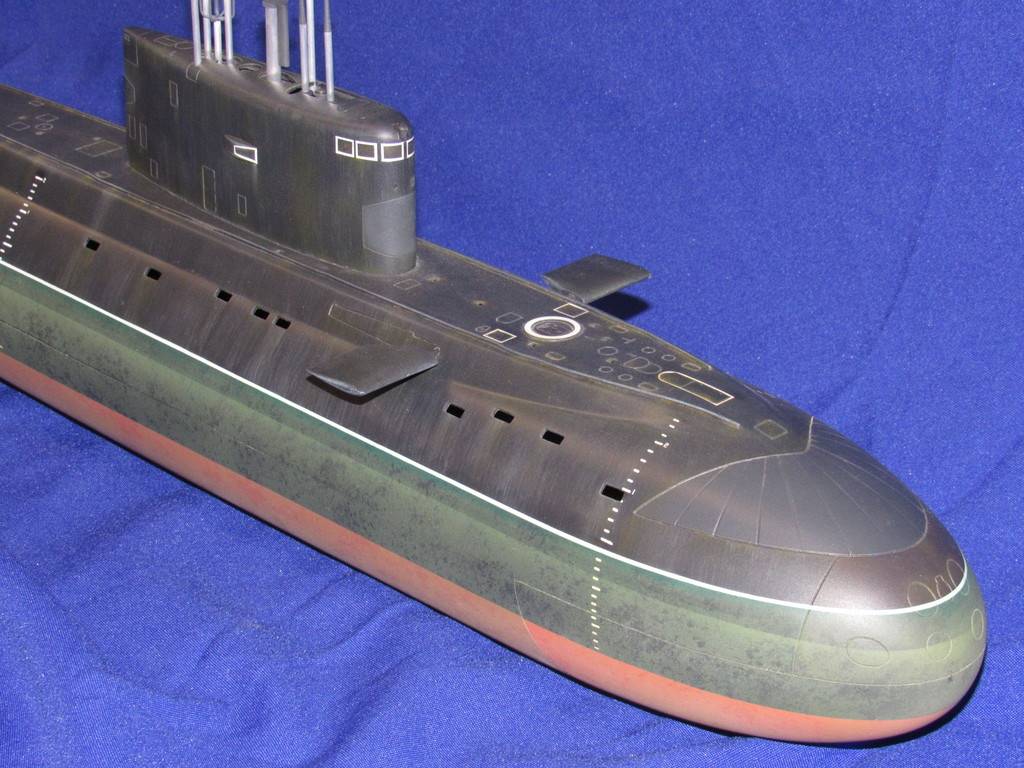
Here's a picture of the bow of the first BLUEBLACK model I completed almost a decade ago. This shows off the scribing and paint job applied, representing the end-game: the narrow, deep, well executed engraving of the torpedo tube shutter doors. The following discussion will deal with how to improve on the shallow, and unrealistically wide engraved details of the original kit parts.
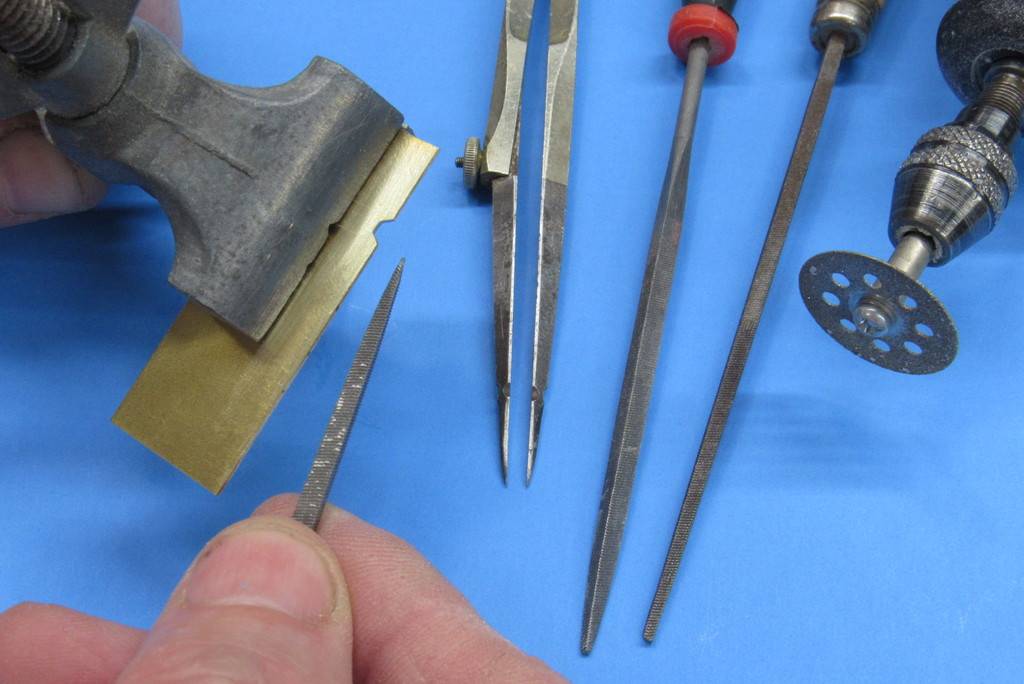
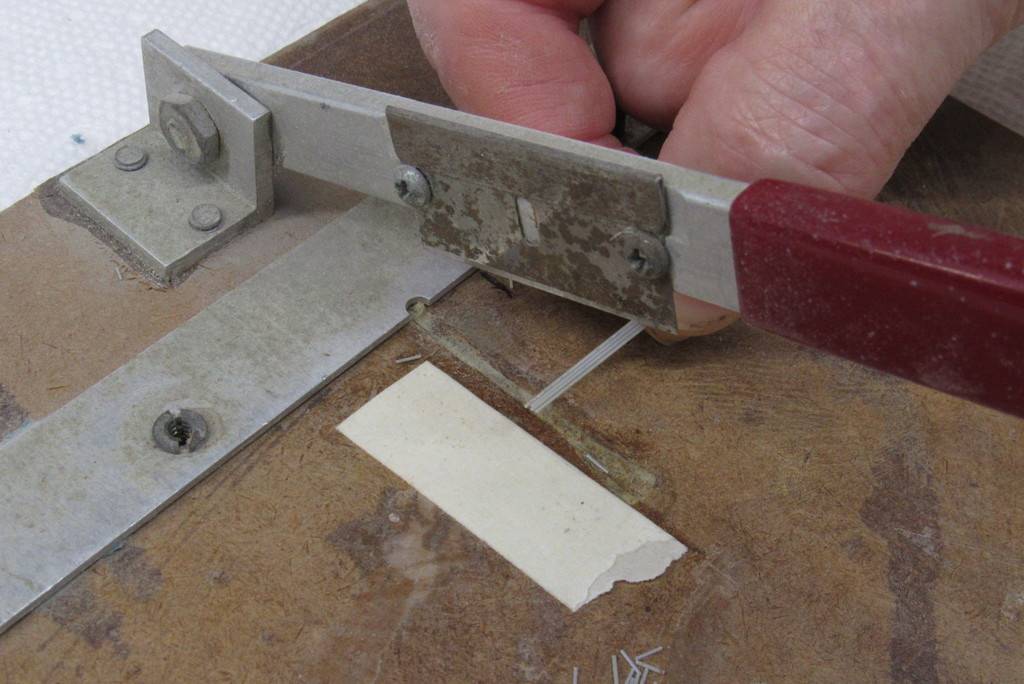
When straightening and deepening engraved lines with little to no radius I'll use a modified small razor-saw like this one. The first pass within the original engraving is done with a very light sawing motion, progressing along the length of the line till nearly to the corner. From there I switch from the sawing to a jabbing motion using the sharp 'tip' of the modified razor-saw to complete the line.
Yes! It looks like hell with all those over-strikes, but we'll fix that in a moment. Be patient, dammit!!
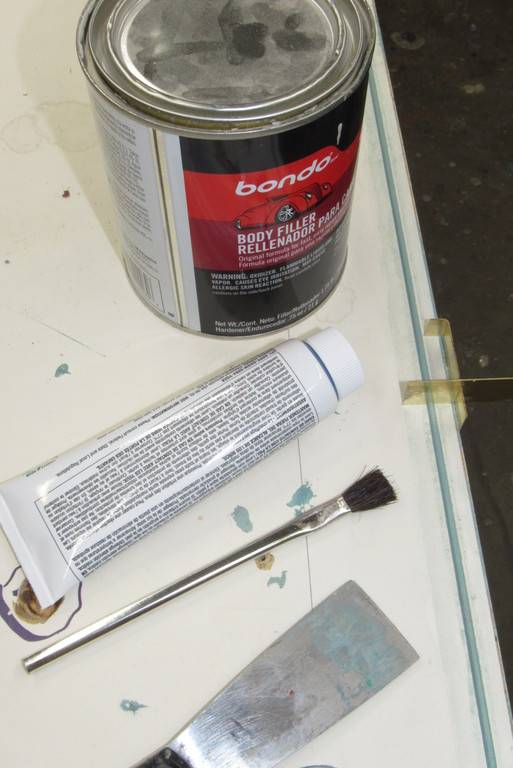
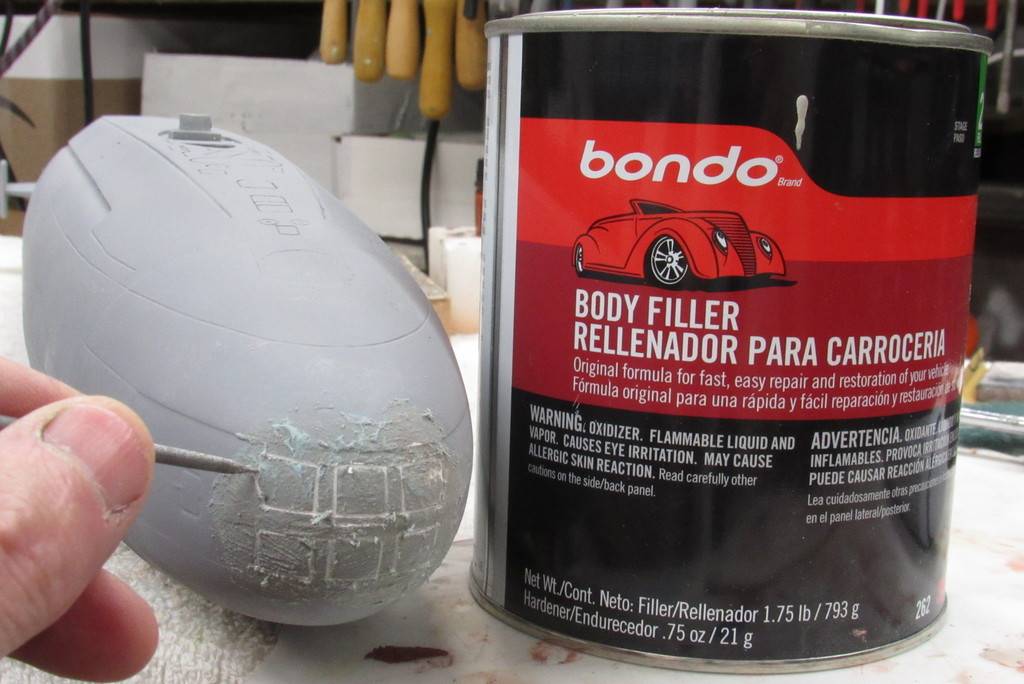
On a difficult scribing enhancement job like this – the sharp, compound curves of the bow here a perfect example – I don't worry about over-strikes with the saw or engraving tool to this point; such deep artifacts of the process soon filled and made to go away through use of a two-part automotive filler, such as Bondo.
Immediately after the catalyzed Bondo is rubbed into the work any filler that got into the improved engravings was chased out with the scribing tool.
Once the Bondo had cured reasonably hard the entire bow was wet sanded with #240 sandpaper, and all the goo rinsed off and wiped down with a paper towel. A light re-scribing to chase out all the dust, and the torpedo tube shutter doors were ready for some touch-up putty.
Though the Bondo filled almost all of the deep over-strikes and corrected other boo-boo's, there always remains, after the wet-sanding there remain small, shallow tool marks and sandpaper scratches to fill. That task performed with air-drying lacquer based touch-up putty, suitable for scratches of shallow depth.
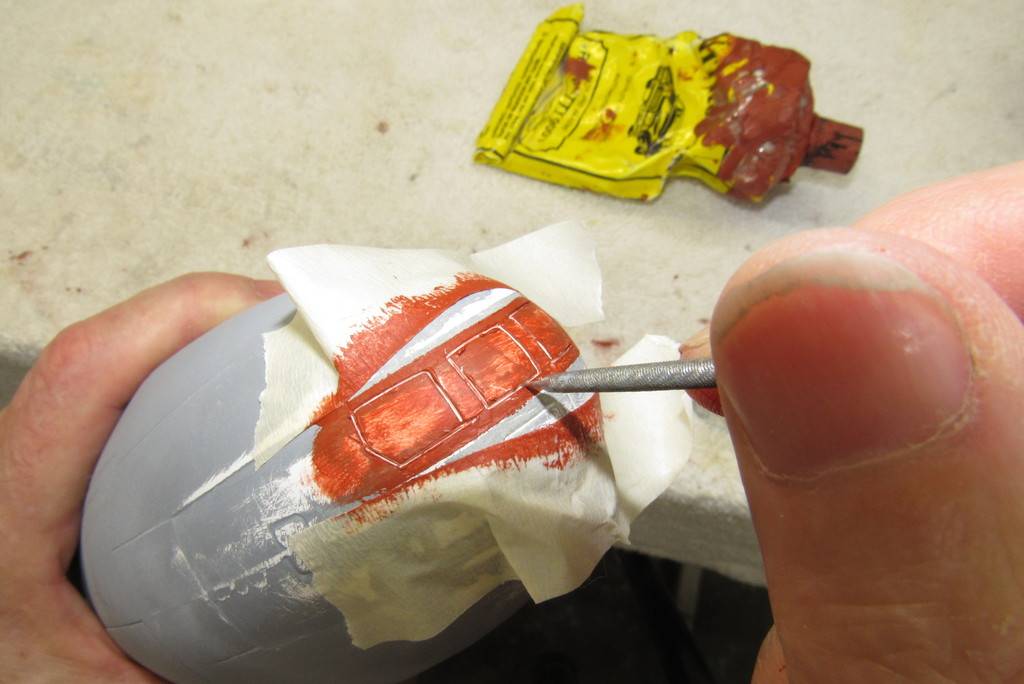
The go-to stuff in my shop is Nitro-Stan, red. You can still get this foul-smelling putty (stink is usually an indicator of quality!) through evil-bay (unless the California PC police have even managed to shut down that source of useful hydrocarbons) at a criminally high price. Don't use hobby-shop putties, they're all crap – formulated to be safe, not good!
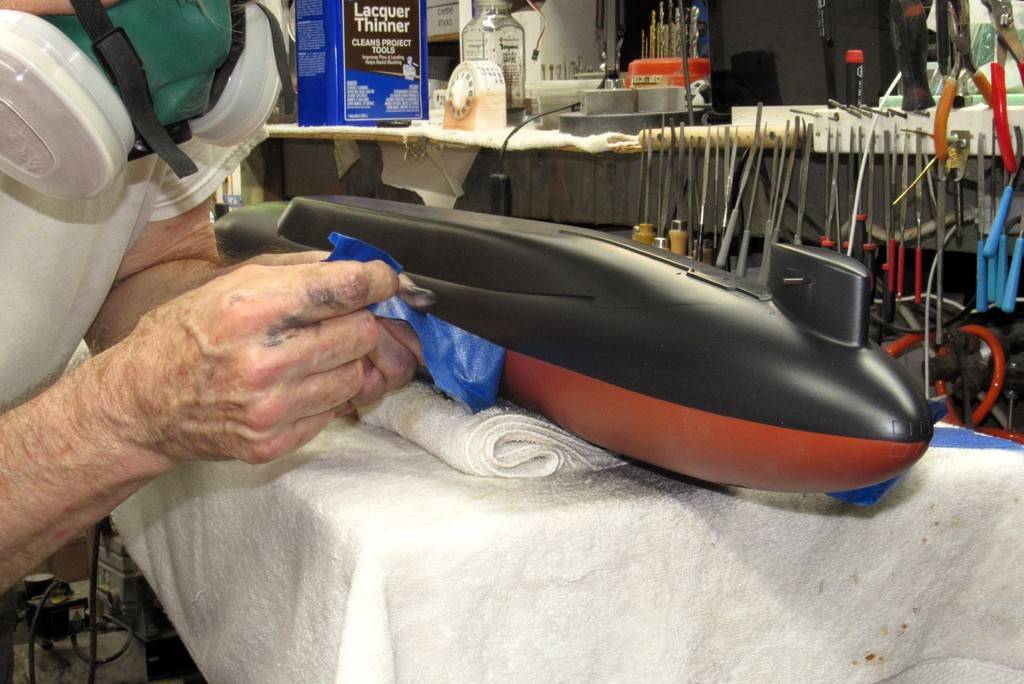
The putty is driven in with a finger and the engraved lines chased out with the scribing tool before the stuff dries hard.
Note the use of masking tape to confine the putty coverage area to only those areas of the model that needs it.
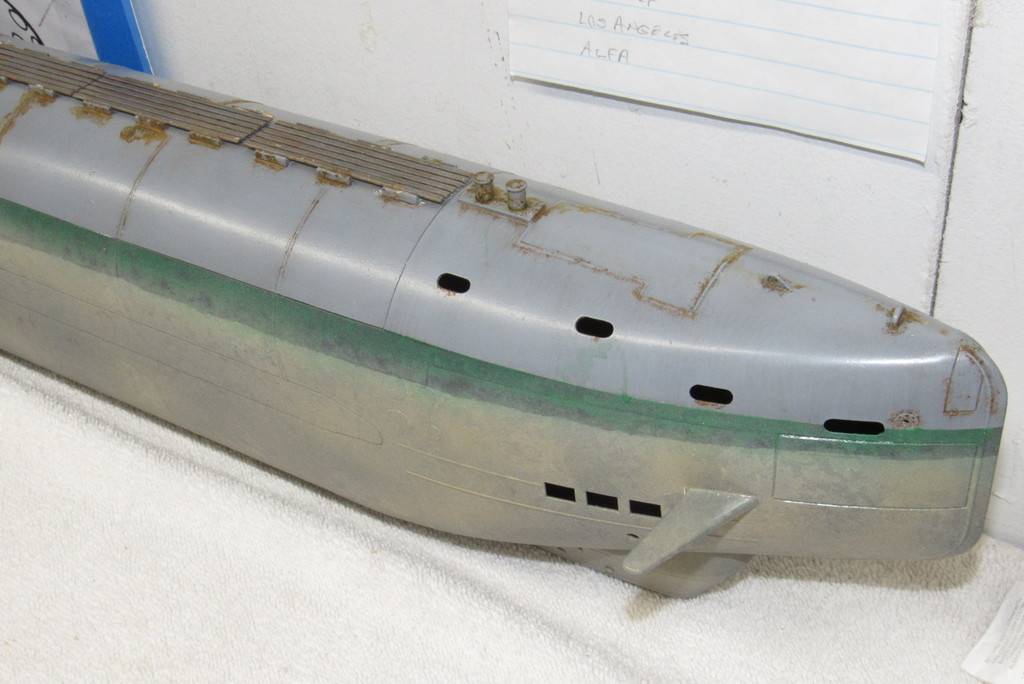
The only reason you can make out the engravings that represent the torpedo tube shutter doors at the bow of this 1/96 KILO model submarine – originally produced by Small World Models – is that I went through the effort of deepening the original engraved oval-shaped circles. Had I not engraved deeper lines the observer would be hard pressed to differentiate between hull and shutter door.
The shallow and out-of-scale wide engraved lines at the bows of the KILO and BLUEBACK hulls are not exceptions, they are the norm. For a good reason, I must add. Such details had to be marginalized owing to the production technique used to fabricate these fiberglass hulls.
During lay-up, the tools used to give form to the fiberglass laminates are of the 'hard-shell' type; easily capable of producing hundreds of parts without damage. The disadvantage of this type tool is that it will not tolerate any extreme or negative 'draft' projections or depressions within the cavity of the tool i.e., high relief detailing, such as engraved lines. So, such items must be shallow of height/depth and wide enough to resist damage to part and/or tool during part removal.
Because the shutter doors are on an area of the hull that are nearly at a right-angle to the direction the completed fiberglass part is yanked from its tool, there is a high likelihood of entrapment if the draft of the engraving (positive on the tool, negative on the part) is too severe. Hence, the very shallow and wide engravings at the bow of the model part, rendering such detail very low visibility and utility as far as being able to be seen on the completed model.
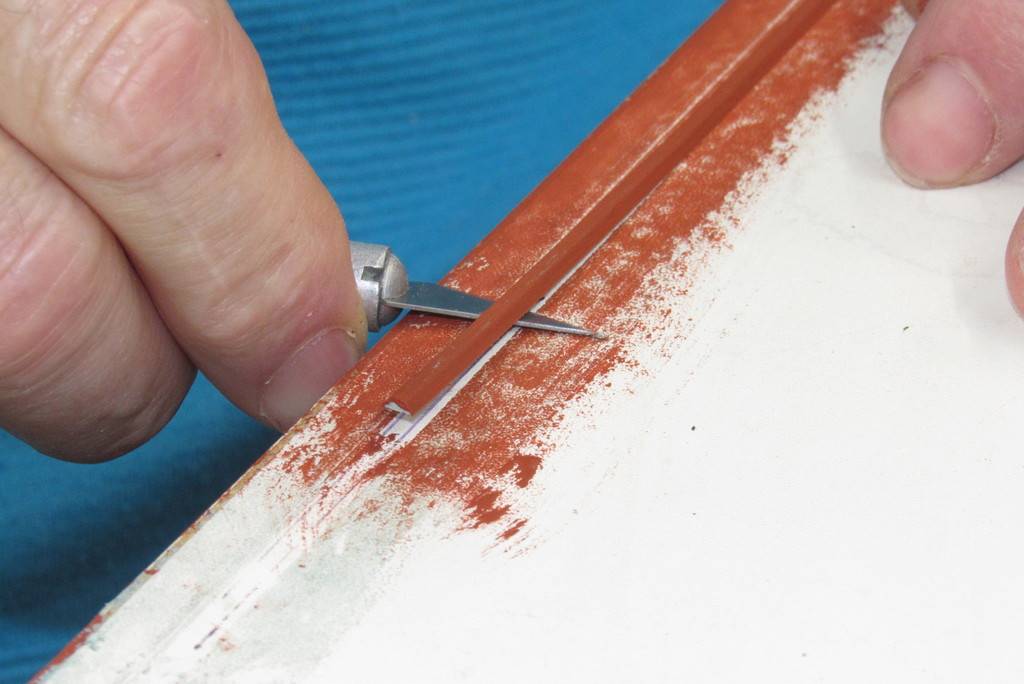
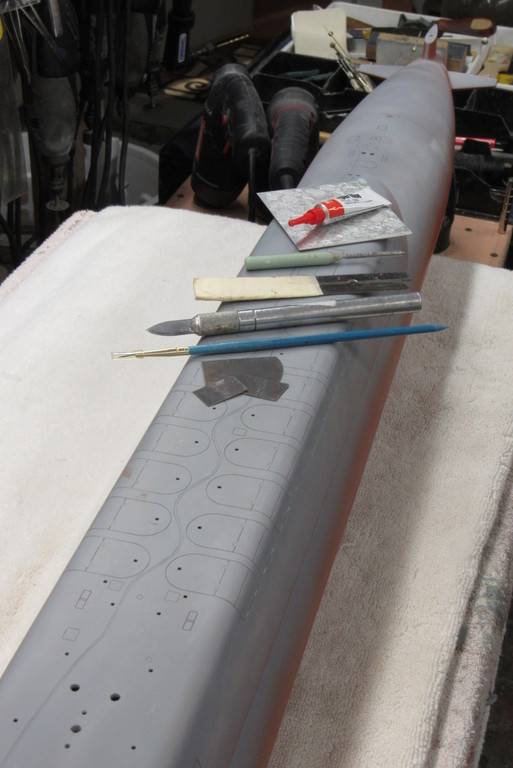
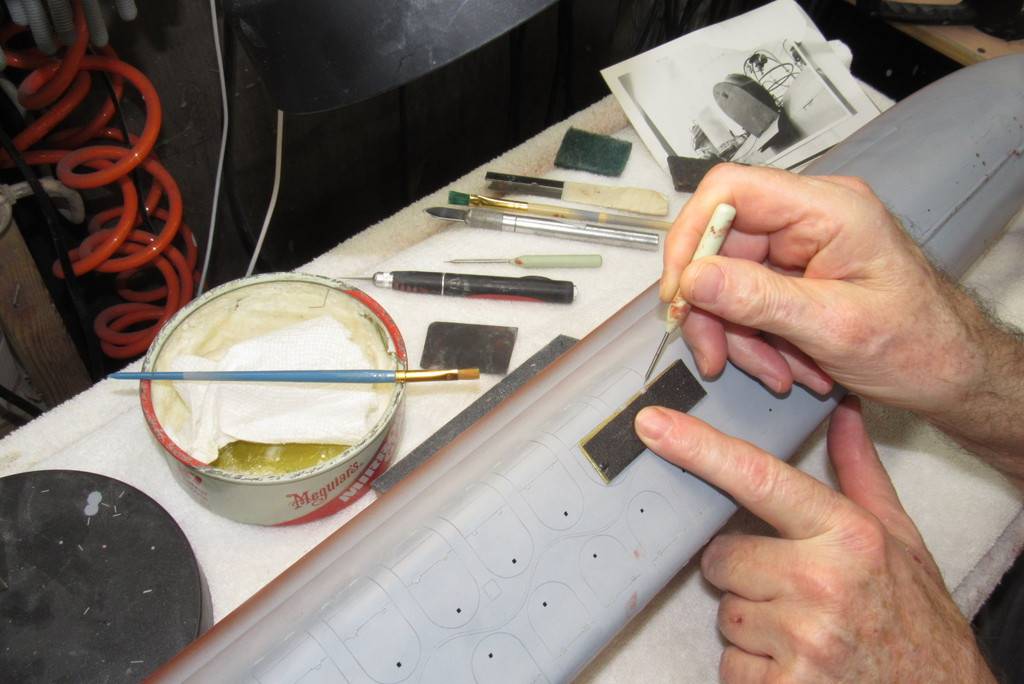
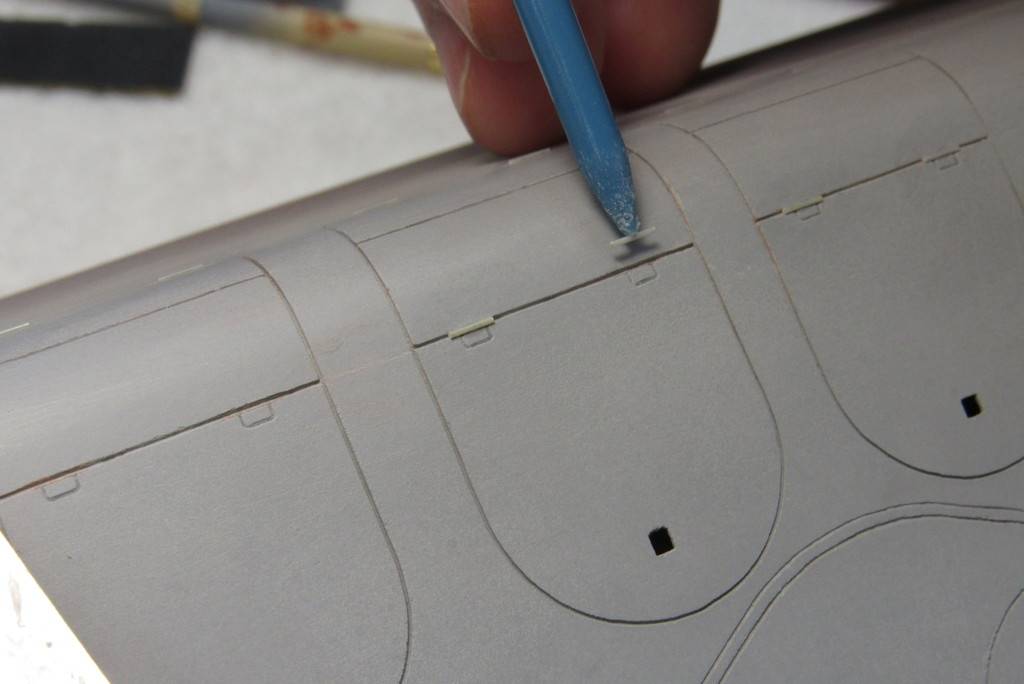
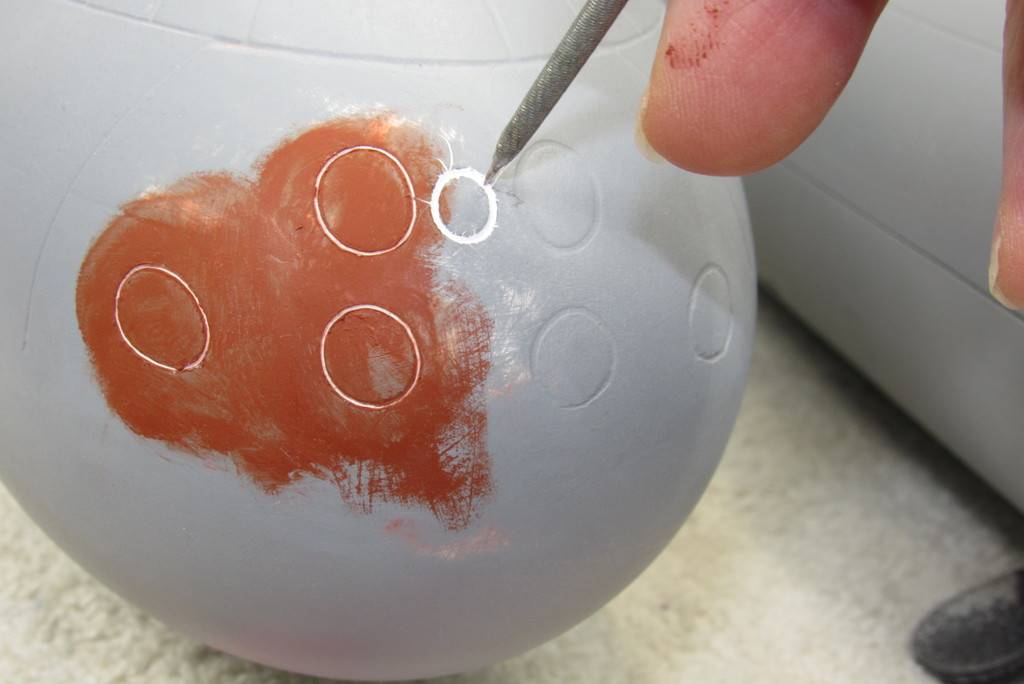
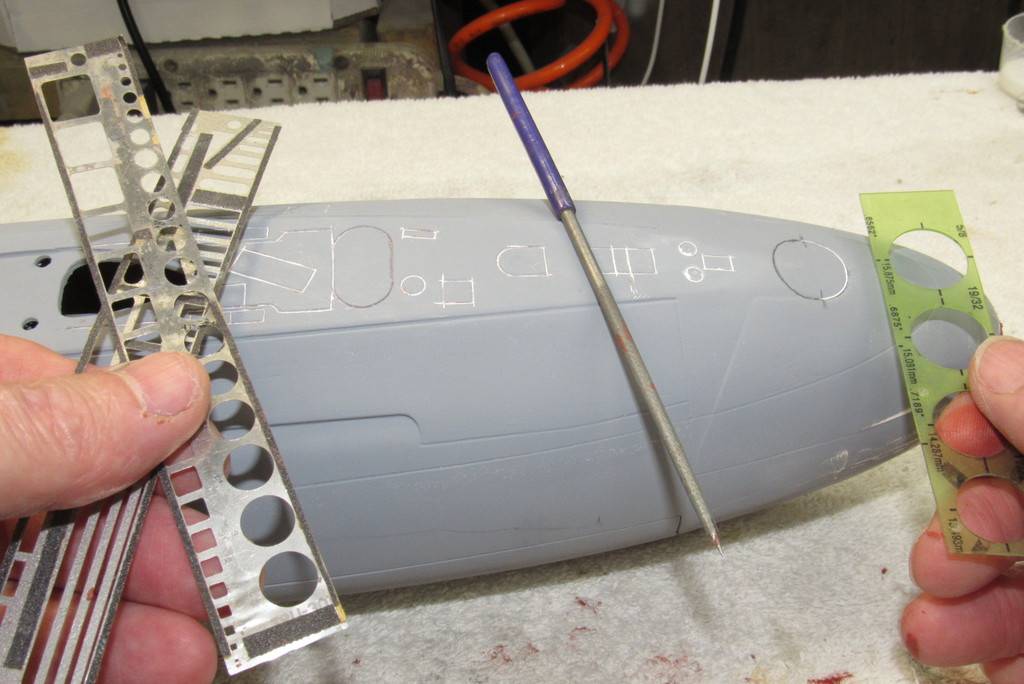
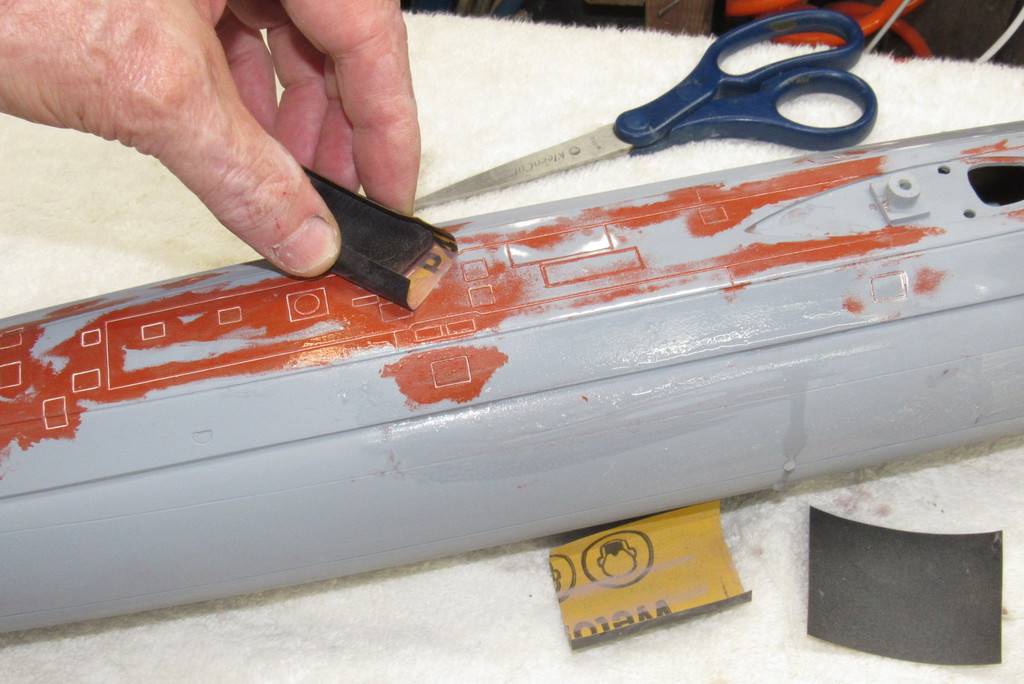
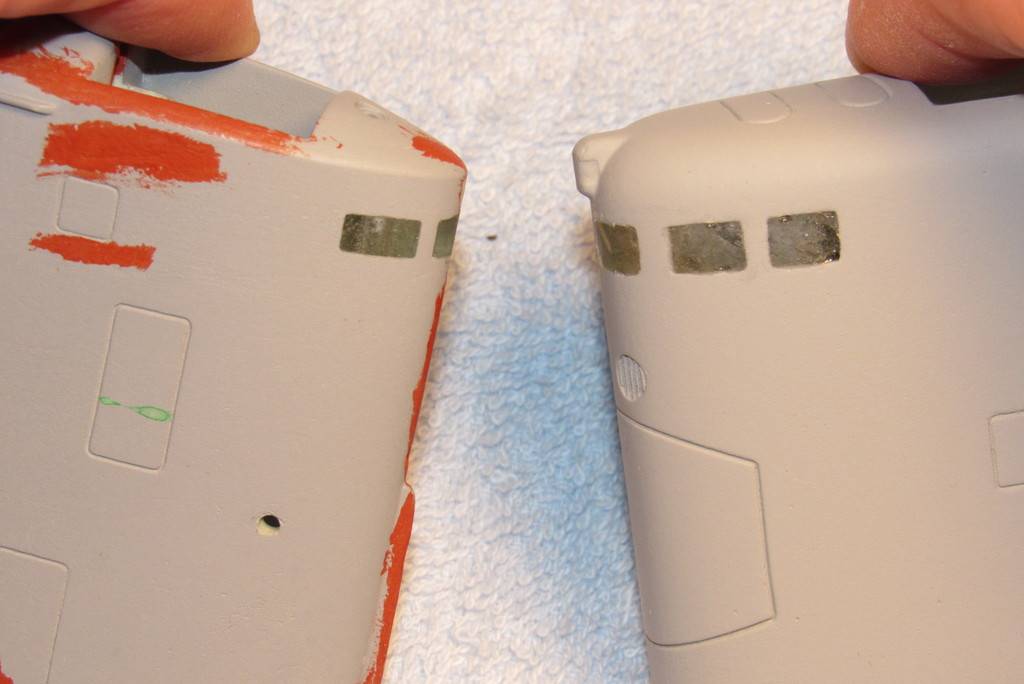
To use the existing shallow and wide engraving as a guide I take a scribing tool who's shank above the tip is a diameter that matches the width of the original engraving. That scribe is free-handed around the original engraving until it has scratched away the gray primer, revealing the white gel-coat beneath. This establishes a uniform, slightly deeper engraving which is followed by a much narrower tipped scribing tool to further deepen the engraving, but this time with an engraving depth and width more in scale with the subject.
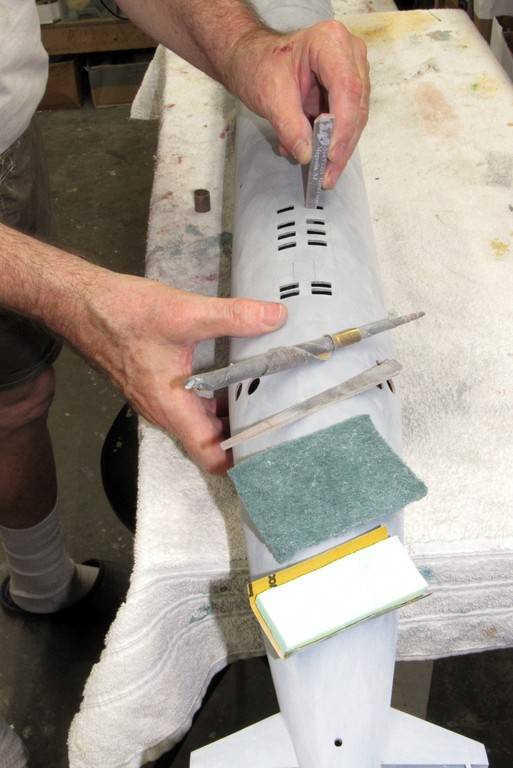
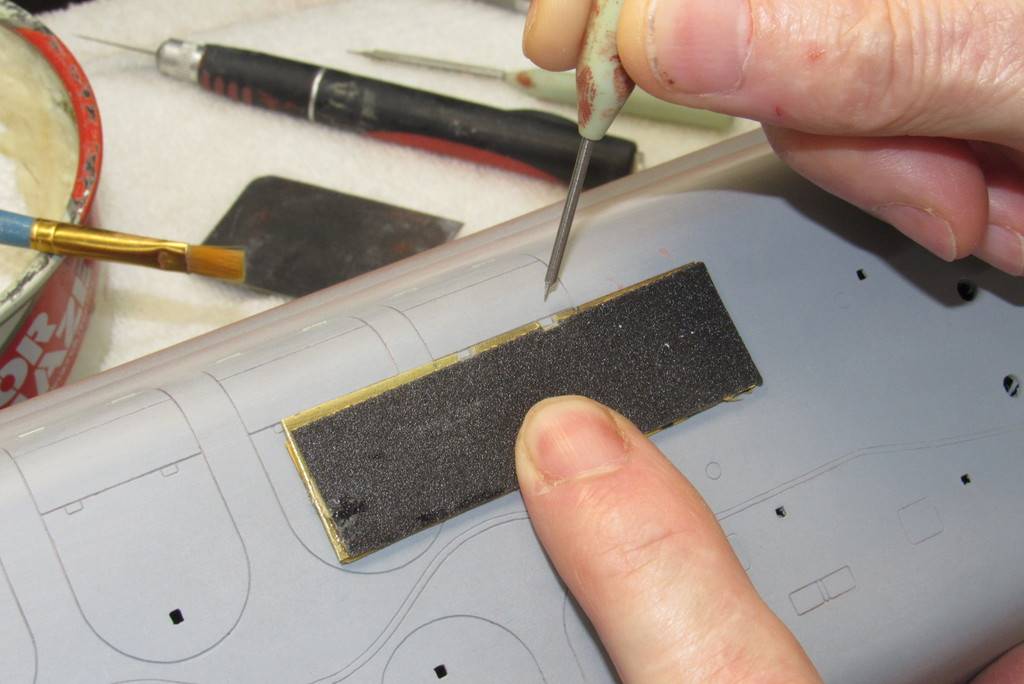
Here I'm using the 'finishing scribe' to deepen the engraving with a very narrow width.
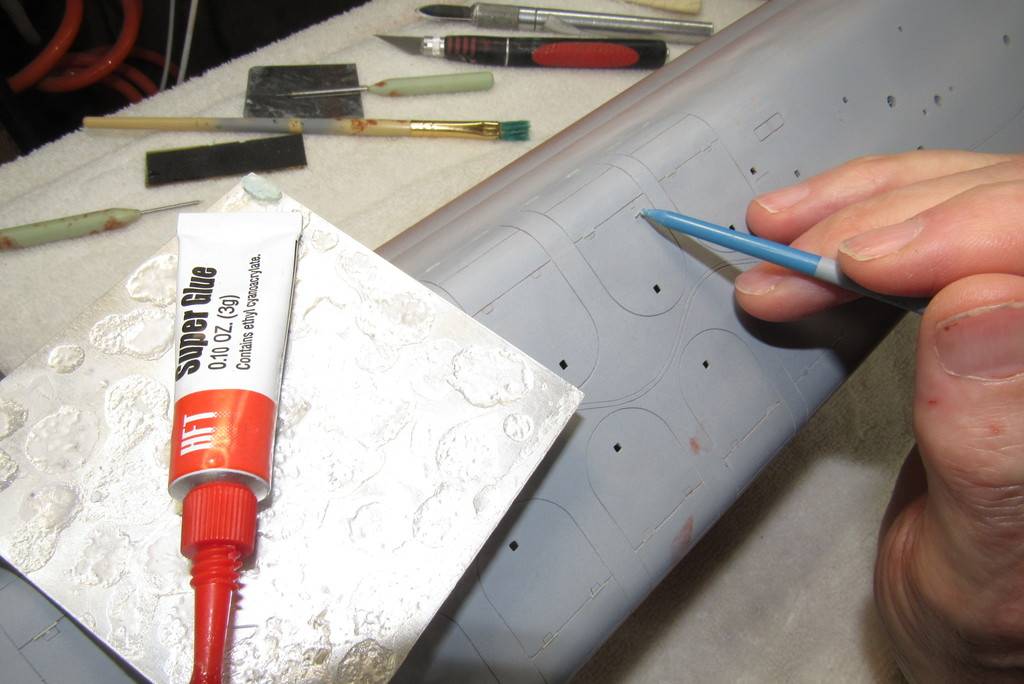
After deepening the engraving, air-dry touch-up putty is pushed into and around the new engraved line, and the putty chased out with the scribe before it can dry hard. This fills the original, wide portions of the engraving near the surface. The result is a narrow, deep engraved enhancement of the original engraved lines (ovoids in this case).
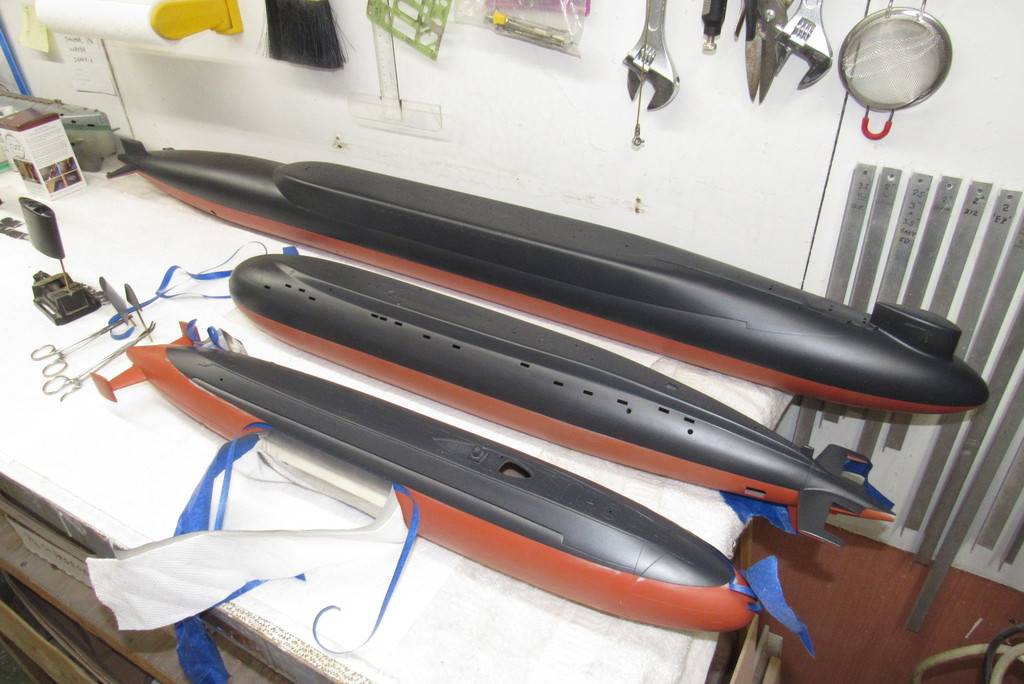
This picture, better than anything else, demonstrates the difference between original and enhanced engraved lines applied to this KILO and BLUEBLACK model hulls.
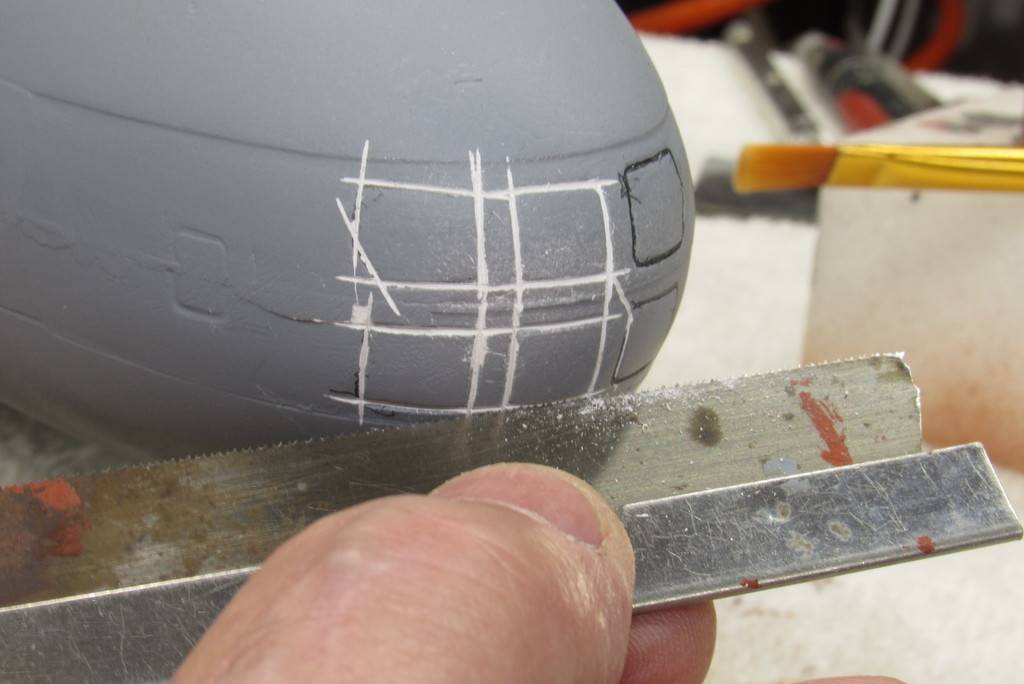
All of the re-worked, straight running engraved lines were initially deepened with the tip of my modified razor-saw, followed up with the scribing tool. For the few circle and semi-circle items on the deck and sides of the superstructure, they were scribed with the aid of stainless-steel or plastic drafting scribing/marking templates.
Using the razor-saw like this inevitably results in some over-strikes, but these are quickly addressed with touch-up putty later as I refine and further deepen the engraved lines.
Note that I've glued narrow strips of sandpaper to the face of the metal templates. This to assure a non-slide situation as I hold the template down with only finger-pressure as I guide the scribe within a template opening, digging out a narrow and deep engraved line.
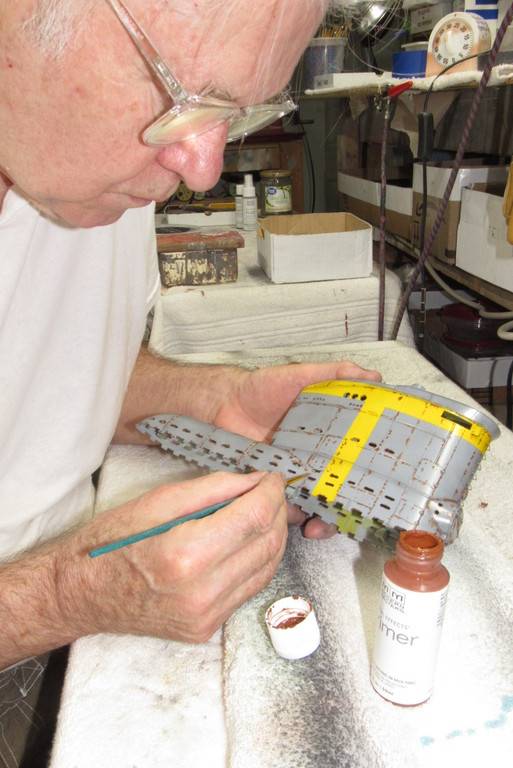
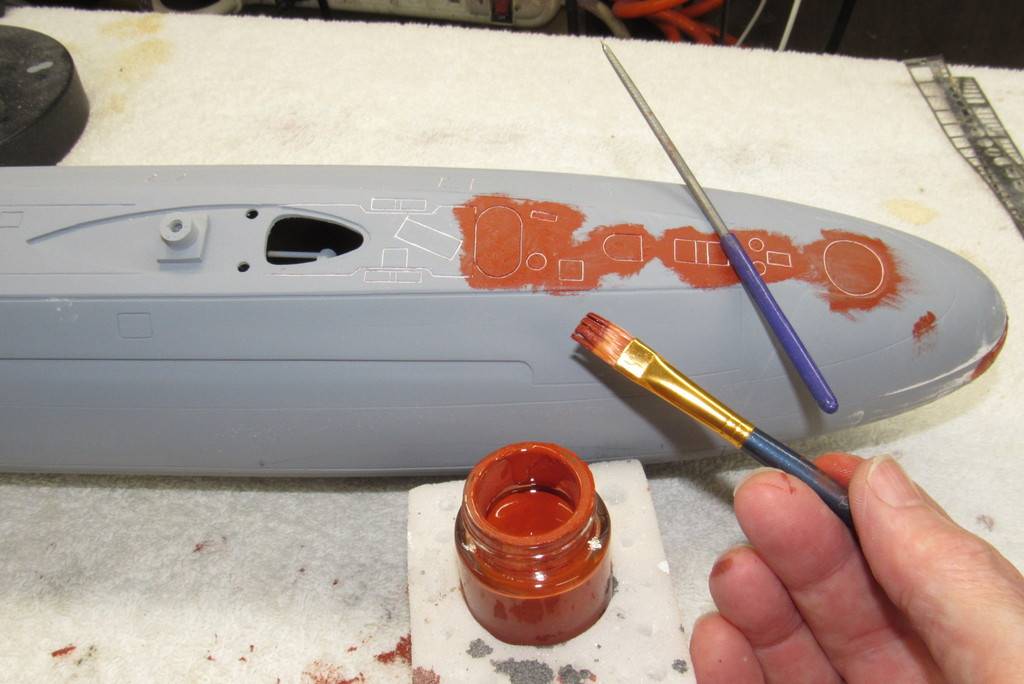
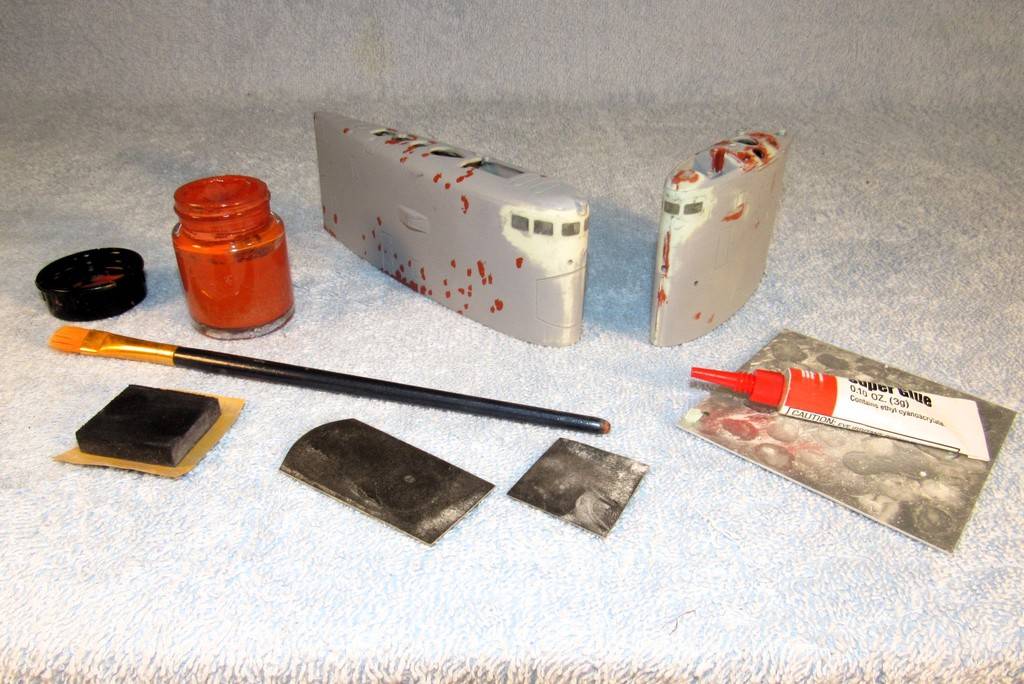
For ease of application I've placed a quantity of Nitro-Stan putty into a little paint jar. As most of the application will be with a brush, the putty is cut and mixed with a little lacquer thinner. Here I'm applying the putty to fill over strikes and other miss-adventures on and around the reworked engraved lines.
Cleaning up the over-strikes and poor quality engravings, I can assure everyone, is at least as mind-numbing a task as it is to read about it. But it's a task that's gotta be done if a quality product is to be the result!
So, strap yourself in and make what you will of the following procedural.
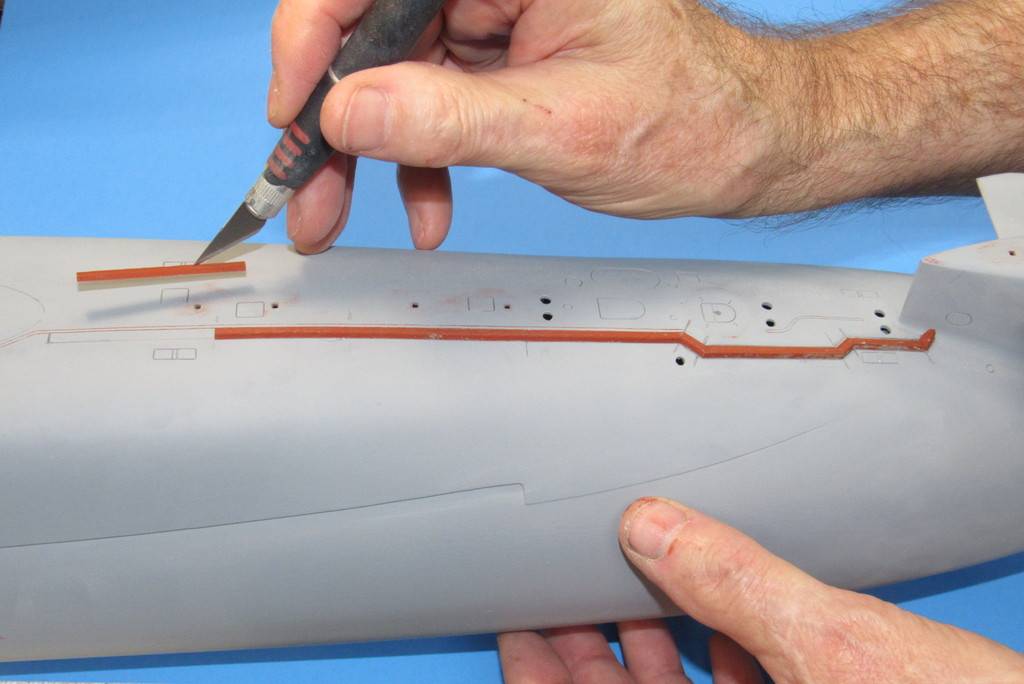
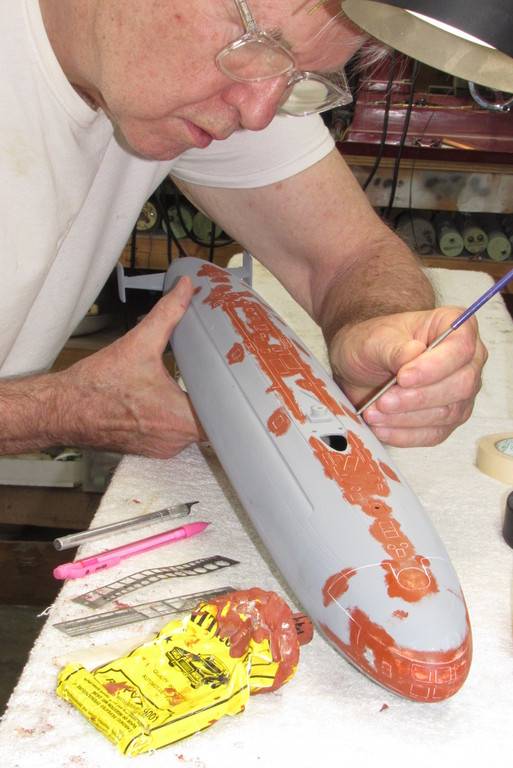
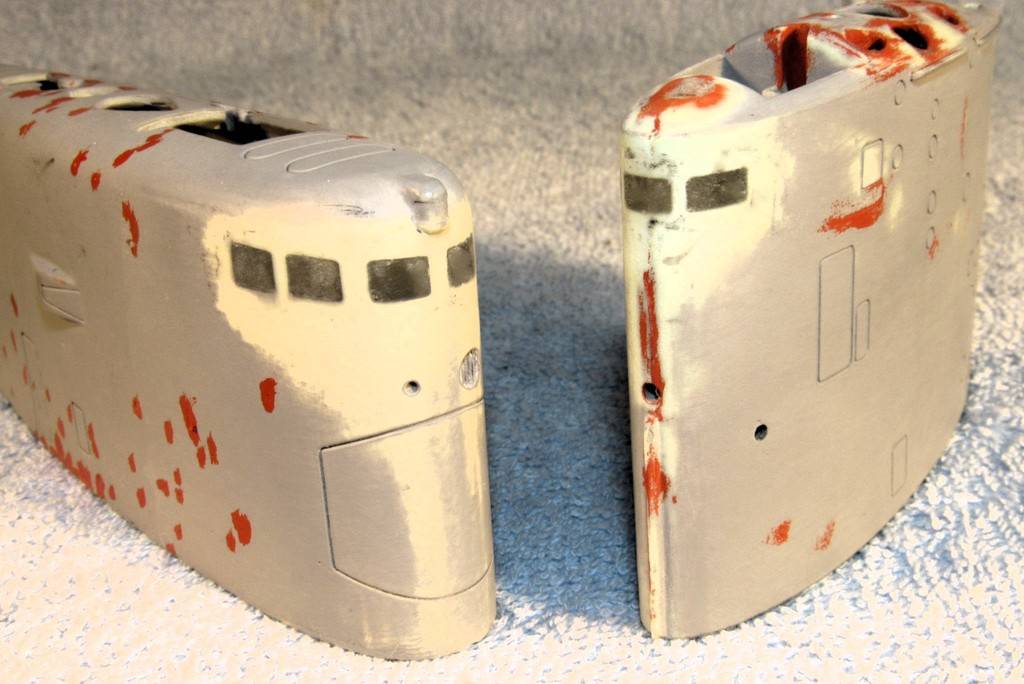
The initial scribing done forward I've applied some putty.
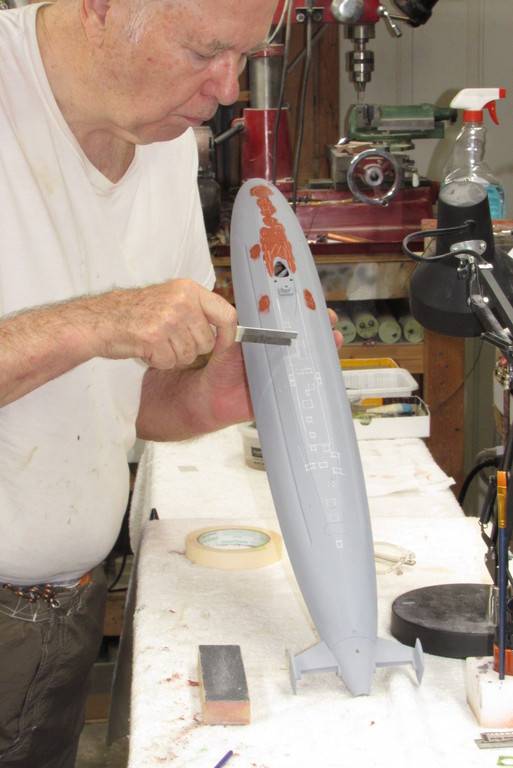
Here I'm deepening the straight running engravings with the modified razor-saw. While continuing aft along the model deck with scribing tool and saw, the putty, up forward, has plenty of time to dry.
As soon as an engraving task was completed, I brushed on air-dry Nitro-Stan touch-up putty over that work, promptly chasing out any putty that gets into the engravings.
Air dry putty is never applied thick, its only to address shallow scratches and gaps. Since this putty polymerizes (changes state from liquid/paste to solid) through evaporation of its solvent – if put on too thick it takes forever for the buried solvents within the mass to be liberated to the air. The top surface will skin hard, but underneath that the putty is still soft. A killer later!
(Two-part fillers, on the other hand, change state quickly if put down thick as the polymerization process – how the filler changes state from liquid/paste to solid – is through an exothermic reaction between the resin base and catalyst. So, with a two-part filler, the denser the mass the greater the heat generated, the quicker the cure of the filler.)
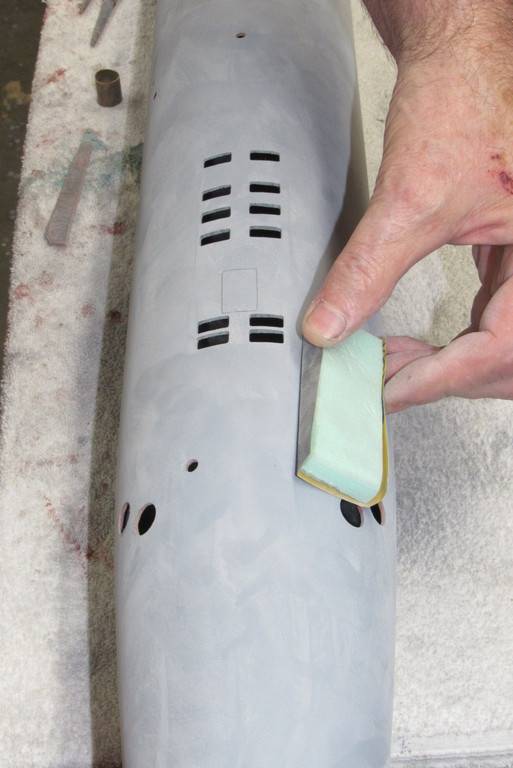
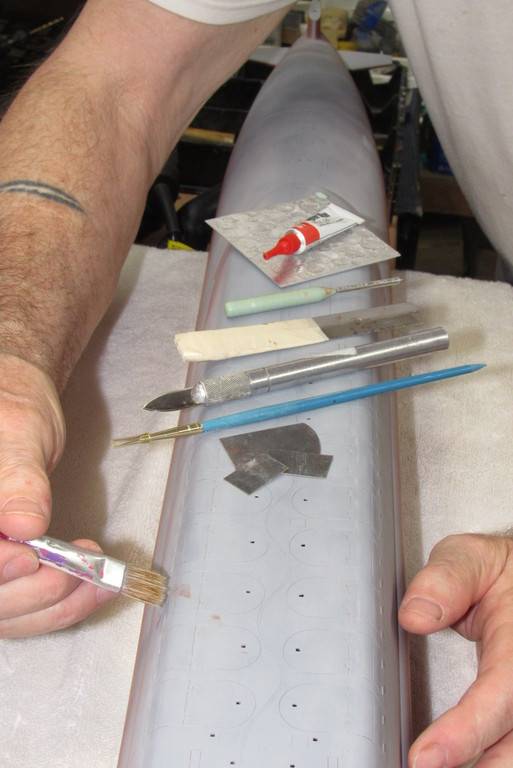
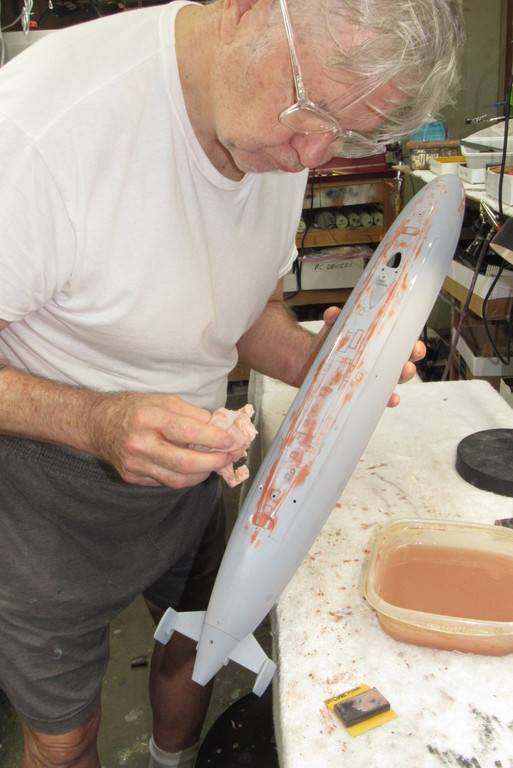
The dried putty is wet-sanded with a small hard-rubber sanding-block backing up a piece of #400 grit sandpaper. Copious amounts of water are the order of the day.
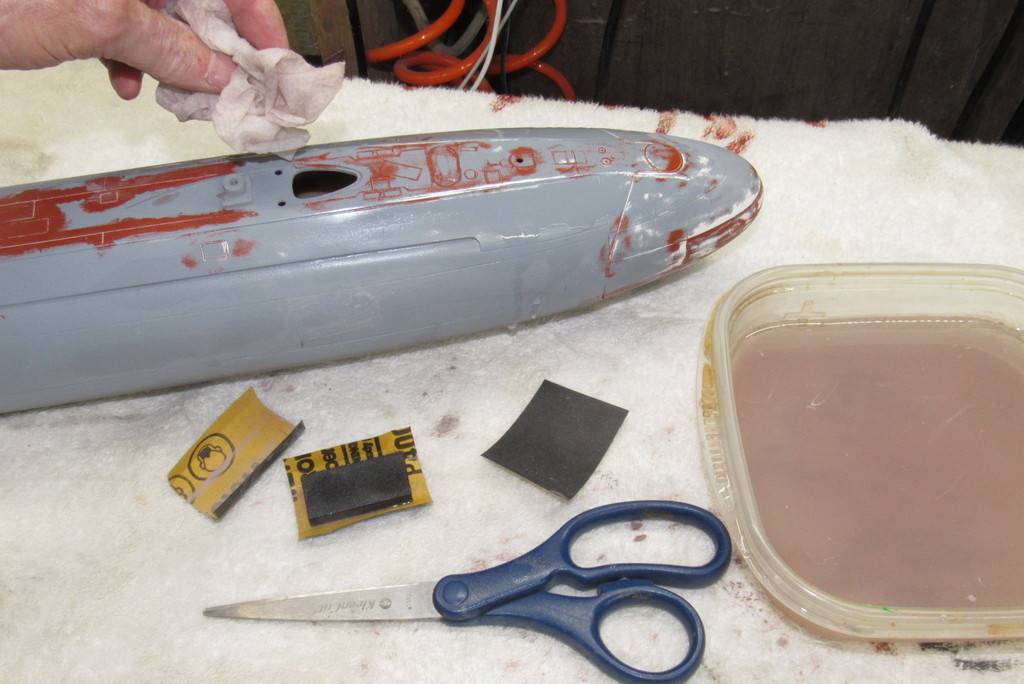
The sanding done; a wet paper towel is used to remove the water suspended sanding dust.
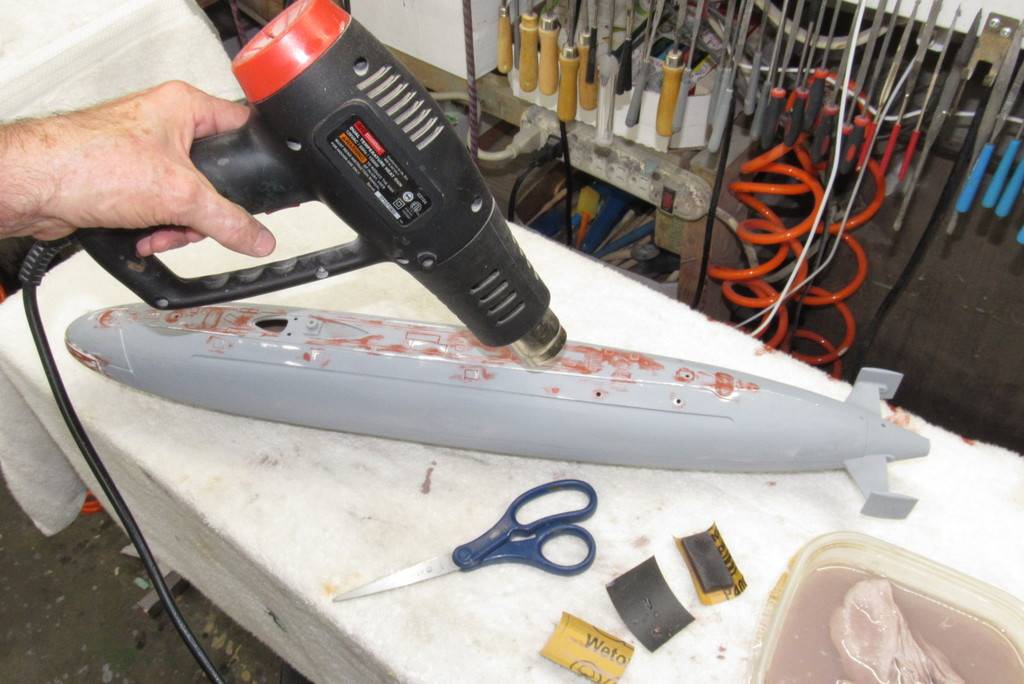
Followed by a blow-down with low pressure air to chase out any water still hiding in the engravings.
And... just to be sure... some hot air to evaporate the last traces of water.
At this stage I'm chasing out sanding dust from the THIRD scribe-putty-sand cycle!
God!... will it never end????
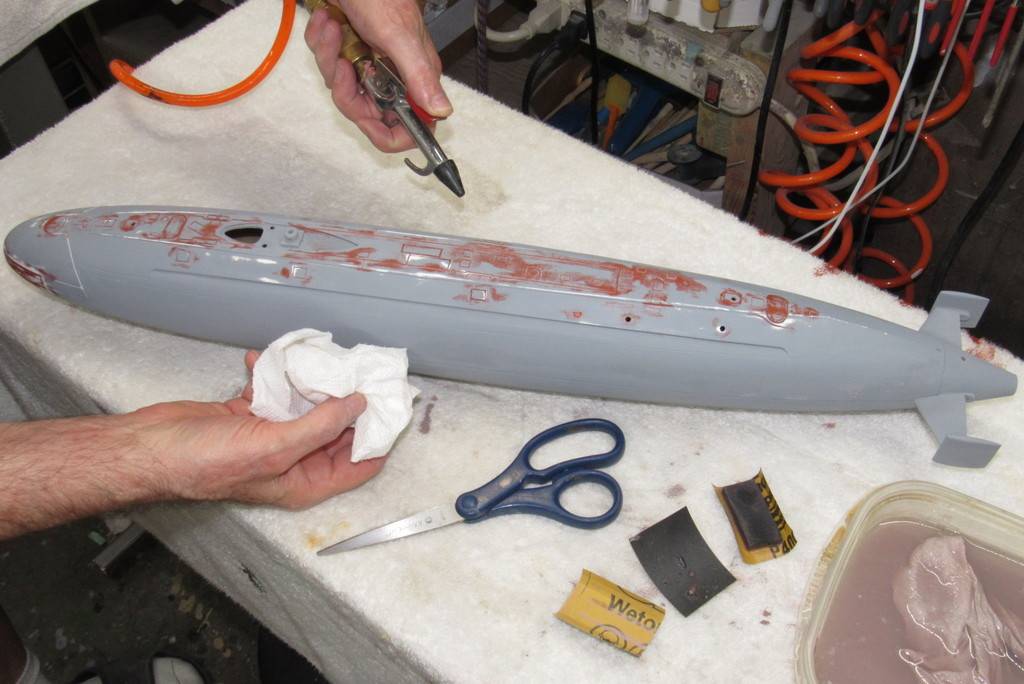
Now that the engraved lines are deep enough to guide the tool there's no need for stencils or straight-edge, just push the tip of the tool into the work and gently guide it along. This pushes any stubborn dust clear of the work. Making things ready for another coat of gray primer which further fills scratches and at the same time renders an easier to examine models surface.
To check for any missed over-strikes, misshapen engravings or other flaws, a coat of primer to fill and identify the problem children.
… and the process repeated until perfection (who am I kidding?!...) is achieved.
Have you ever considered "armoring" the front of the sail with some titanium? It's a bit of a pain to shape without a roller, but I'm pretty sure you can find pre-shaped pieces in the aircraft industry. Maybe helicopter tail rotor leading edges?
I figured since you talked about playing hard and needing to leave most masts and antennas down/off the model with one sacrificial scope for when you run into a target...
I figured since you talked about playing hard and needing to leave most masts and antennas down/off the model with one sacrificial scope for when you run into a target...
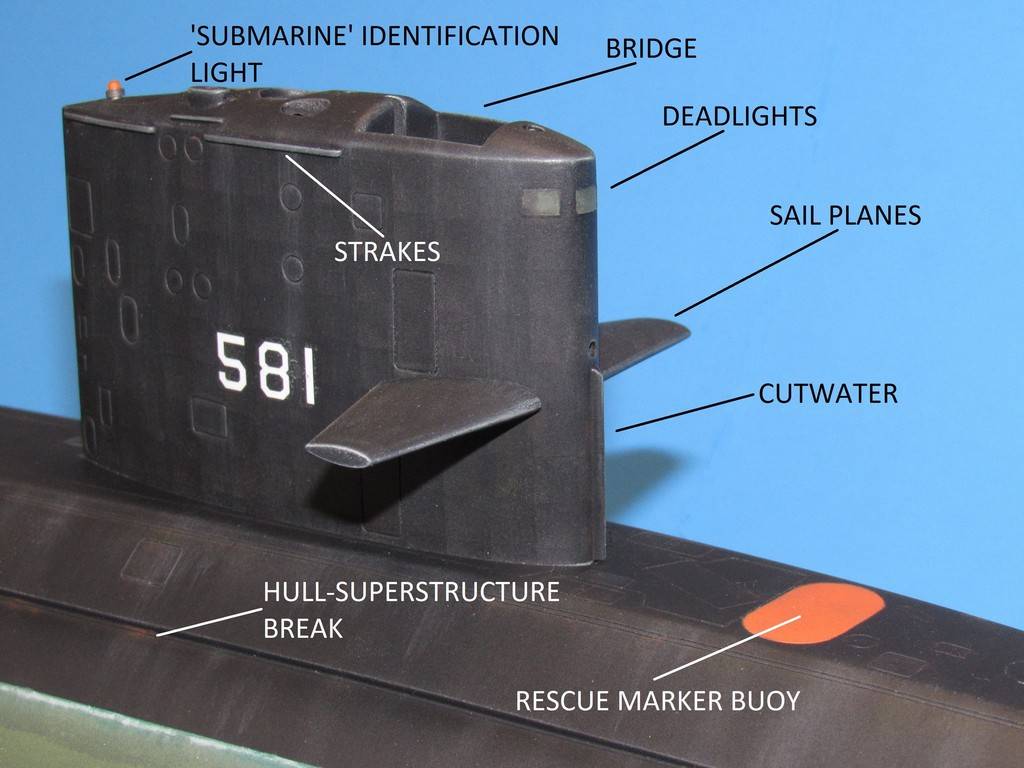
Deadlights is navy lingo for 'windows', or for that matter any transparency built into the hull or superstructure of a ship to permit the passage of light. Important before the advent of electrically driven interior illumination. Of course if the glass does not distort light too much, that same deadlight becomes a window to the outside world.
The KILO and BLUEBACK models featured these deadlights atop their respective sails. In the case of the Russian boat, the deadlights are used by the Helmsman stationed behind those deadlights when the boats maneuvering on the surface. Not so with American submarines outfitted with such deadlights – the BARBEL class boats were nearly the last class of US submarines to employ deadlights – as the space behind the deadlights was a hidy-place for the topside watch to duck into when green-water came crashing over the sail; and also offered the OOD a place to lay out and study his chart without wind and spray making a shambles of everything.
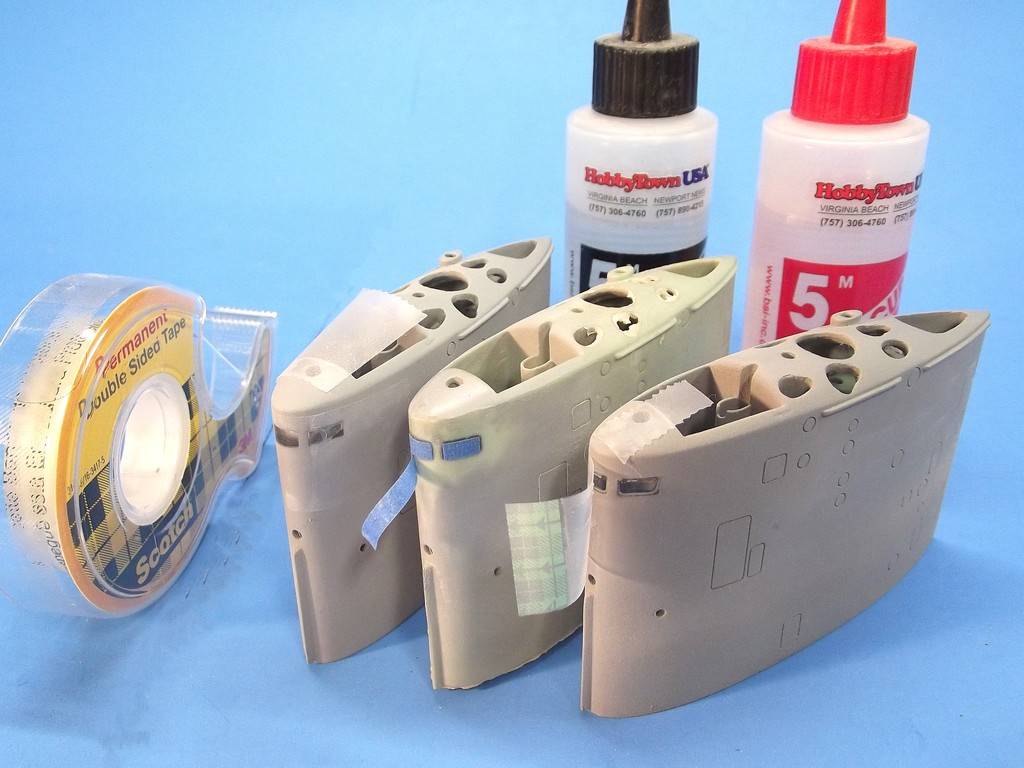
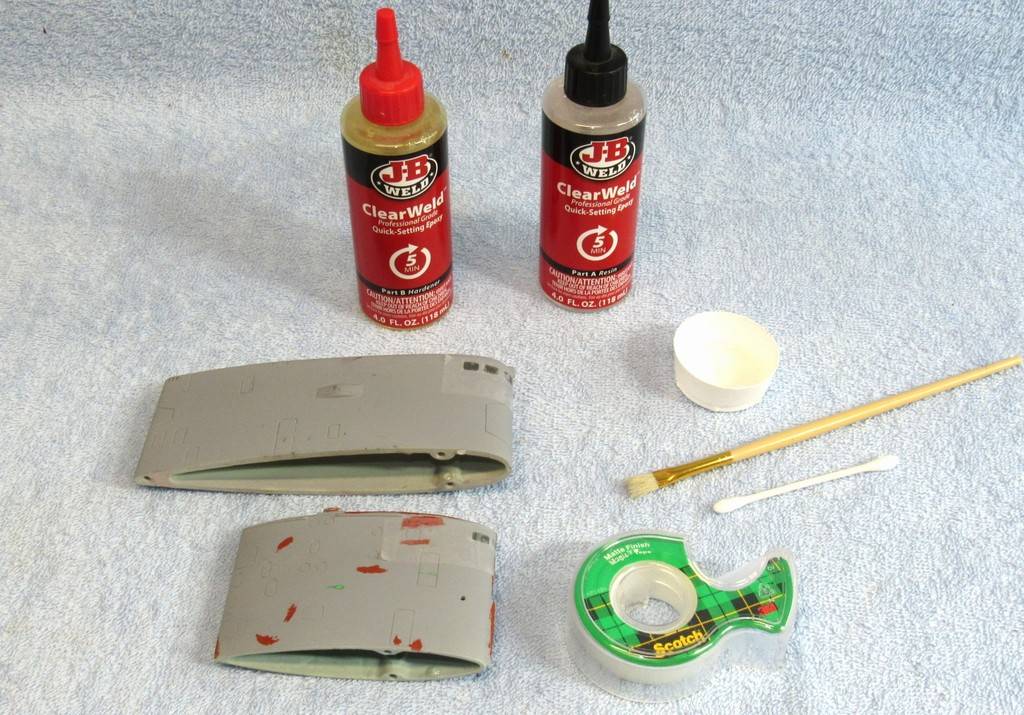
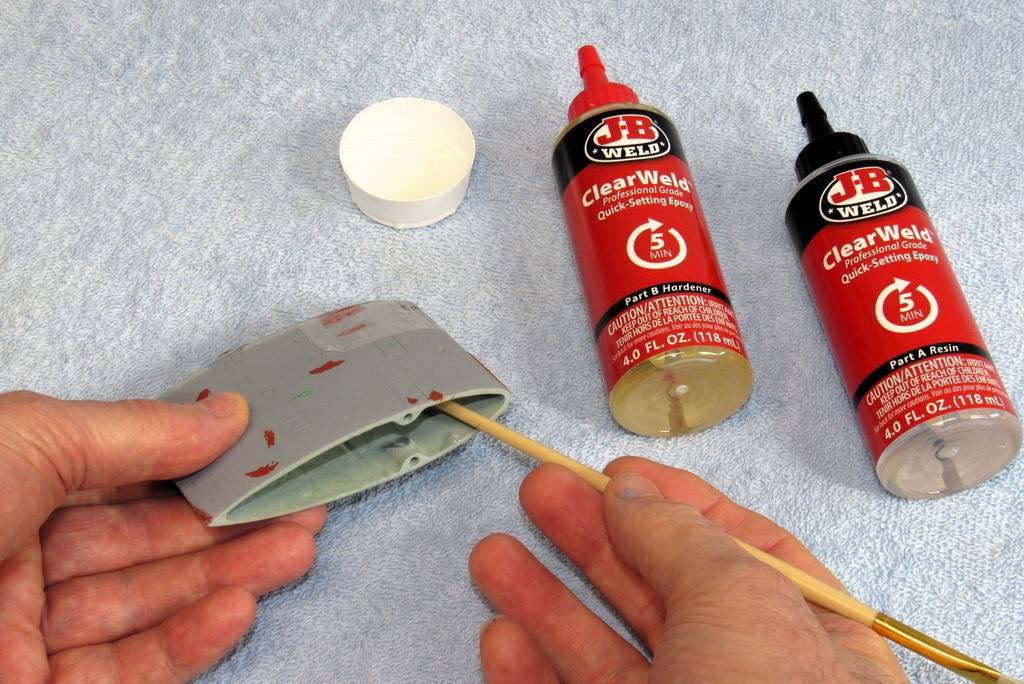
A couple of years ago I built three BLUEBACK models. Using a technique outlined by the kits originator, Dave Manley to pour-in-place resin deadlights – that work done with 5-minute epoxy glue followed by a coating of CA adhesive.
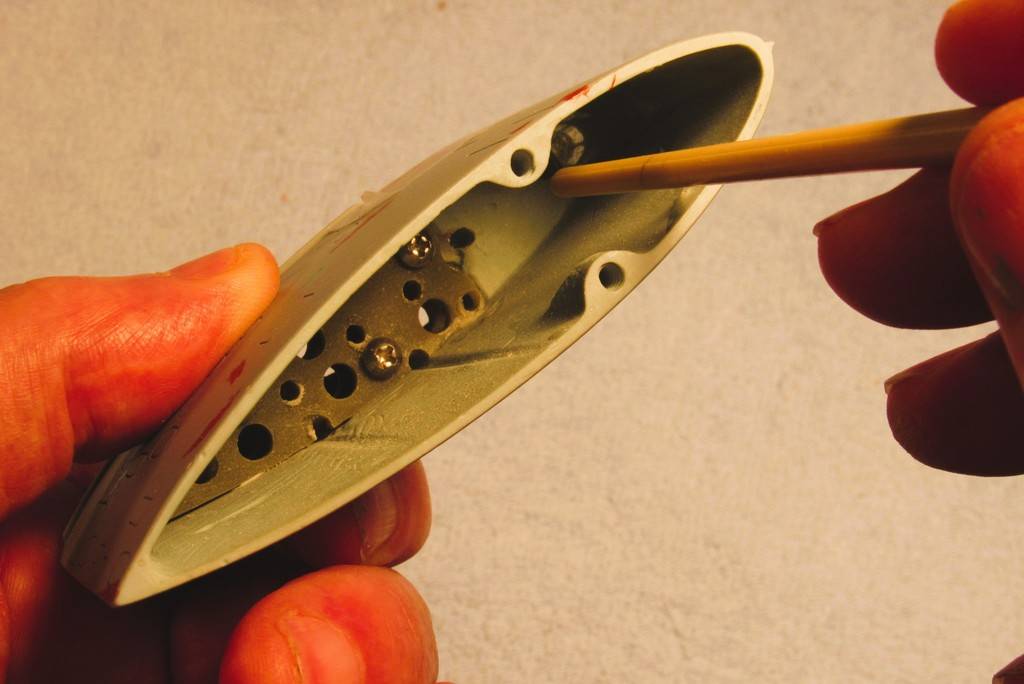
Here's the end-game: the hardened epoxy glue and CA deadlights sanded and polished flush with the leading edge of the BLUEBACK sail; masking applied, and the area around the masking given a heavy coat of black paint to prevent any 'light leakage' through the eventual paint-job.
The technique does not produce a useful transparency, but good enough for a little 1/96 scale model submarine.
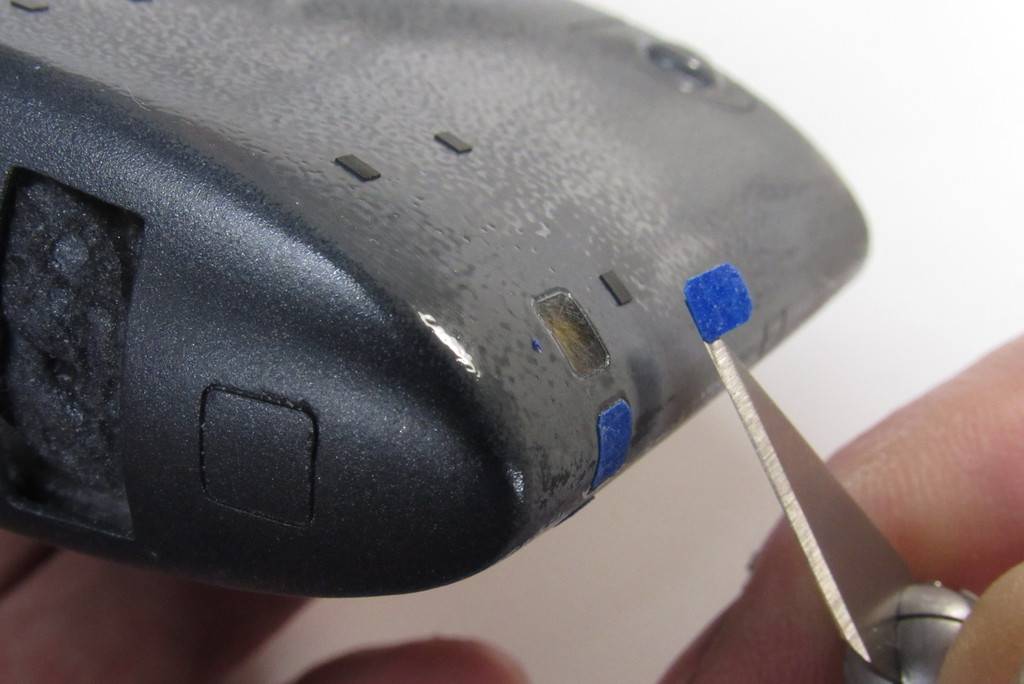
Imperfections in the deadlight are cut away and thin formula CA applied and activated. The repaired area is then filed flush and all transparent surfaces are given repeated coats of CA to form a tough, clear film over the deadlights and adjacent areas of the sails leading edge.
The BLUEBACK, like her two sisters, was a diesel boat. Meaning it was married pretty much to the surface or snorkel depth whether the seas were calm or boiling. If on the surface, and the weather gets foul, it's bad ju-ju to dive the boat to get out of the weather, as there is a brief window as the ballast tanks fill where free-water might get away from you and roll the boat.
So, Diesel boats tend to ride it out on the surface no matter how bad the weather gets.
Believe me, I know, I was on the TRUTTA standing bridge lookout watches during many squalls and one hurricane and we took face fulls of green water for hours on end (Our GUPPY-2A had a stepped sail that put our pusses only fifteen-feet above the water. If you didn't duck behind the deadlights a wave could throw your inattentive ass back into the sail and you'd wake up wrapped around the periscope shears.
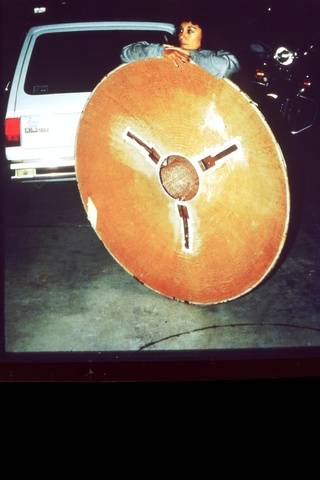
That hemispherical clear acrylic windshield. Useless!
Not TRUTTA, but representative of a GUPPY's stepped sail
The BLUEBACK, like her two sisters, was a diesel boat. Meaning it was married pretty much to the surface or snorkel depth whether the seas were calm or boiling. If on the surface, and the weather gets foul, it's bad ju-ju to dive the boat to get out of the weather, as there is a brief window as the ballast tanks fill where free-water might get away from you and roll the boat.
So, Diesel boats tend to ride it out on the surface no matter how bad the weather gets.
Believe me, I know, I was on the TRUTTA standing bridge lookout watches during many squalls and one hurricane and we took face fulls of green water for hours on end (Our GUPPY-2A had a stepped sail that put our pusses only fifteen-feet above the water. If you didn't duck behind the deadlights a wave could throw your inattentive ass back into the sail and you'd wake up wrapped around the periscope shears.
That hemispherical clear acrylic windshield. Useless!
Not TRUTTA, but representative of a GUPPY's stepped sail
The 640-class SSBNs did have deadlights in the sail.
And if the waves were right and we hadn't finished blowing all the water out of the tanks yet (first surfaced bridge watches), we'd take an occasional wave up the sail and a face full of green water.
Yeah. Did nine patrols on the WEBSTER, a 616 class boat. Doing a 1/96 model of the pig-fish now. Yup, deadlights. What a stinky place to be, heading back through the channel after a two-month patrol!
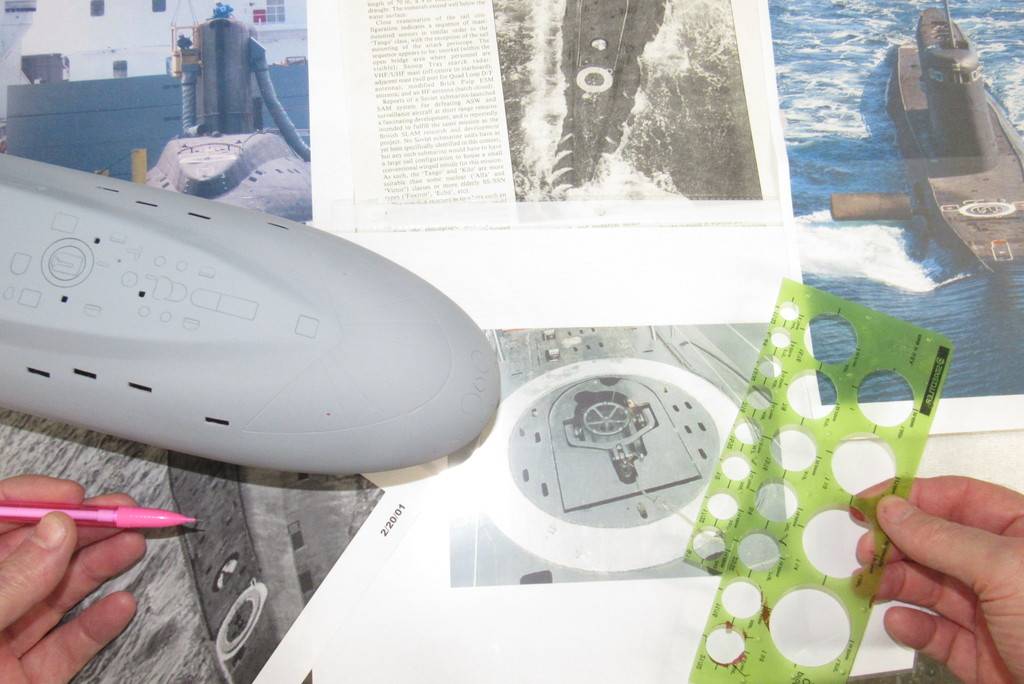
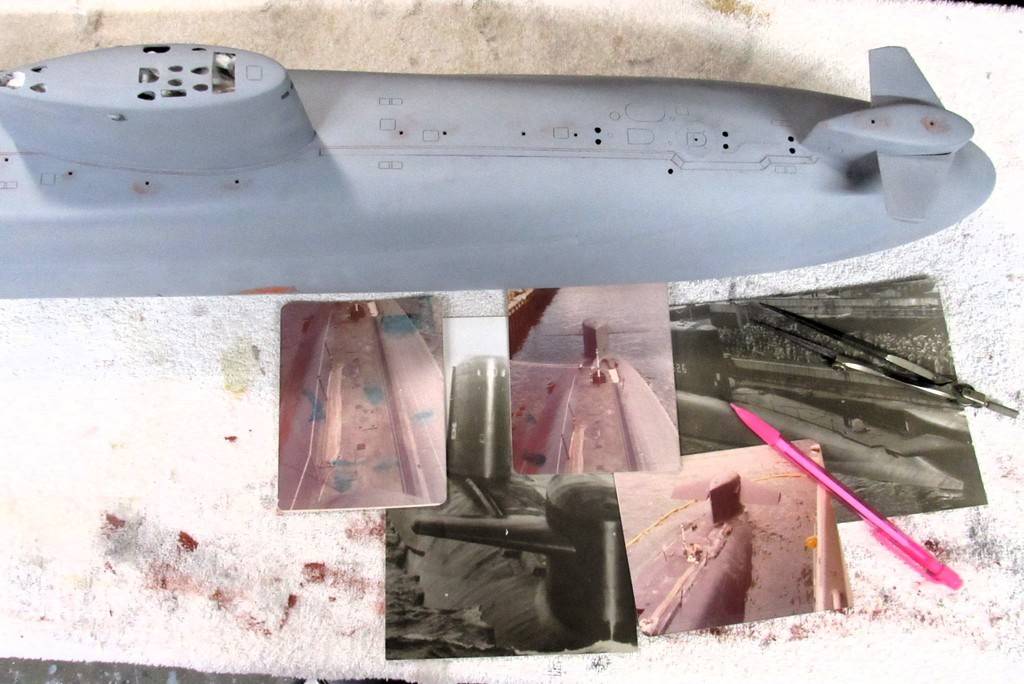
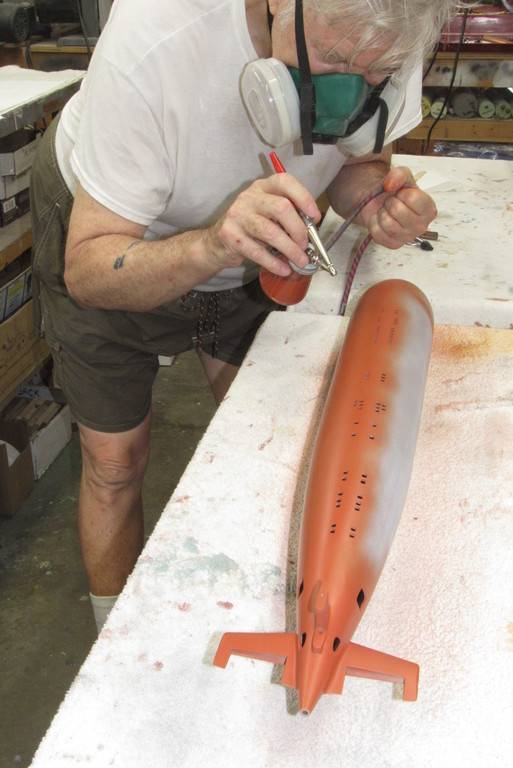
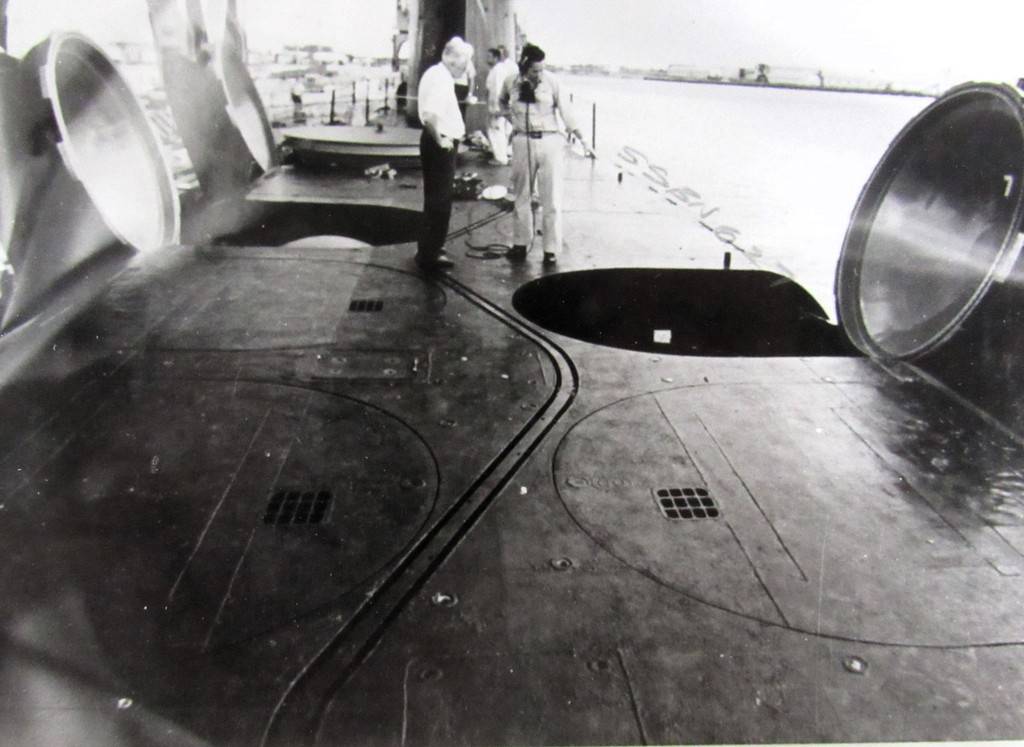
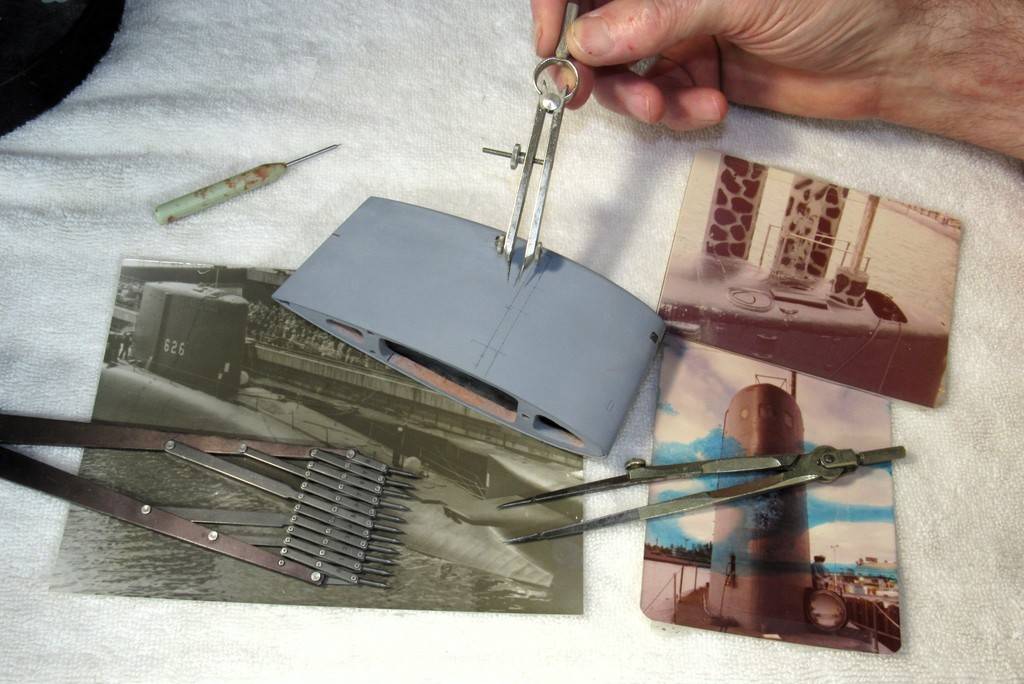
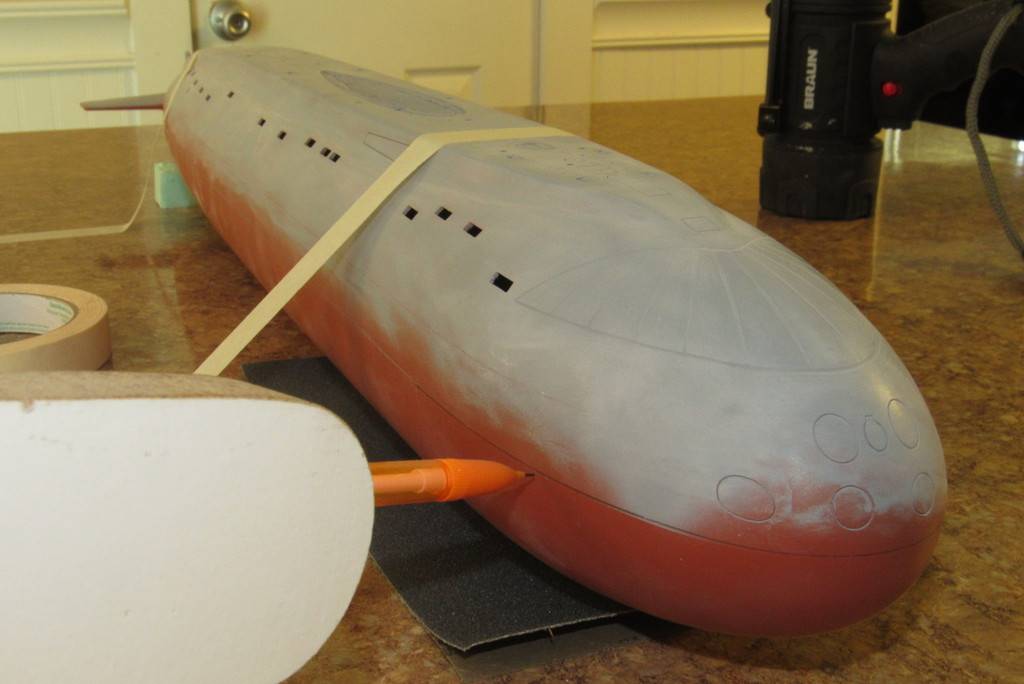
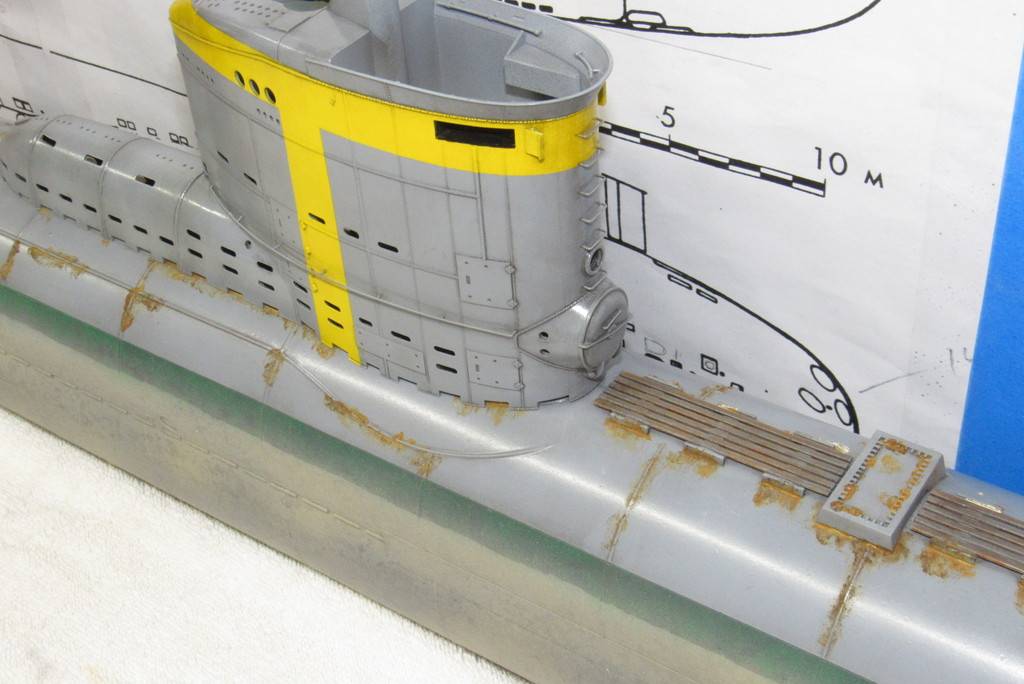
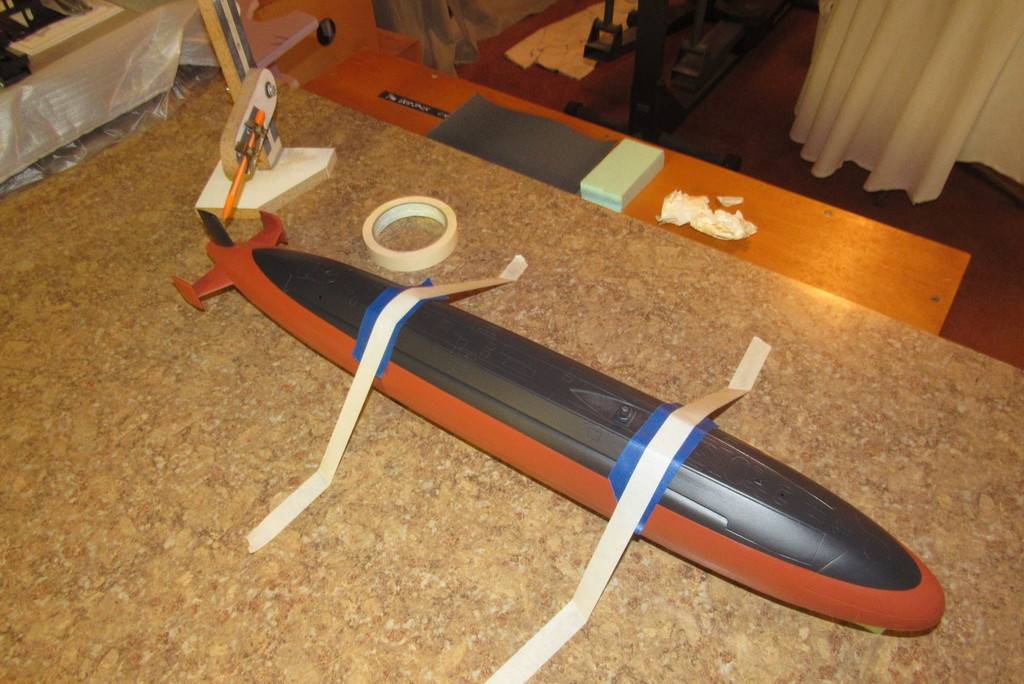
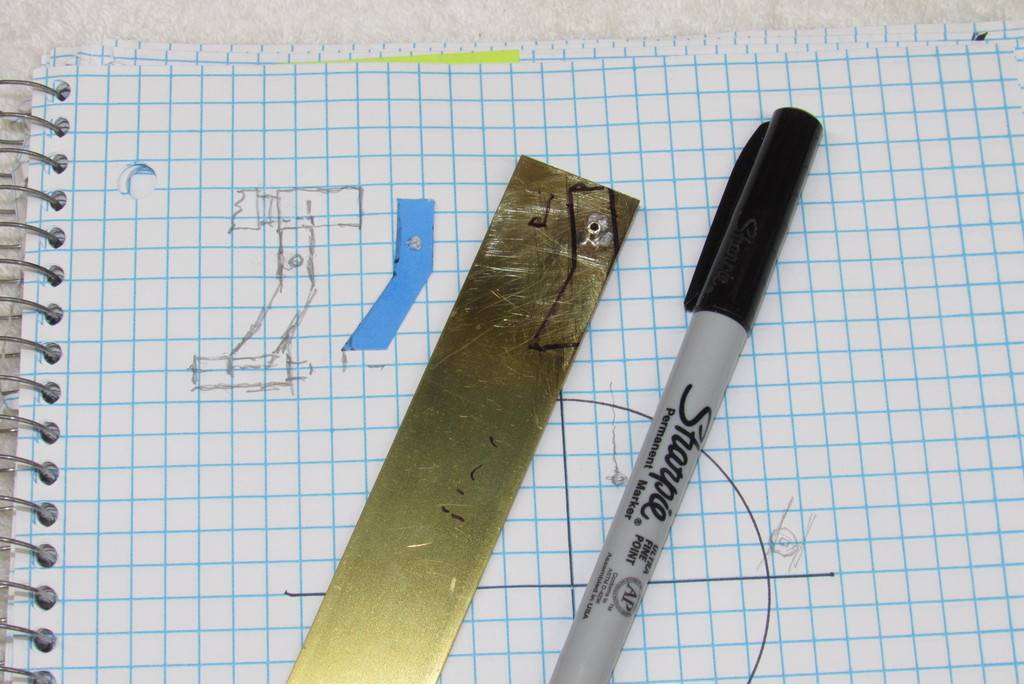
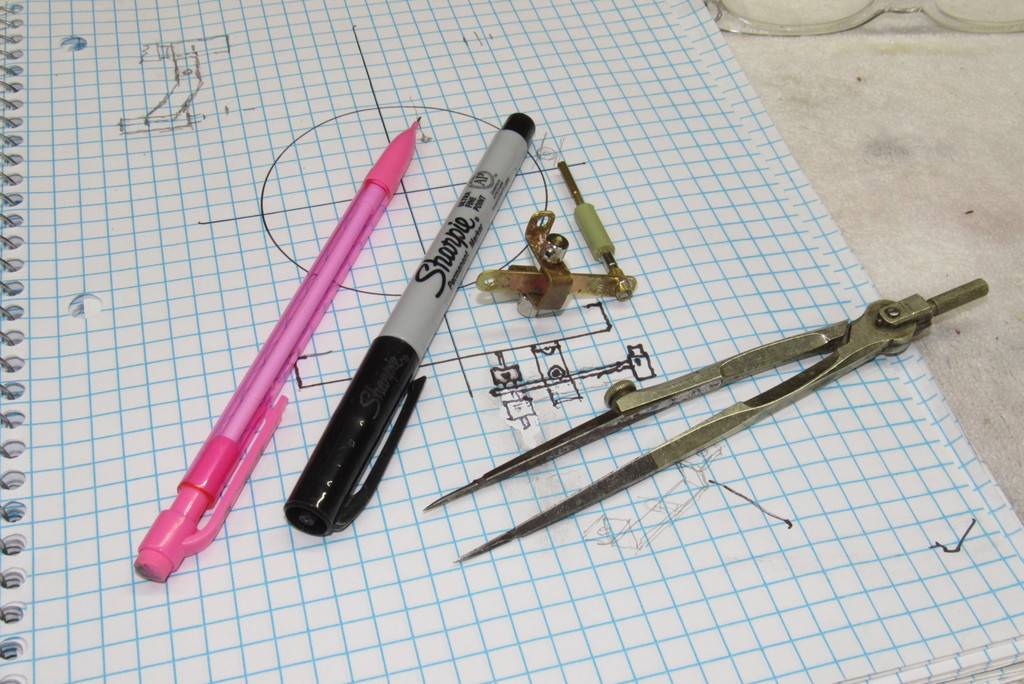
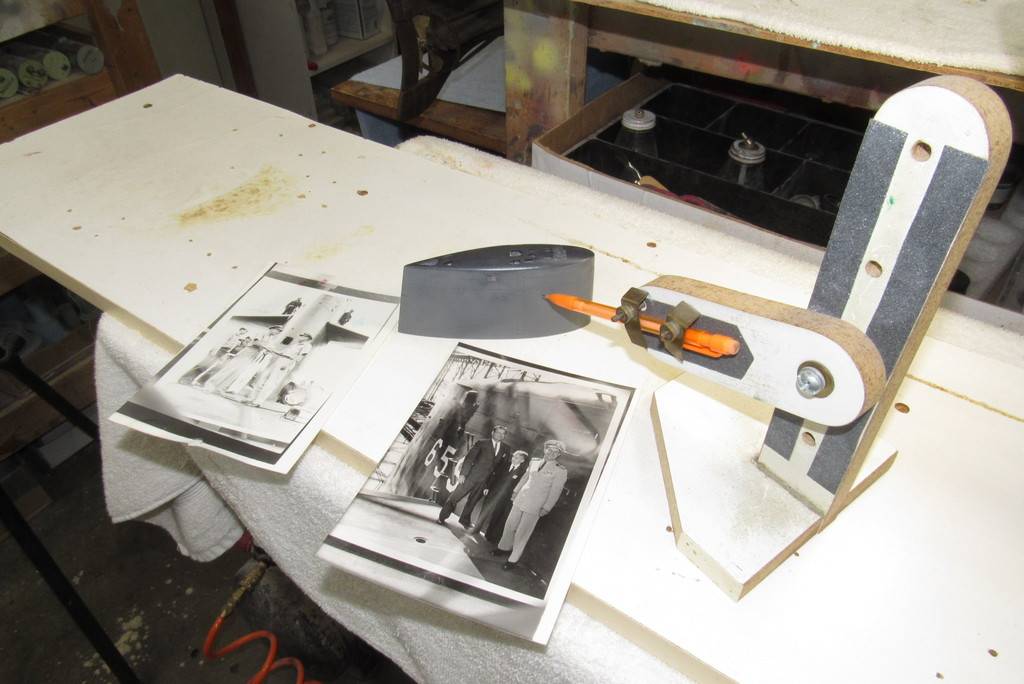
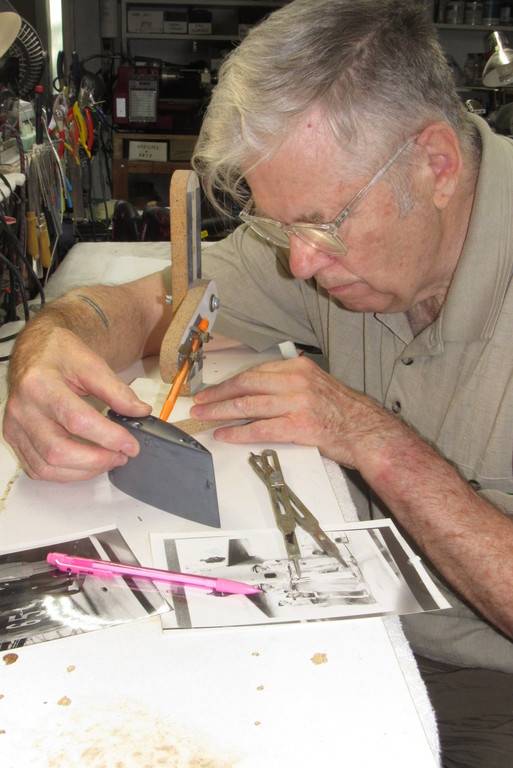
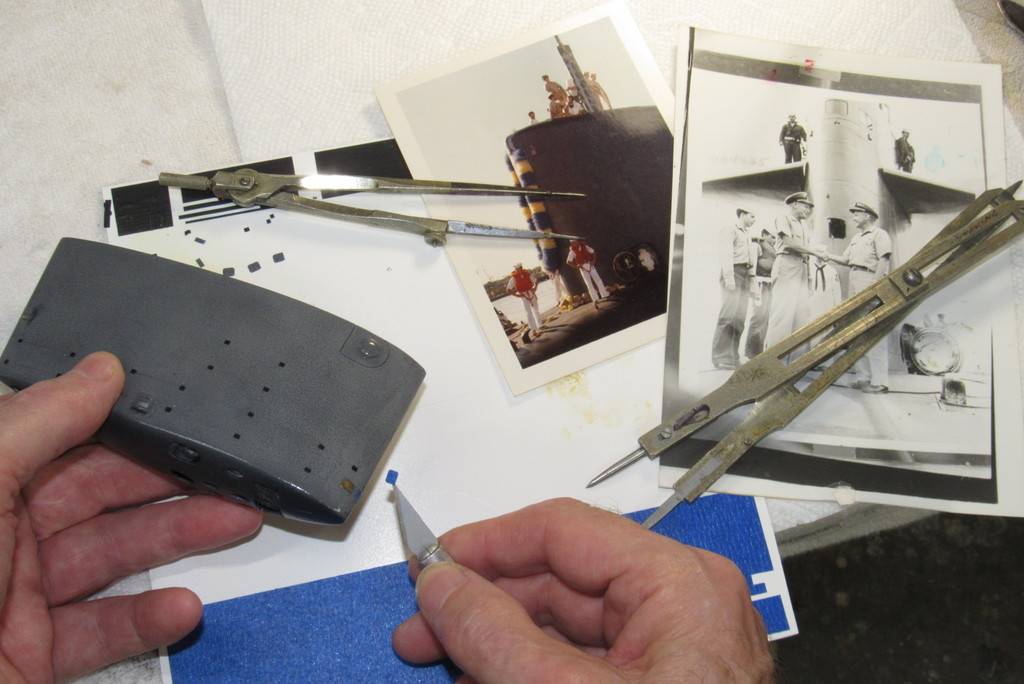
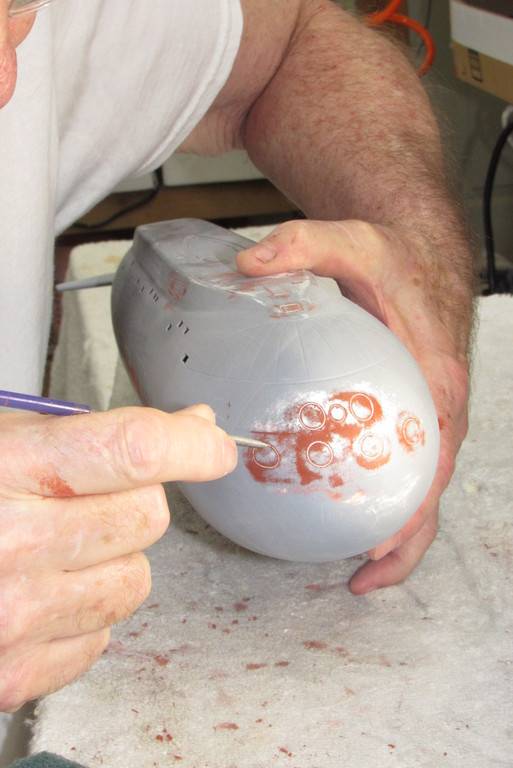
One last scribing job to be performed on the 1/96 KILO was engraving the two concentric circles around the two escape trunk hatches. The white circles will be applied after the basic red and black are laid down. On the actual boats these white circles serve as a target, a visual aid to help guide a manned or remotely controlled rescue vehicle aiming to mate with the escape hatch seating surface. Here you see some of the documentation used to determine location and size of these markings.
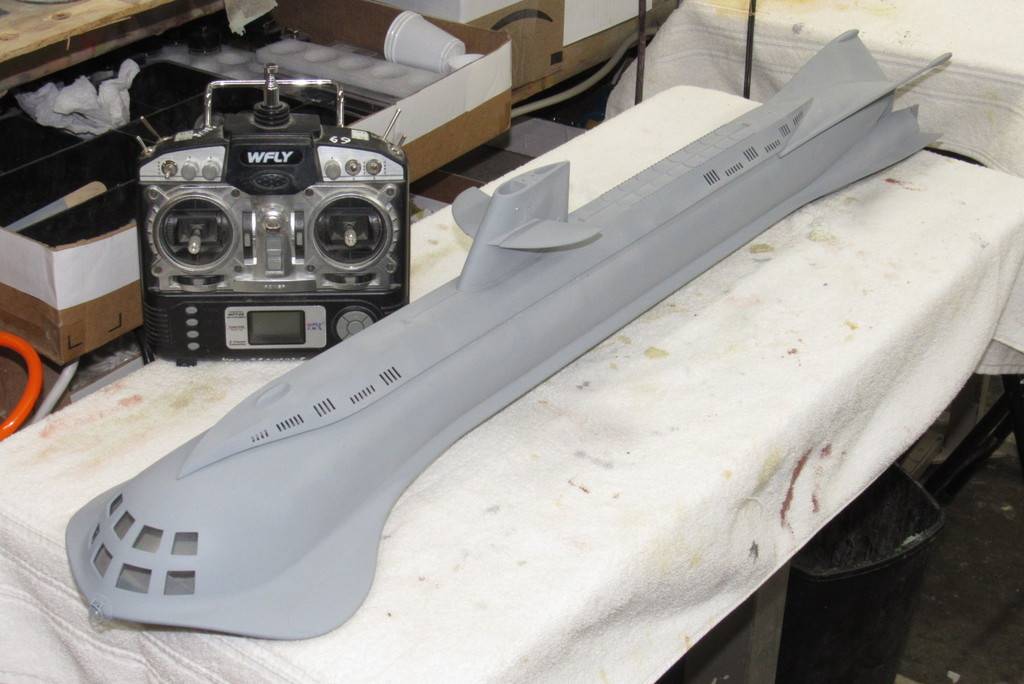
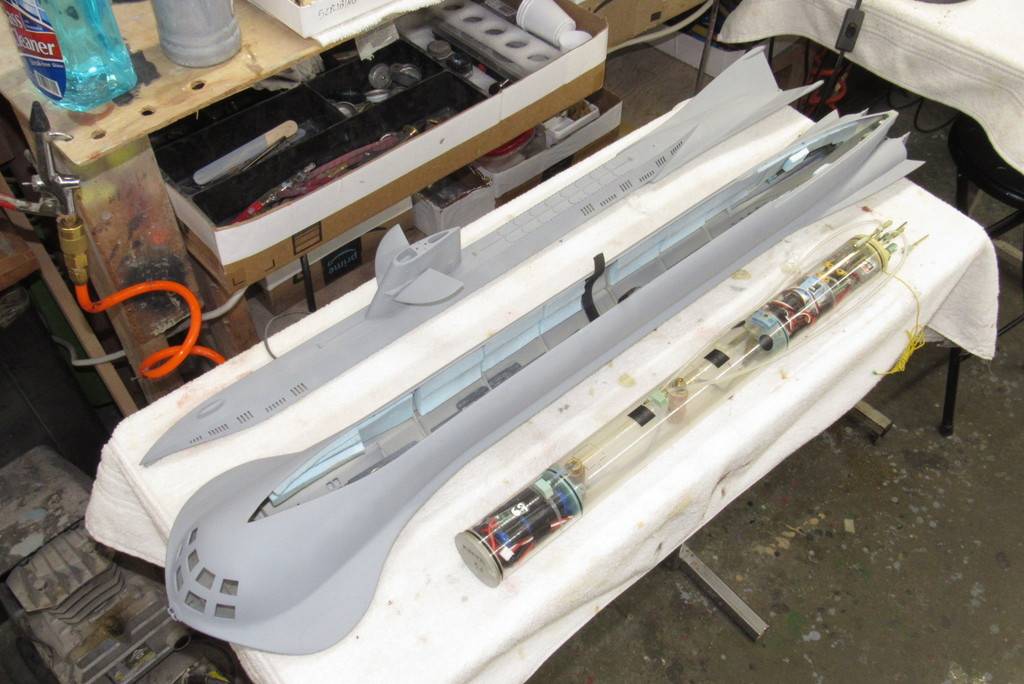
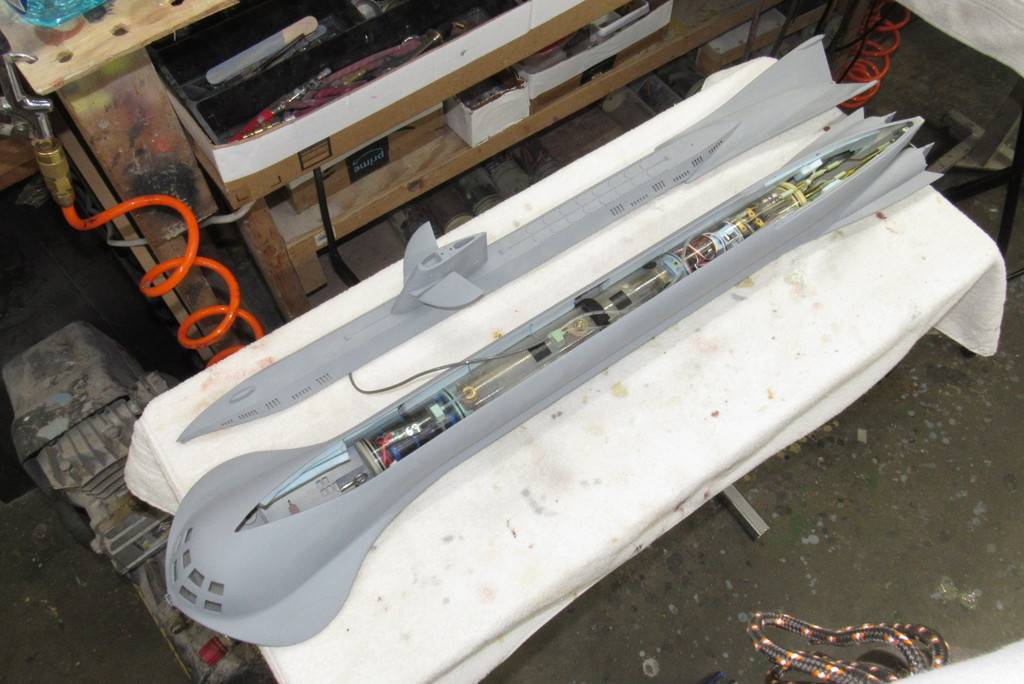
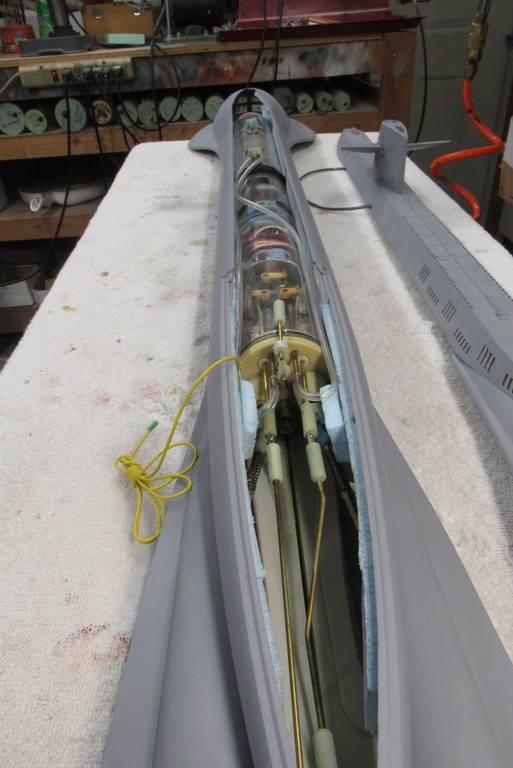
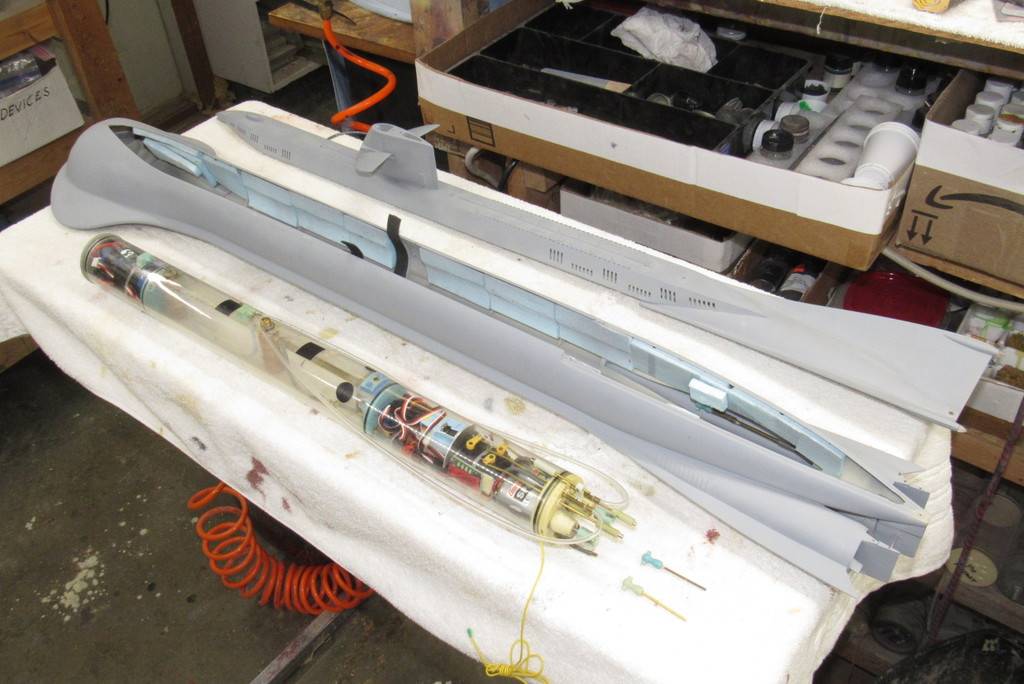
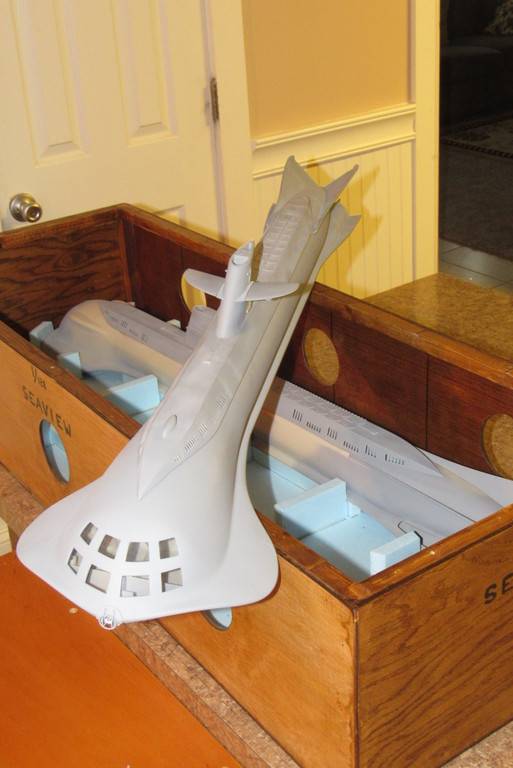
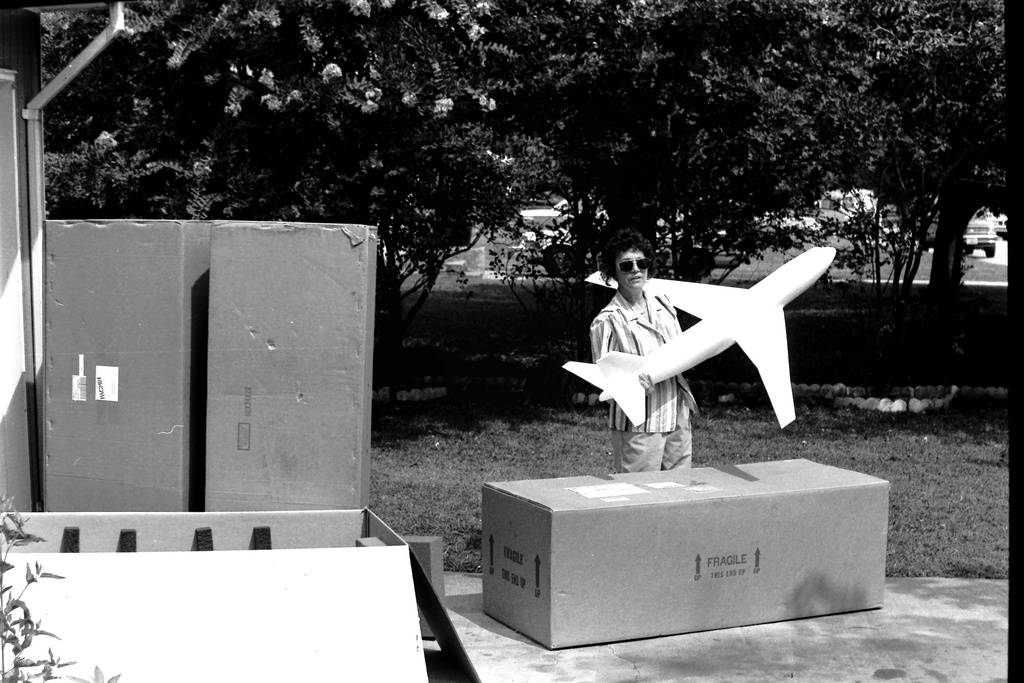
Moebius Models, with the skillful help of SF vehicle researcher and draftsman, Garry Kerr, developed the definitive injection formed kit of the SEAVIEW from the movie-TV show, Voyage To The Bottom Of The Sea. The 1/128 scale, 38.5-inch long submarine was produced in both the movie and TV versions. I've assembled four of these kits, having converted them to r/c operation. Here's a quick video to show how that worked out:
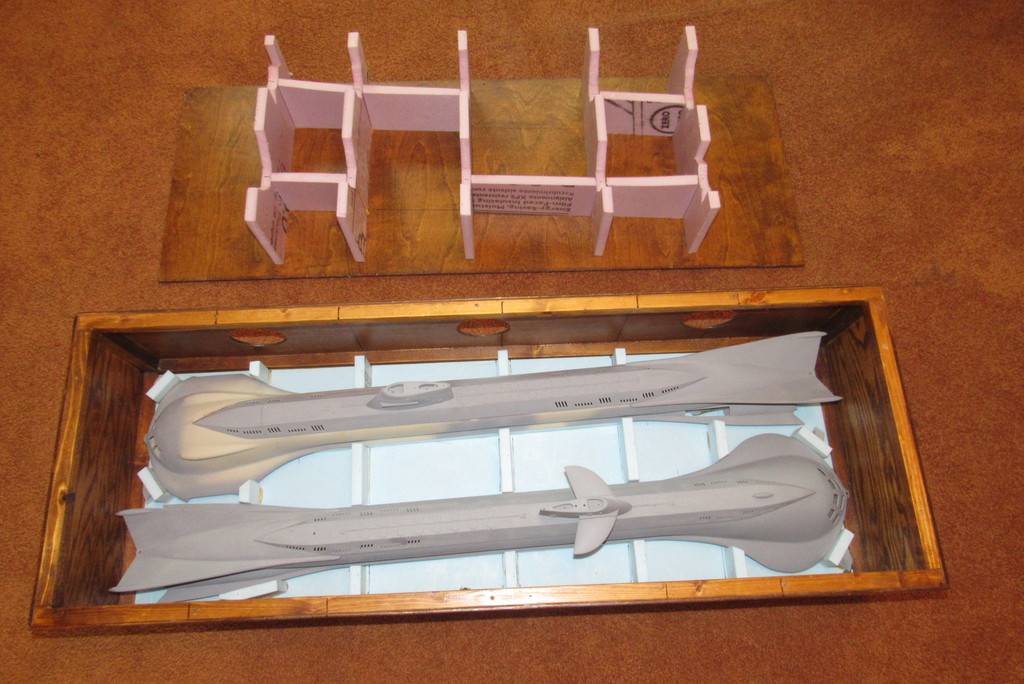
The operational movie SEAVIEW next to a partially assembled TV SEAVIEW in their common storage-transportation box.
Last week I was challenged by one of the drones at the Nautilus Drydocks forum to bring the movie version SEAVIEW – not completed, it still needs a proper paint-job and some low-key weathering – to the big all r/c submarine SubFest regatta at Cohutta, Georgia next month. So, out of its storage box, plopped onto the workbench, and a quick affirmation that the SubDriver sub-systems were working and all dialed in with the models control surface linkage. That took about three days of part-time work.
If you're in the area, try and make this event – a beautiful venue and three days of solid r/c submarine action:
I assume William Creber and Abert Nosaki rubbed shoulder professionally at some time during their respective careers. Those two revolved in a very select circle of associates.
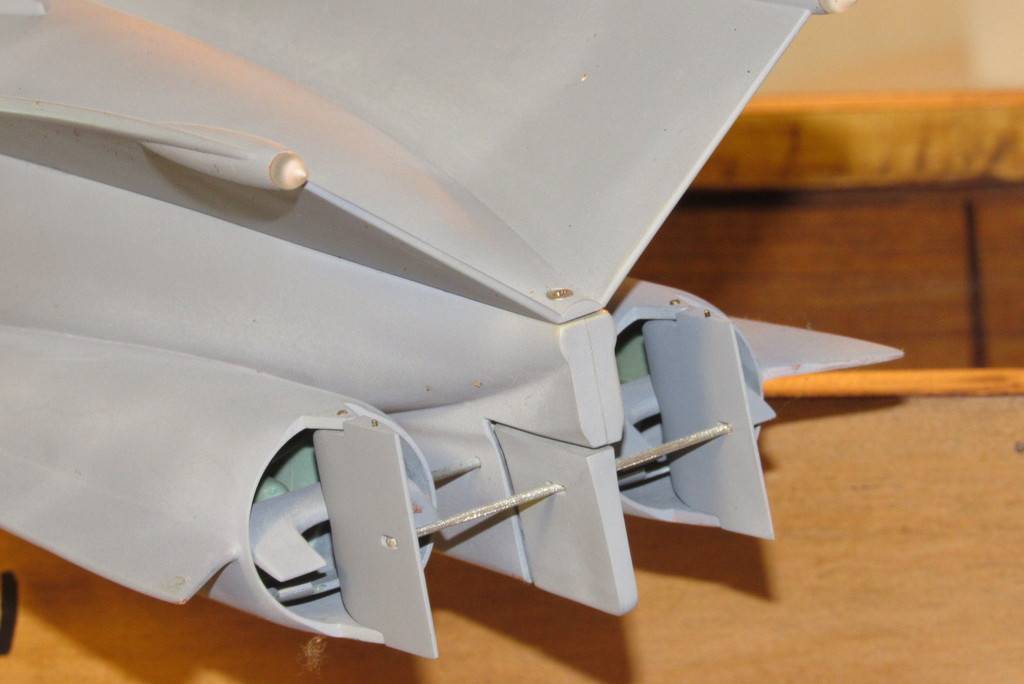
Take your basic Mark-1, Mod-0 LAFAETTE class SSBN submarine, and move the sail planes to the bow, and you get the one-off boat of the class, the USS DANIEL WEBSTER.
A laudable effort: putting the planes forward greatly improved the ability of the ship control party to seek, obtain, and stay put on assigned depth. However, by placing the ever clanking ram, squeaking operating shaft bearings, and linkage back-lash – put all those noise sources so close to the boats bow mounted sonar arrays and you've taken a step too far. The kind of stuff that makes the sonar gang nuts.
The WEBSTER was a joy to drive in depth, but the noise those planes produced rendered the passive sonar gear near useless when running shallow in any sea-state other than glass smooth. The WEBSTER finished her career with the planes placed on the sail. Where they belong. The grand experiment was over. Boomers don't have to be agile, but they do have to be quiet.
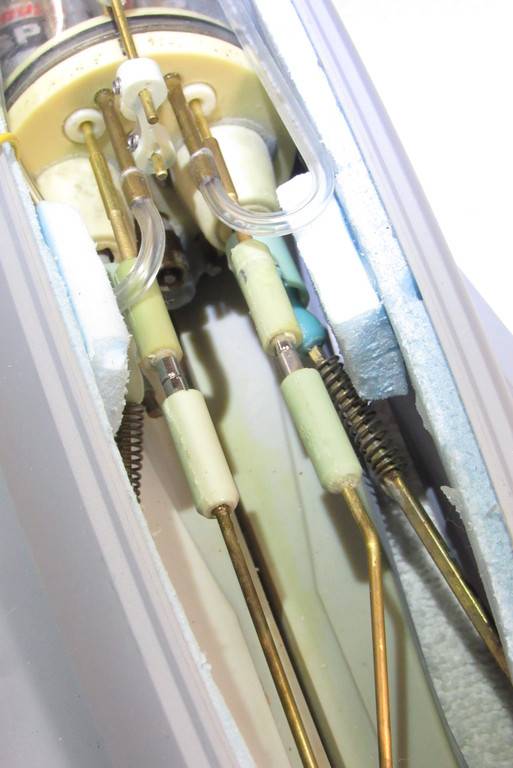
The hydraulic lines to the bow planes ram ran on the starboard side of the deck and were covered by an armored conduit. That conduit, which ran a rather twisting path along the deck in order to clear cleats, safety track, and main ballast tank vents – had a section of a truncated cone; sloping sides, with a flat top. This of course was a unique feature of the boat when she sported bow planes. A feature that had to be represented on my 1/96 model of this most iconic SSBN.
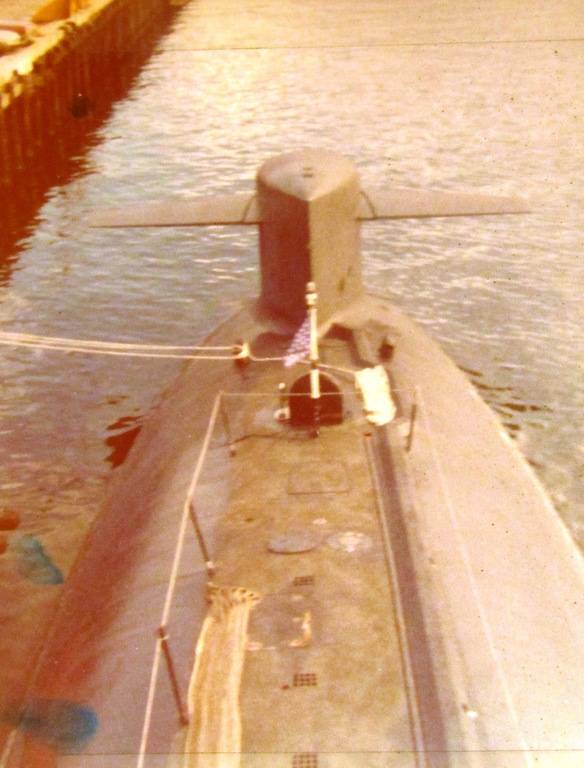
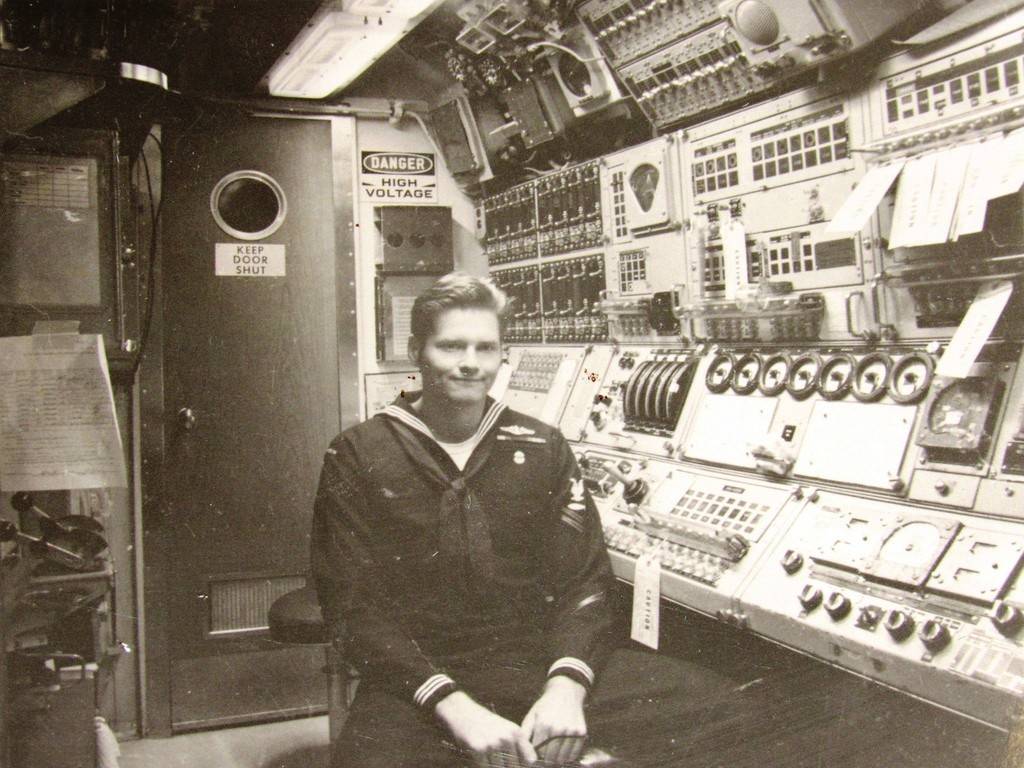
I snapped this shot from the bridge of the WEBSTER while we were at Pearl, getting ready for our canal crossing to Groton for a major yard period and missile upgrade, from Polaris A-3 to Poseidon.
Study of my documentation gave me a pretty accurate layout of the conduit. After a few poor attempts, I finally penciled onto the models hull the path of the conduit from just off the sails leading edge to the starboard side of the bow plane fairing (often referred to as the 'wart').
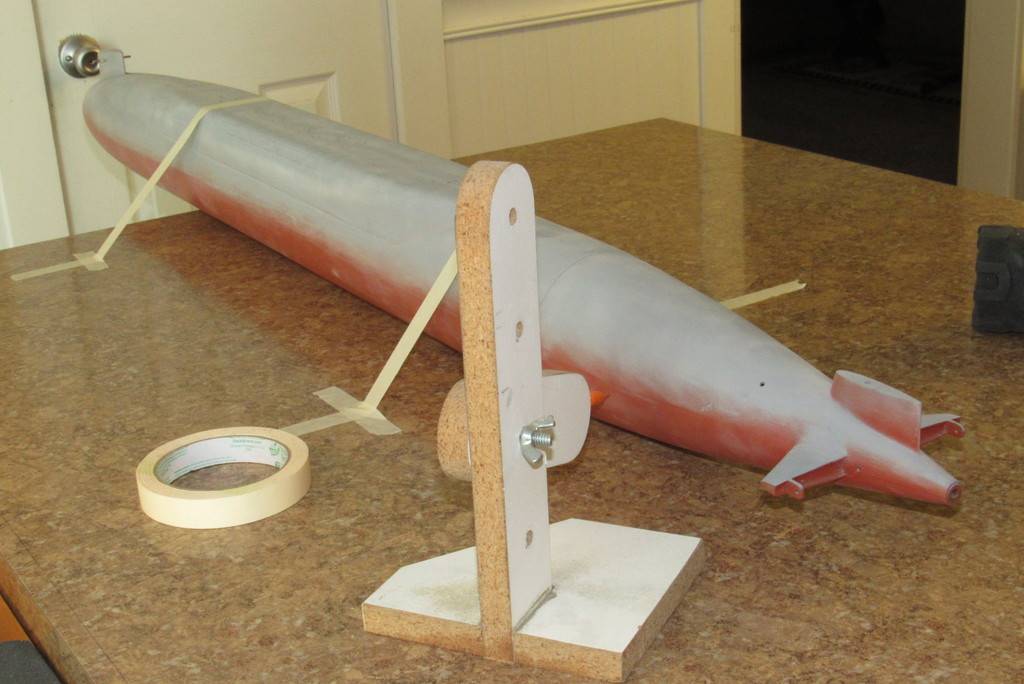
As no commercially available lengths of plastic shape had the geometry or dimensions needed, I elected to screed out a length of properly sectioned conduit from Bondo.
Linear screeding is simple: Plop some catalyzed Bondo onto a waxed flat board and run a properly shaped die across it linearly.
Here you see the screeded periscope and antenna fairings formed using this process. To the left is my initial attempt at creating the bow plane hydraulic line conduit but found that it was much too wide and tall of section to work at 1/96 scale. Dummy! But this shot does illustrate the sectional shape of the conduit.
As one of my Junior High School shop teachers was fond of saying: “measure twice... cut once. Moron's!”
Here I'm giving shape to the die of the second conduit forming attempt.
Here I've screeded out a one-foot length of Bondo conduit. Took about five passes, but the work went quickly.
The final pass was a coating of Nitro-Stan air-dry touch-up putty.
I let the work cure and dry overnight and the next morning lifted the work off the board.
The long length of conduit blank in hand I lofted the breaks off the penciled model and started to cut things to proper length and angle.
… and glued each section of conduit in place with the aid of thin formula CA adhesive.
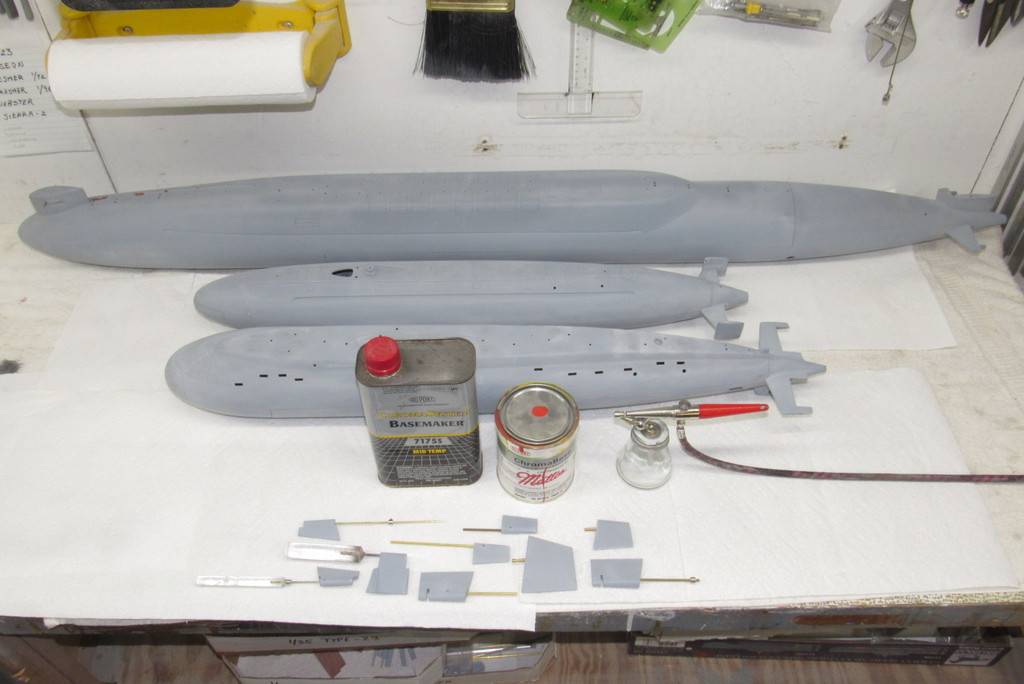
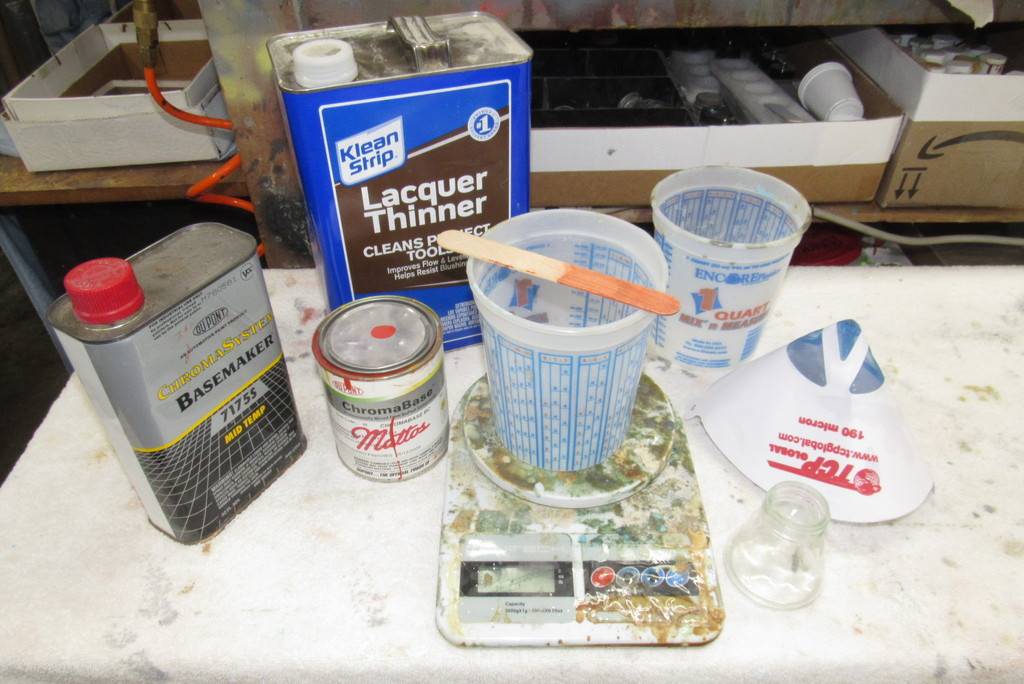
Time to splatter some paint on these three suckers! The paint chemistry is my old friend: two-part, polyurethane DuPont ChromaColor. This automotive paint is tough, quick curing and can be reduced significantly without losing its opacity, which makes shooting it with small air-guns like my trusty Paasche H-model, single-action a very easy proposition.
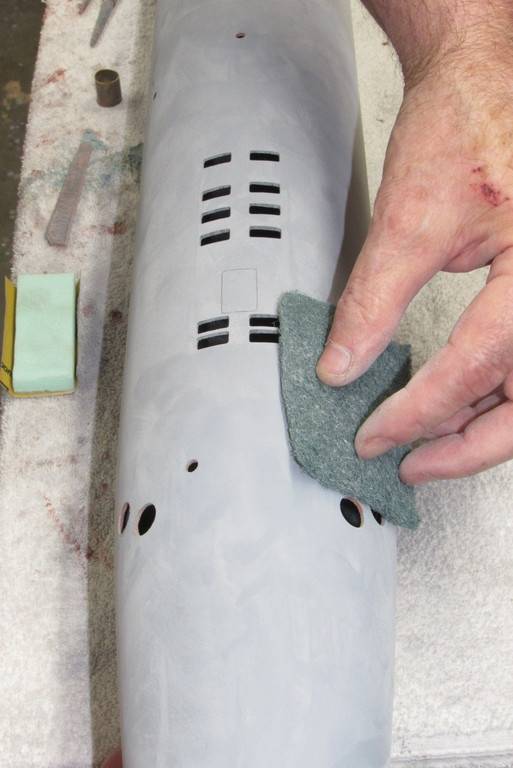
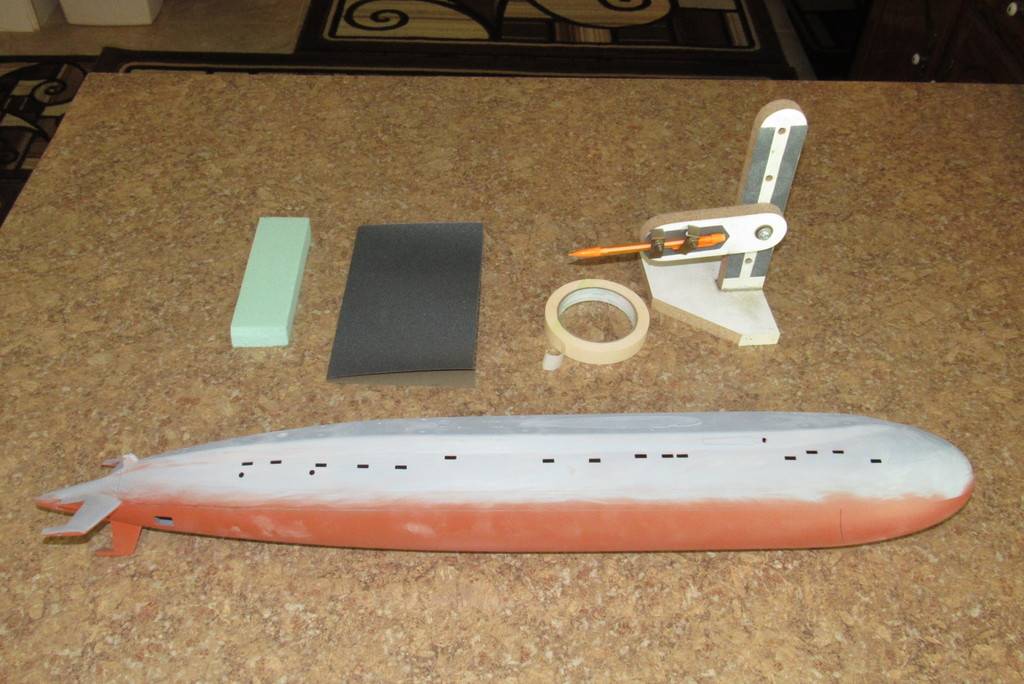
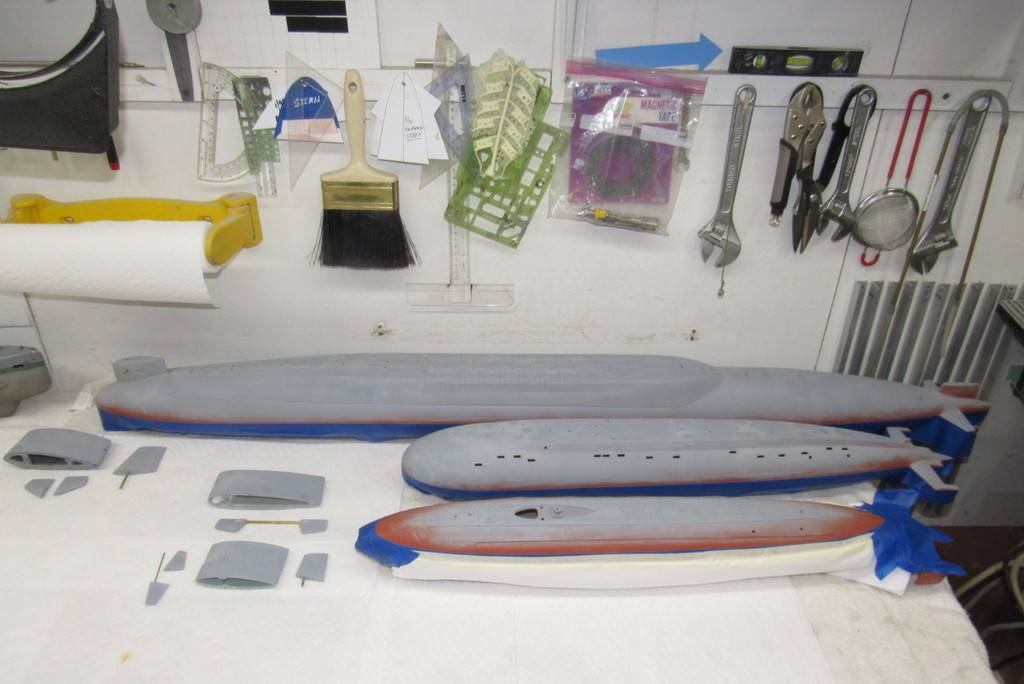
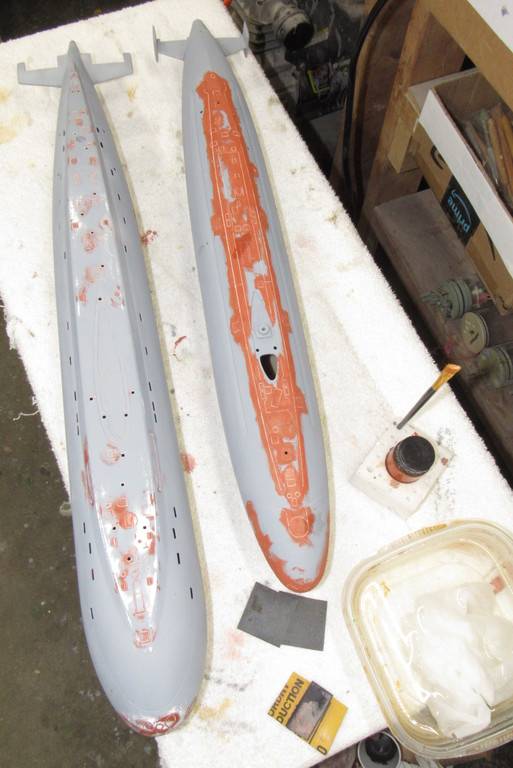
The 1/96 WEBSTER, KILO, and BLUEBACK – all at this point in their final primer gray – had their hulls and appendages given a final dry sanding with #600 grit abrasive; a polishing with an abrasive pad; blown-down to get any sanding dust trapped into the engravings; and everything wiped with a tack-cloth to remove the last little bits of sanding dust from the surfaces to be painted.
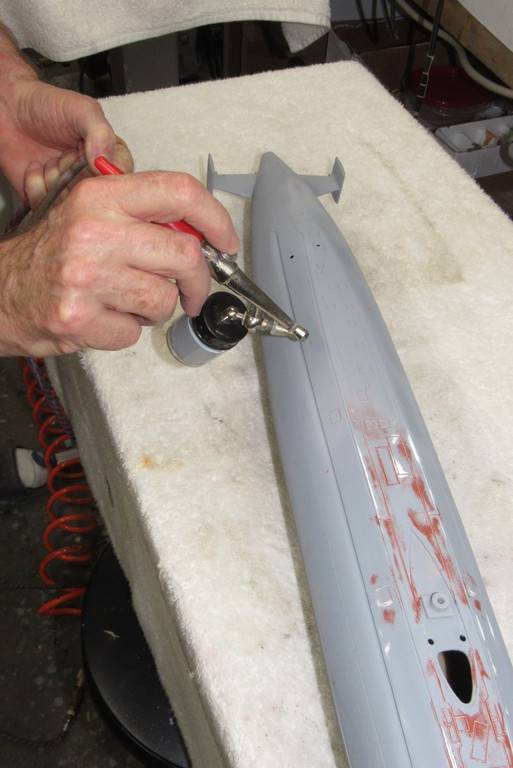
The first color to go down was anti-fouling red, applied to all hull and appendages that would either be below center line, or below water line. The demarcation line between red and black would be center line on the WEBSTER and KILO, and waterline on the BLUEBACK.
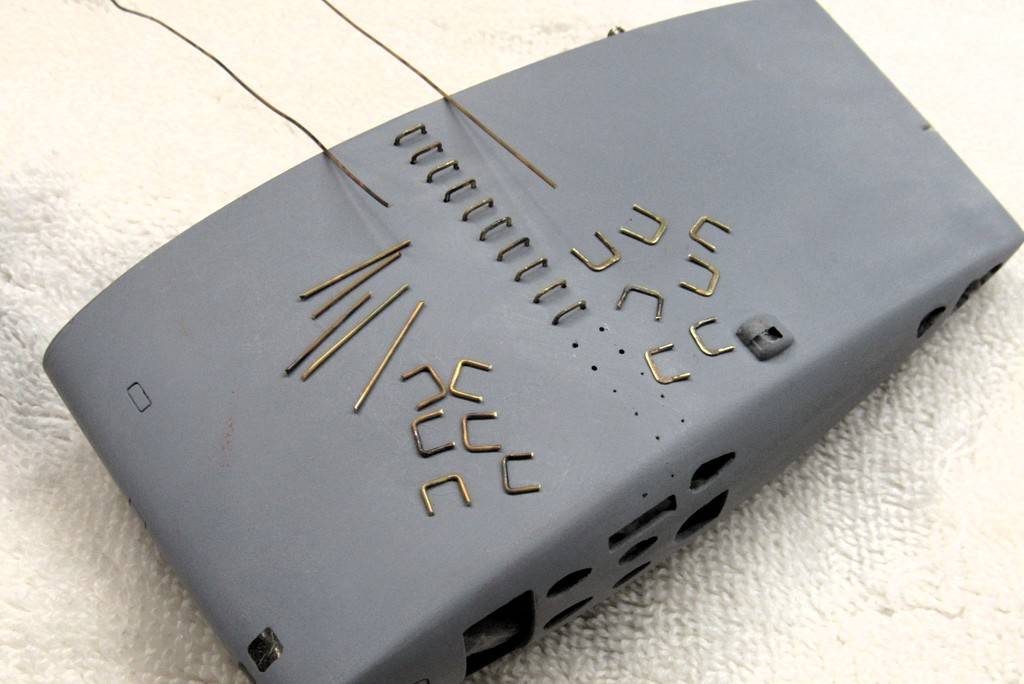
It's often the 'little things' that makes an otherwise fair model to become an interesting and appreciated display. Little things like the projecting hinge pins employed to permit travel of the three-piece missile tube muzzle hatch fairings.
Missile tube fairing hatch hinge securing brackets were represented by engraved rectangular shapes scribed in with the aid of this purpose built stencil.
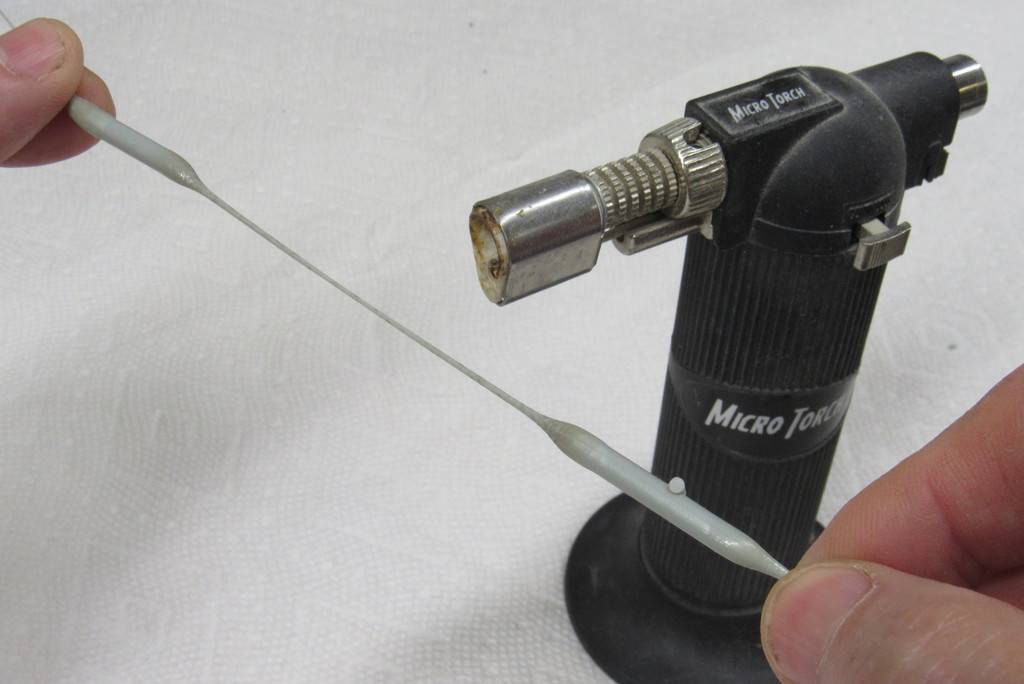
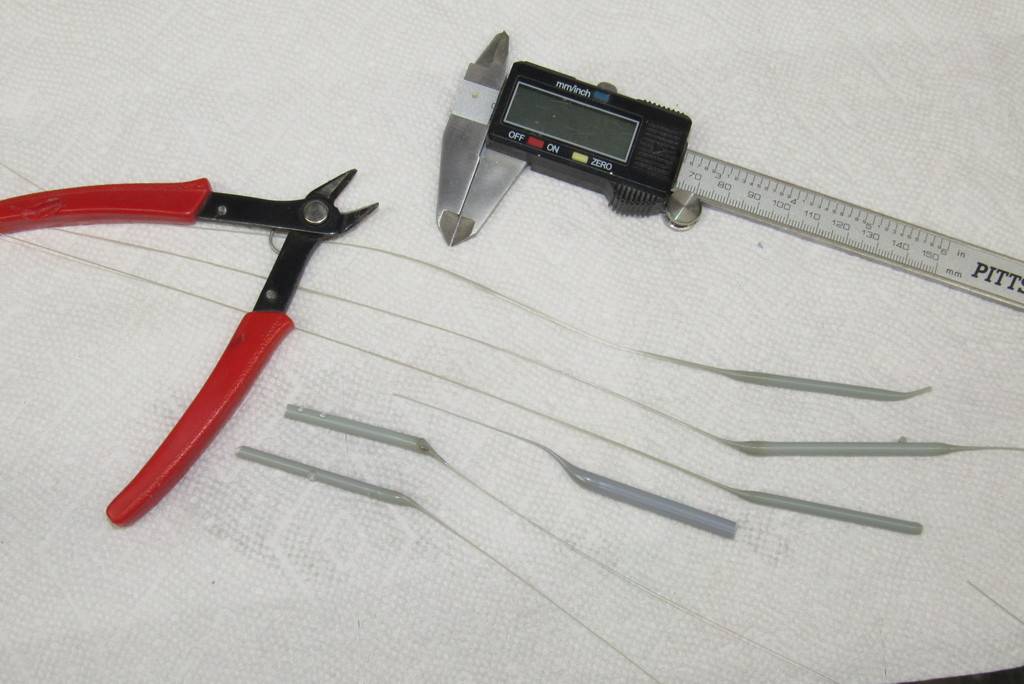
Stretching sprue to derive the correct diameter, round of section fairing hinges.
I found that the ideal hinge diameter was .015”. So, with the aid of a micrometer I found those lengths of stretched sprue that fit the bill and cut them away for later chopping to length.
A very useful tool for slicing thin, soft plastic sheet and extruded shapes is this commercially available 'chopper'. Here I'm using it to cut to length stretched sprue missile tube fairing hinges. Uniformity of length is assured through the use of a masking-tape fence.
I used a bit of spit to hold a 'hinge' piece at the pointy end of a paint-brush handle. Just enough stick to permit me to transfer a hinge from the chopper to the engraved line of a missile tube hatch fairing engraved line.
A very small drop of CA was placed on the engraved line and a hinge placed into position and pressed down hard with a finger for about five-seconds – long enough for the glue to take hold.
Careful blade scraping and sanding with #600 around the slightly raised hinges cleaned up any excess glue. Here I'm chasing out sanding dust from the engravings with a stiff paint-brush.
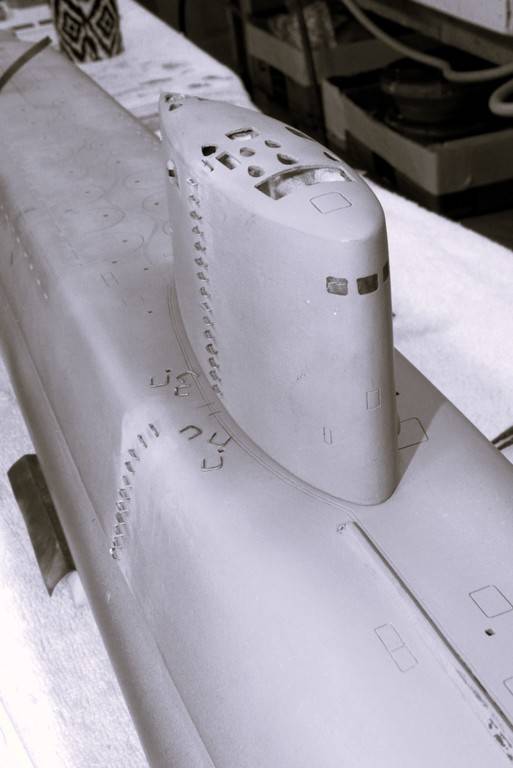
This big model demanded all the little details I could apply to it. That included the many ladder rungs that ran up from the waterline to the top of the sail. It's the small stuff that turns a toy into a proper display piece.
Some of the documentation and layout tools used to position the ladder rung stem holes. The two rather faded color photos were taken by me of the boat during one of her re-fits in Guam, as we worked the boat up for another patrol.
... Hell, I snapped those over a half-century ago. Sobering.
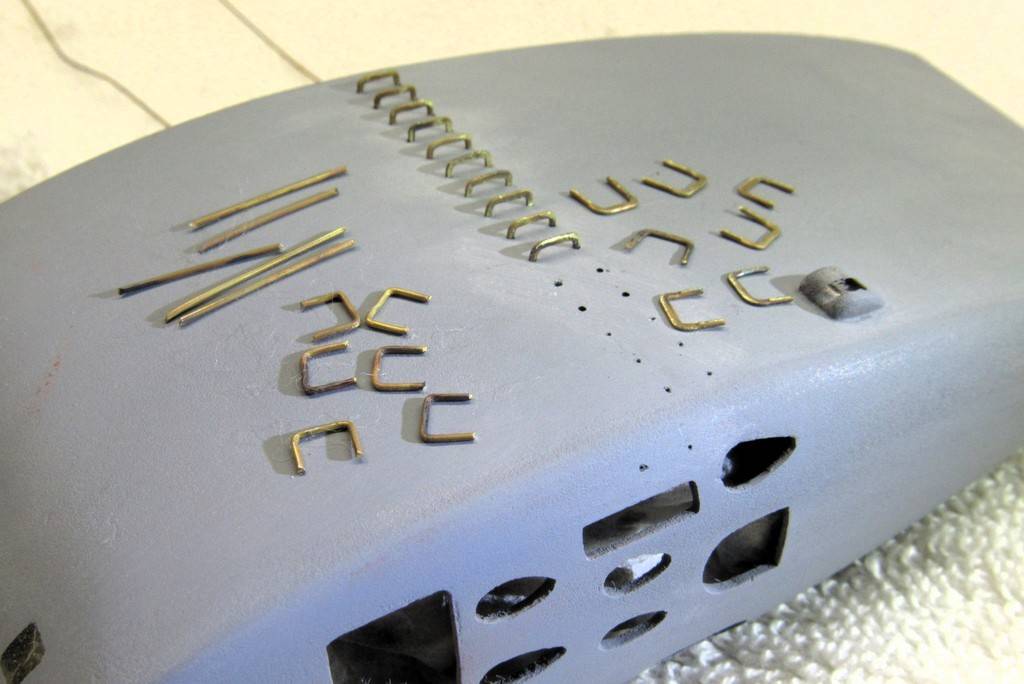
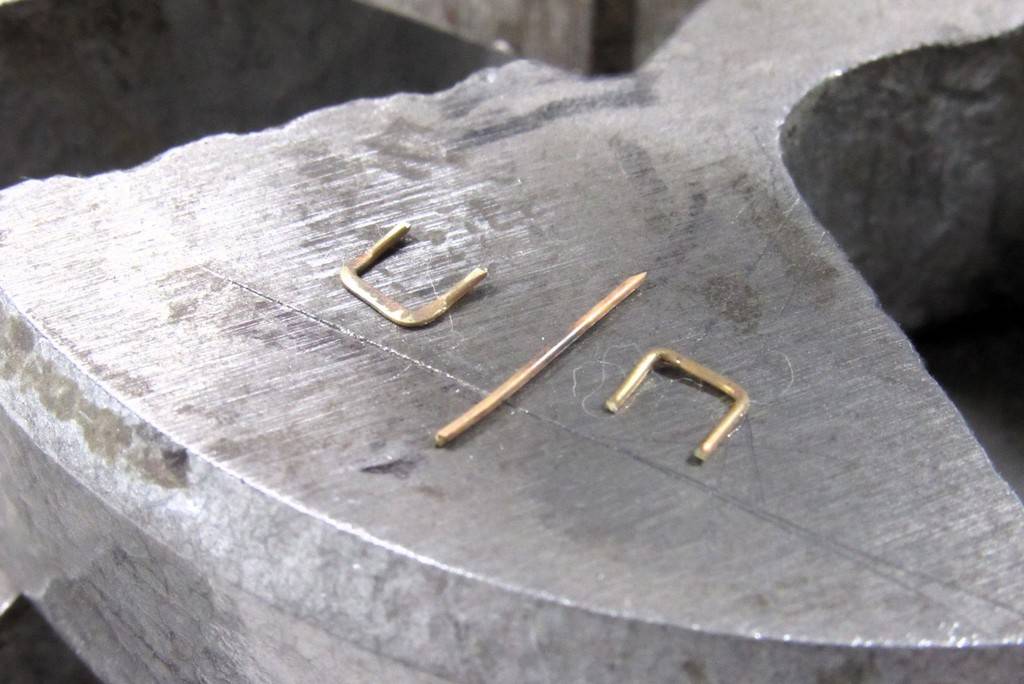
To the left are raw ladder rung blanks, still in the round. To the right are properly flattened ladder rungs ready for installation onto the model. These were made from annealed .020” diameter K&S brass wire.
A hand-press was used to flatten the annealed brass rung blanks.
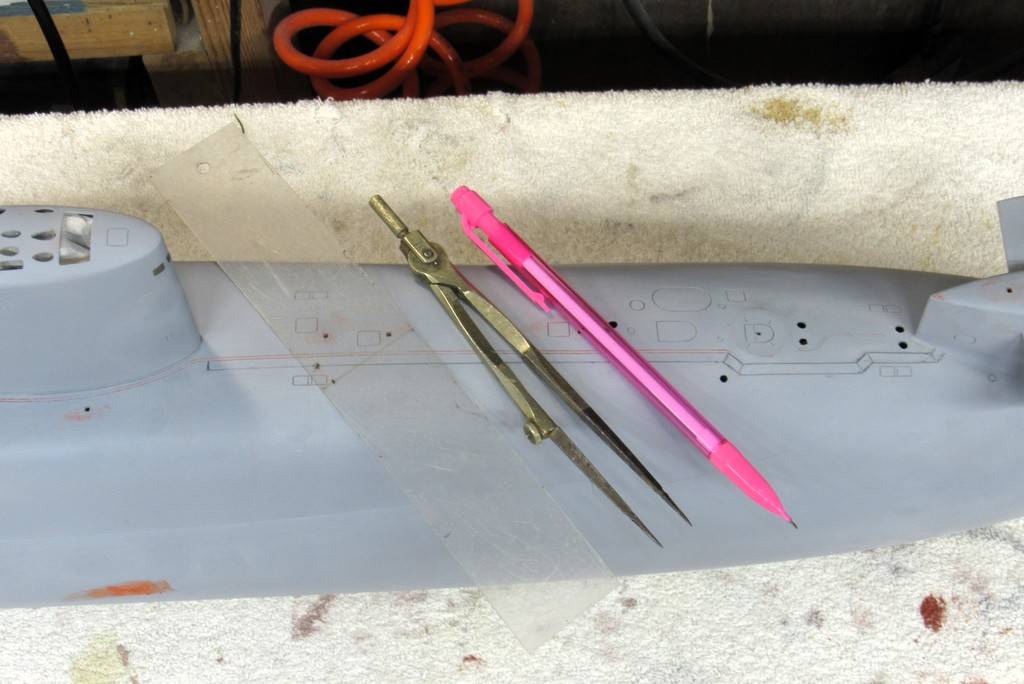
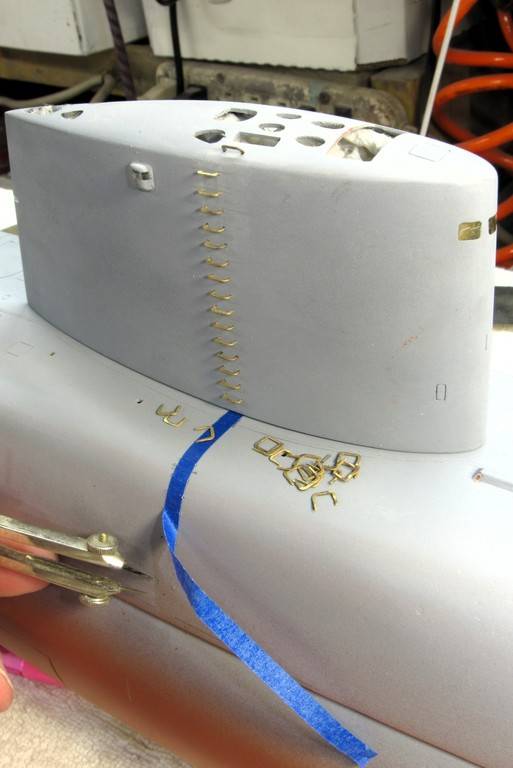
This length of plastic strip was used to set, exactly, the height of the rungs off the surface of the models sail and superstructure.
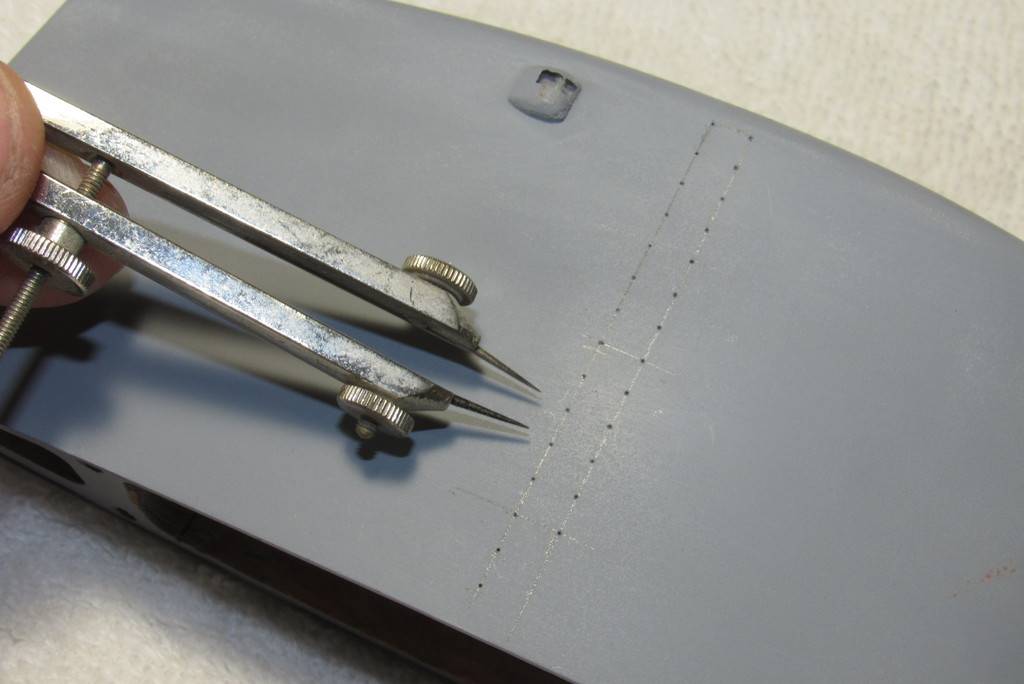
The drafting compass insured equal vertical spacing between rungs and the temporary strip of masking tape insured correct horizontal spacing between the holes that would secure the stems of each ladder rung.
The moto-tool equipped with a .020” diameter bit drilling holes that will accommodate, via an interferrence fit, the stems of the ladder rungs.
Note the use of a modified set of pliers here – they started life as a common needle-nose type but were truncated and the tips ground back to better hold a rung yet not make contact with adjacent rungs as a rung was installed/removed from the sail and superstructure.
All of the ladder rungs are tight friction fits to the sail and superstructure, so no glue is required to retain them in place. This permits me to now remove the rungs and carry on with the painting and weathering of the model without the rungs getting in the way. The rungs will be painted separately and installed before the final flattened clear-coat goes down.
Some of the documentation and layout tools used to position the ladder rung stem holes. The two rather faded color photos were taken by me of the boat during one of her re-fits in Guam, as we worked the boat up for another patrol.
... Hell, I snapped those over a half-century ago. Sobering.
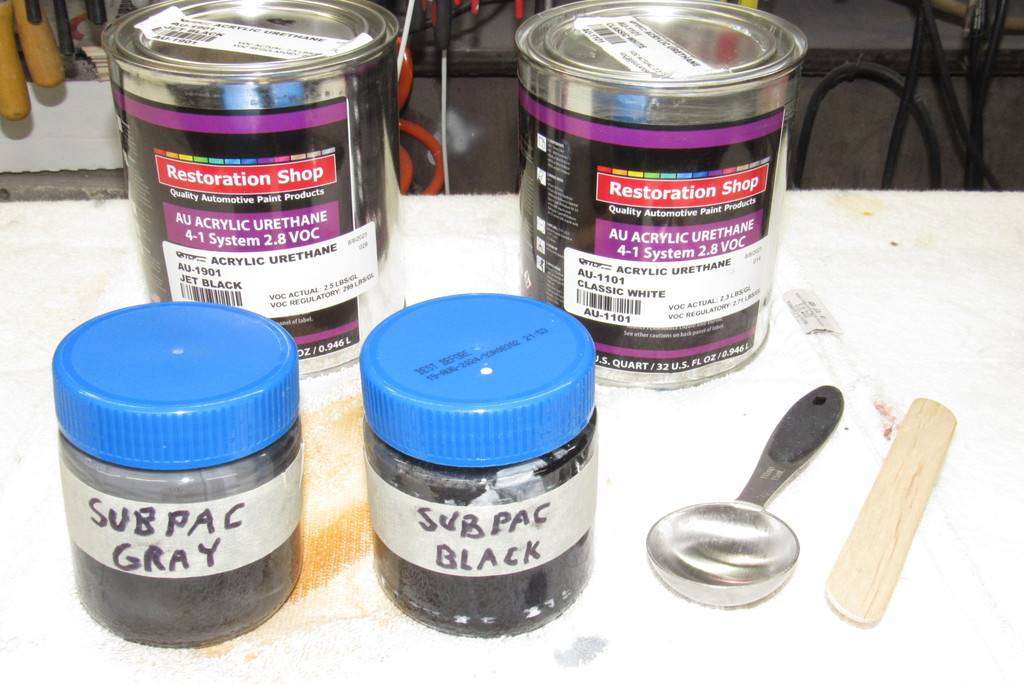
I'm just about done with the last of my stash of DuPont ChromaColor and ChromaClear automotive paints and clear-coat. They stop producing the stuff a decade ago.
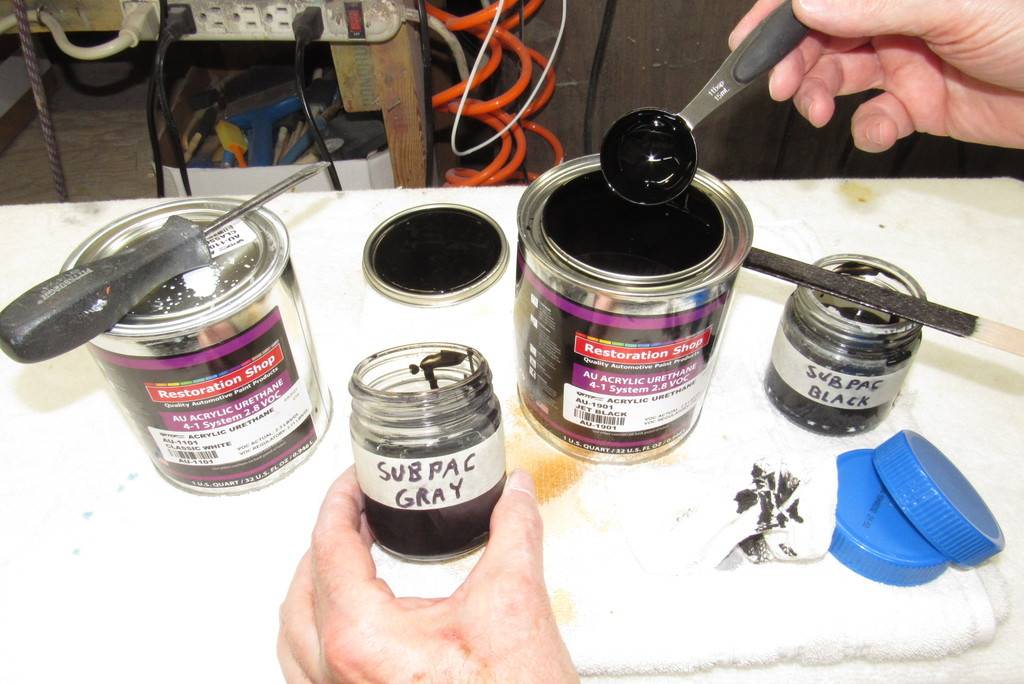
So, I got to the internet and found that an outfit called, 'the Restoration Store' produces equivalent two-part (two-pack, 2K) acrylic urethane (AU, duh!) based color and clear coat systems. About five-hundred bucks later, and D&E Miniatures is back in the game.
And just in time to get some model submarines painted up and ready for this years SubFest at the Red Clay Resort, Cohutta, Georgia. That event going down in less than a month.
All you need in the way of paint is black, white, the three primary colors, clear-coat, flattening agent, the appropriate activator/catalyst/hardener, and thinner/solvent/reducer.
With a proper 'color wheel' you can mix any color needed from the blue, yellow and red primaries.
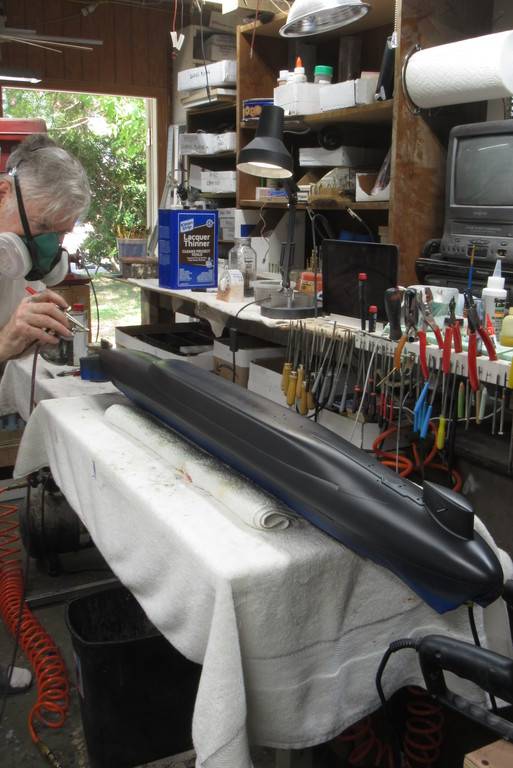
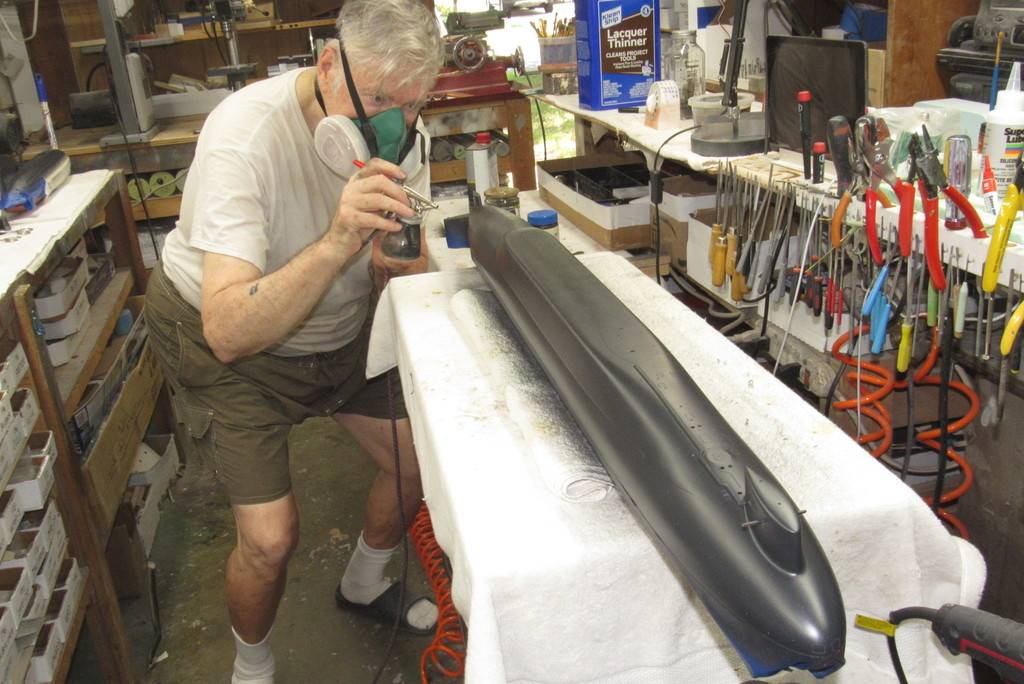
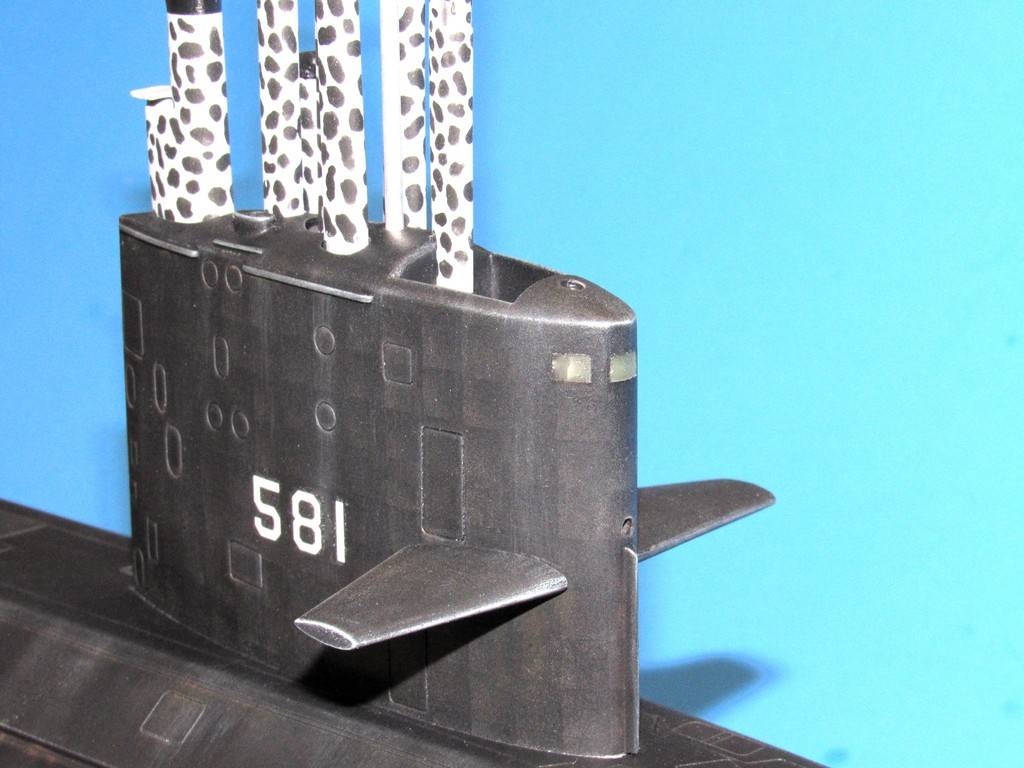
Nowadays the Navy paints its submarines basic black. You don't; we paint our toy submarines a very dark gray, to account for 'scale effect'.
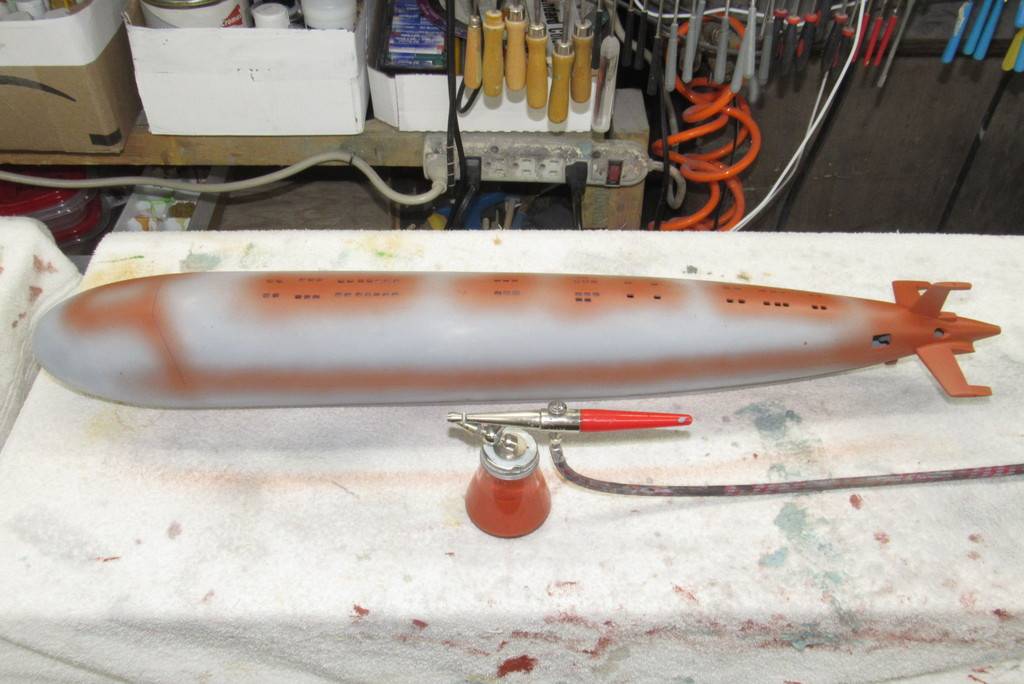
Here I'm preparing the dark, dark gray for black, and a dark 'haze gray' for the Pacific scheme often applied to boats operating during the cold war. Horizontal surfaces black; the vertical surfaces dark gray. This scheme will be applied to the WEBSTER.
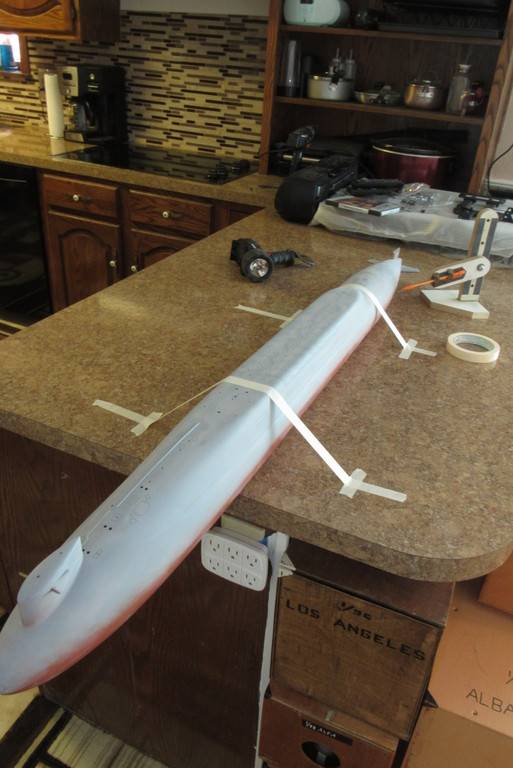
Penciling in the black-red demarcation lines prior to masking off the anti-foul red portions of the hulls.
The 1/96 WEBSTER, KILO, and BLUEBACK all masked off and ready for black paint.
Busy applying 'rust' to the Bronco 1/35 Type-23 kit. Hull's done and some of the rust has to be toned down a bit. Still have the sail to dirty up. Trying to get it ready for presentation at an IPMS meeting this Friday.
I'm just about done with the last of my stash of DuPont ChromaColor and ChromaClear automotive paints and clear-coat. They stop producing the stuff a decade ago.
So, I got to the internet and found that an outfit called, 'the Restoration Store' produces equivalent two-part (two-pack, 2K) acrylic urethane (AU, duh!) based color and clear coat systems. About five-hundred bucks later, and D&E Miniatures is back in the game.
Nowadays the Navy paints its submarines basic black. You don't; we paint our toy submarines a very dark gray, to account for 'scale effect'.
Here I'm preparing the dark, dark gray for black, and a dark 'haze gray' for the Pacific scheme often applied to boats operating during the cold war. Horizontal surfaces black; the vertical surfaces dark gray. This scheme will be applied to the WEBSTER.
I don't think I've ever seen that version of a submarine "camo" scheme... Would have been nice for the Ohios, stupid things are so big they can be seen from 160ft down! By the time I was on boats, they were all black with a red bottom.
I don't think I've ever seen that version of a submarine "camo" scheme... Would have been nice for the Ohios, stupid things are so big they can be seen from 160ft down! By the time I was on boats, they were all black with a red bottom.
You're so lucky your wife puts up with you taking over those nice granite countertops!
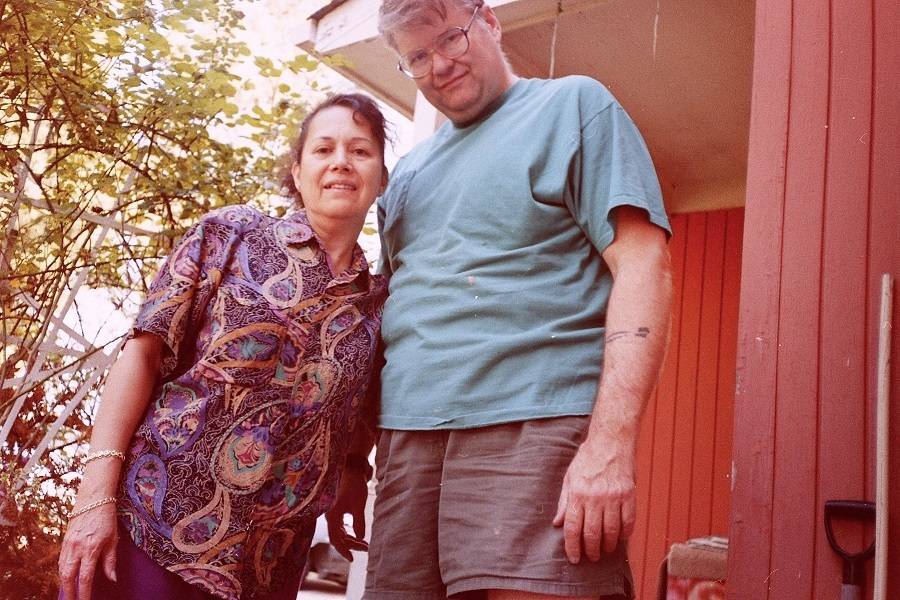
Hell... she encouraged it. Ellie was the other half of, D&E Miniatures for over 40 years. Just as long as we kept the paint and dusty work in the shop, the countertops were on the agenda as truing surfaces.
Hell... she encouraged it. Ellie was the other half of, D&E Miniatures for over 40 years. Just as long as we kept the paint and dusty work in the shop, the countertops were on the agenda as truing surfaces.
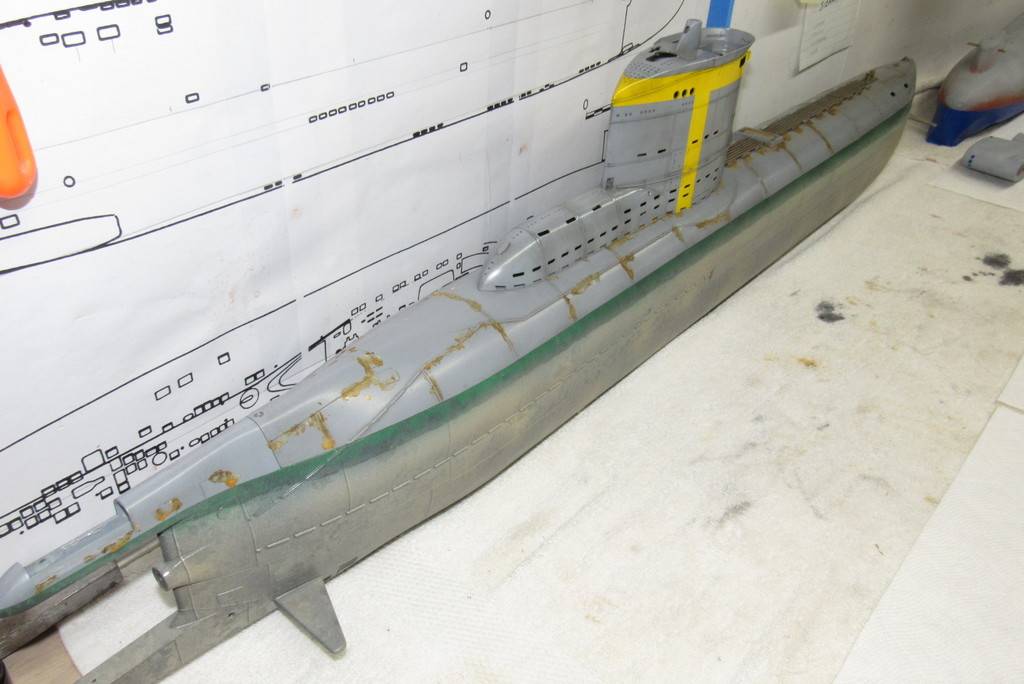
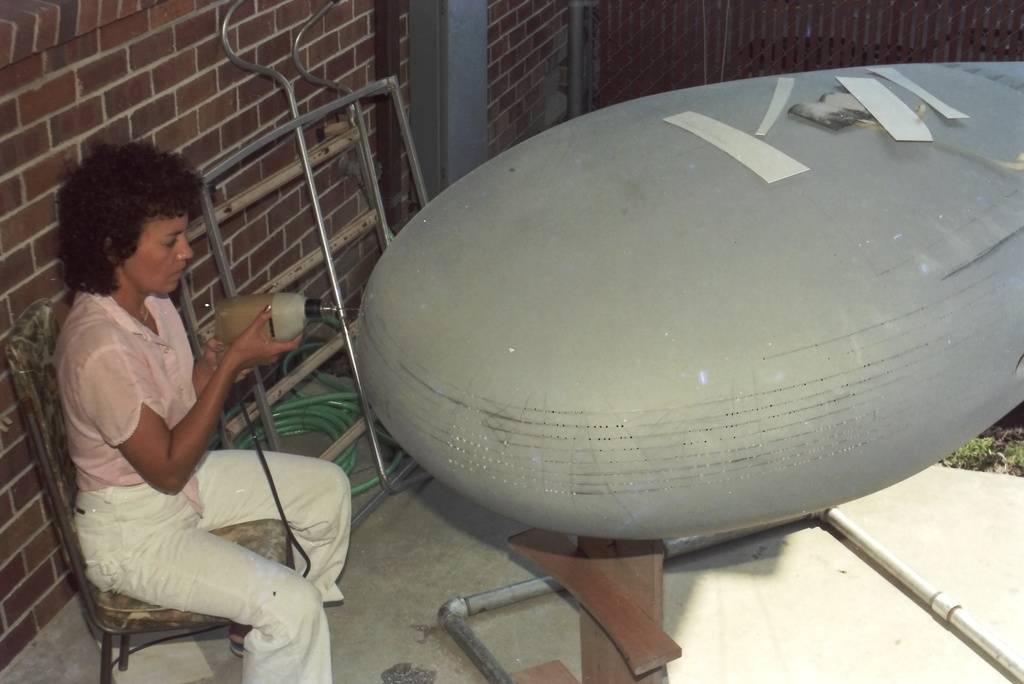
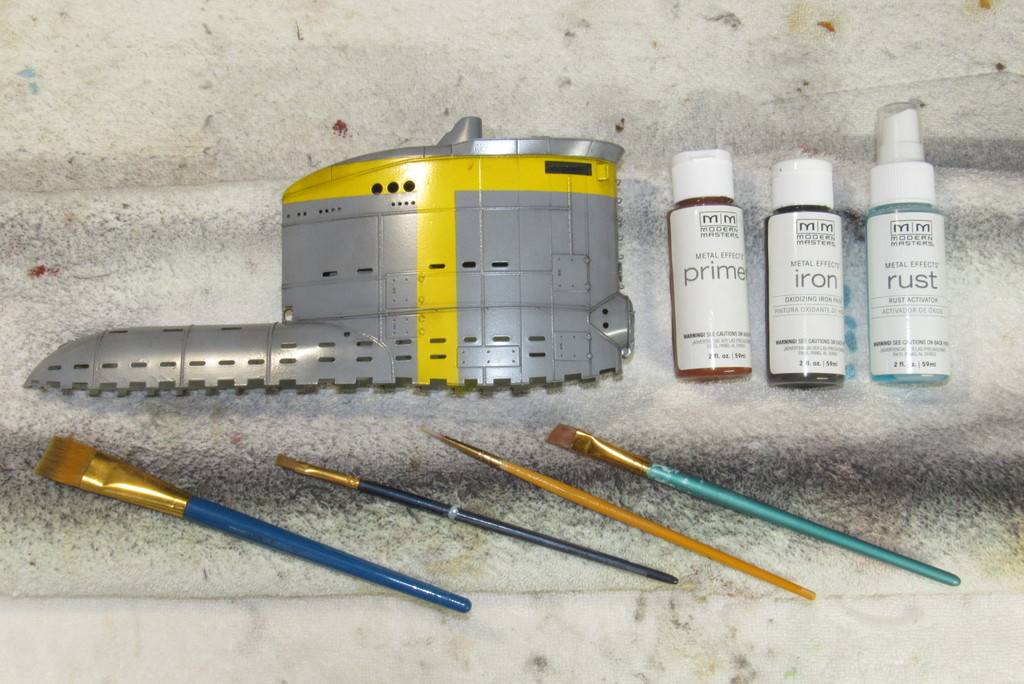
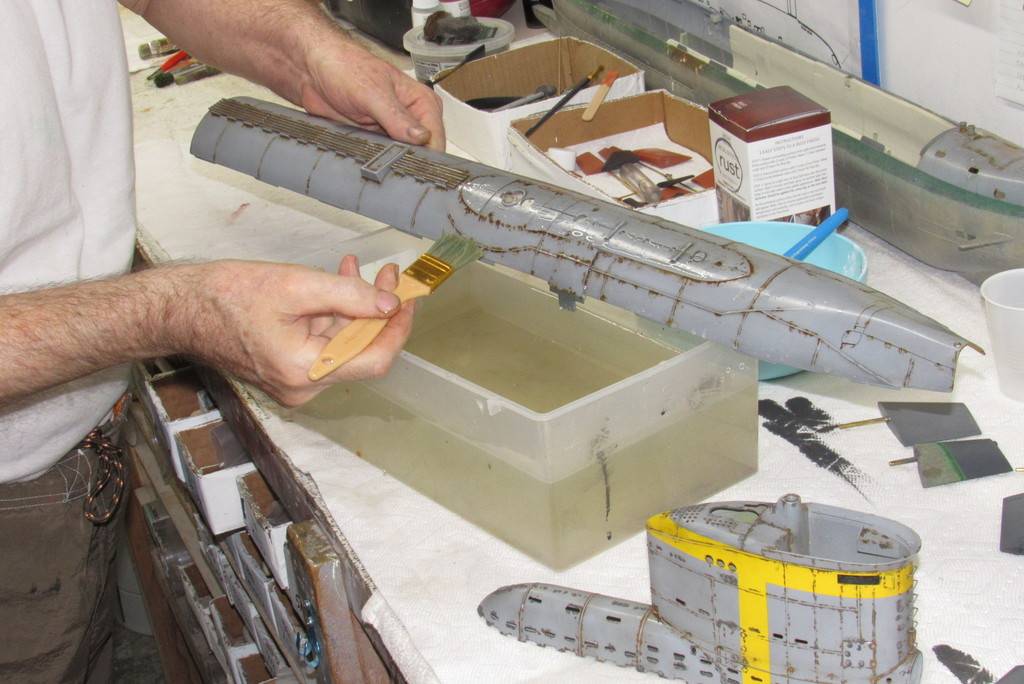
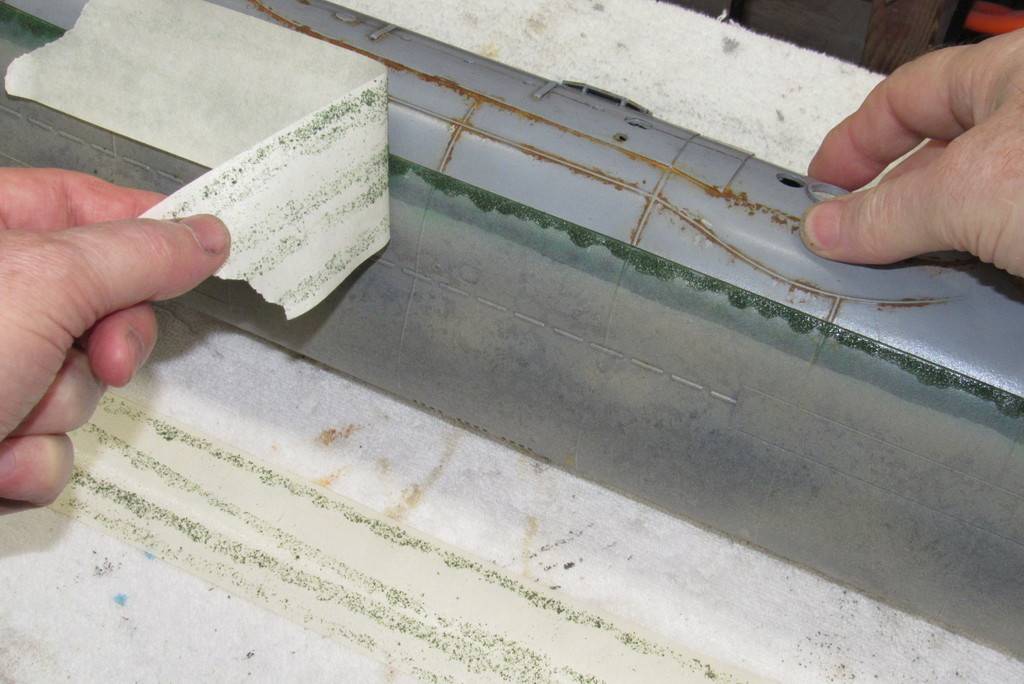
Towards the end of the second world war Germany was desperate to complete and get operational her new breed of fast 'electro-boats', the Type-21 ocean going, and coastal Type-23. Wishing to illustrate how rough-and-ready these boats, being worked up for war patrols, likely to have received sub-standard maintenance and hull preservation – my display had to have the look of a vehicle where looks came in a distant second-place on the list of the Commodore's and crews priorities.
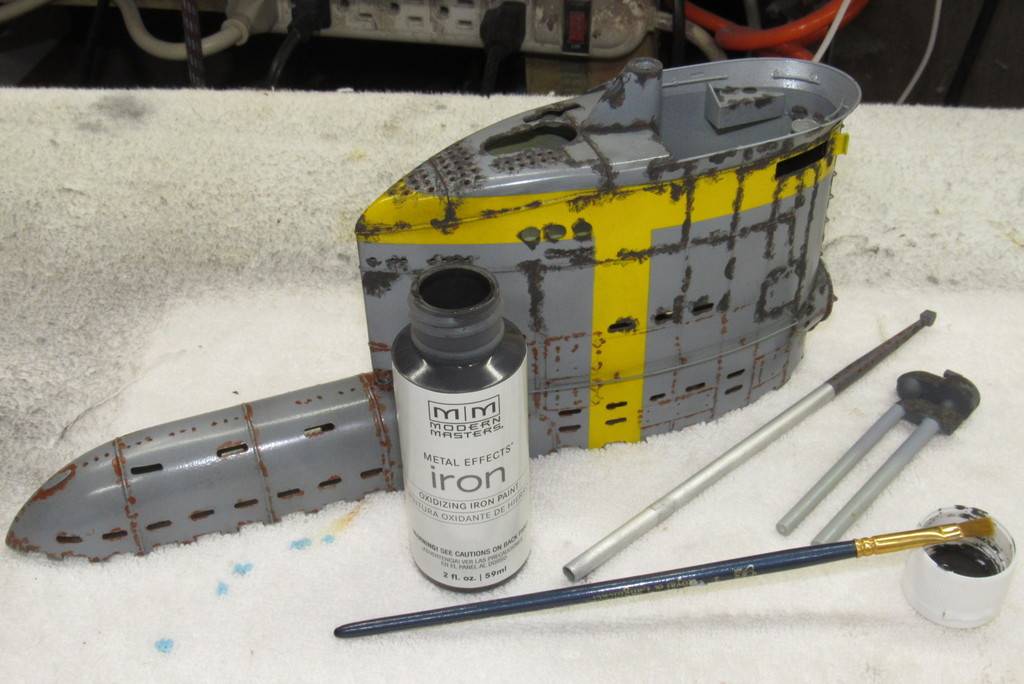
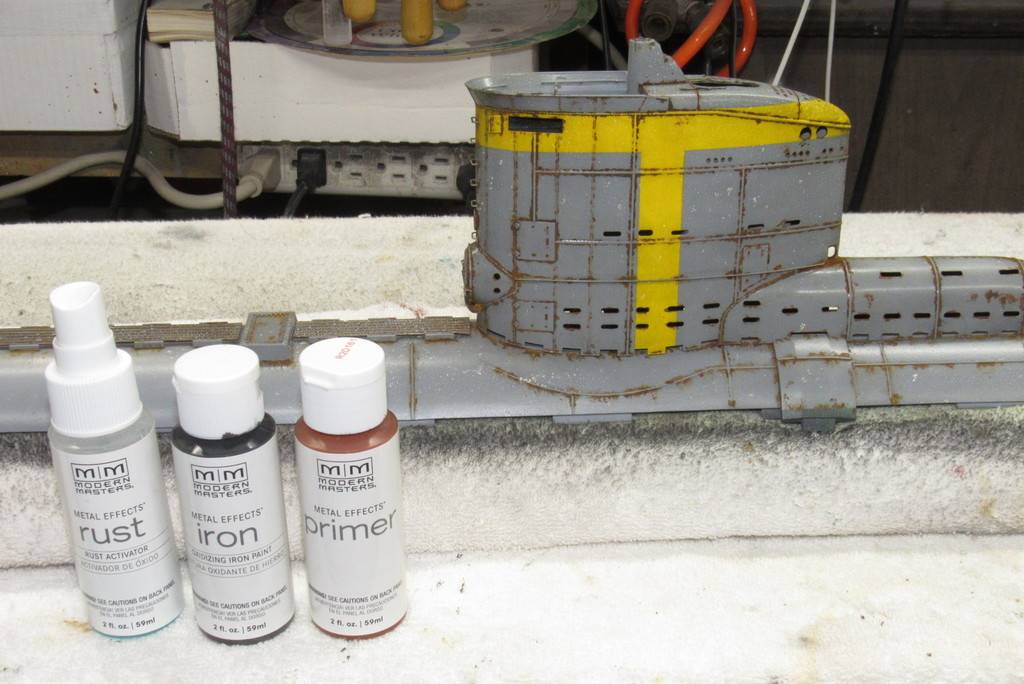
These boats were operated hard and put away wet. Those that survived long enough to gather rust and mung on the hull did so with little effort expended to clean things up. So, my model needed a ton of rust. And nothing looks like rust like... oh, I don't know... RUST!
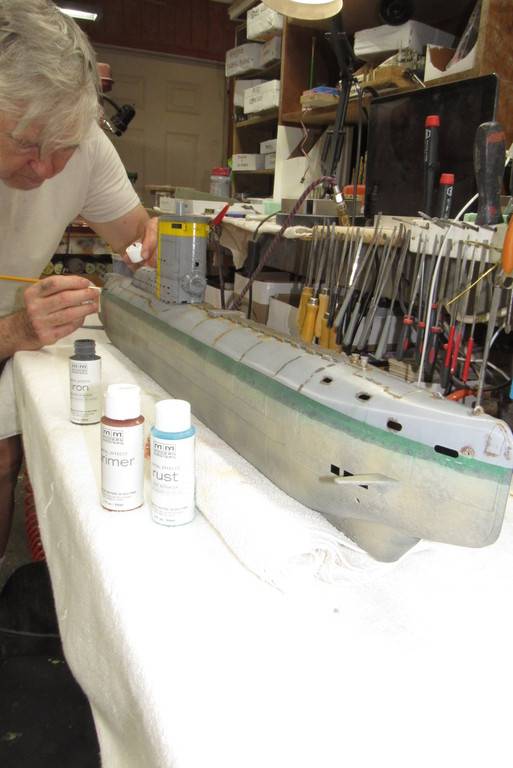
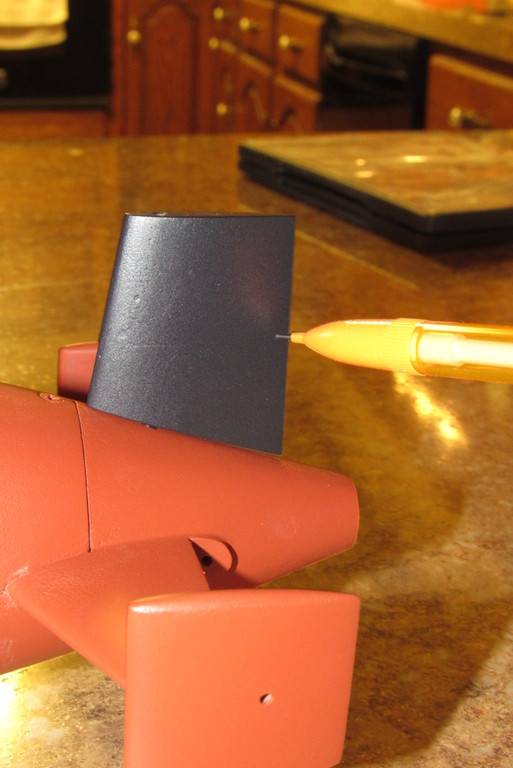
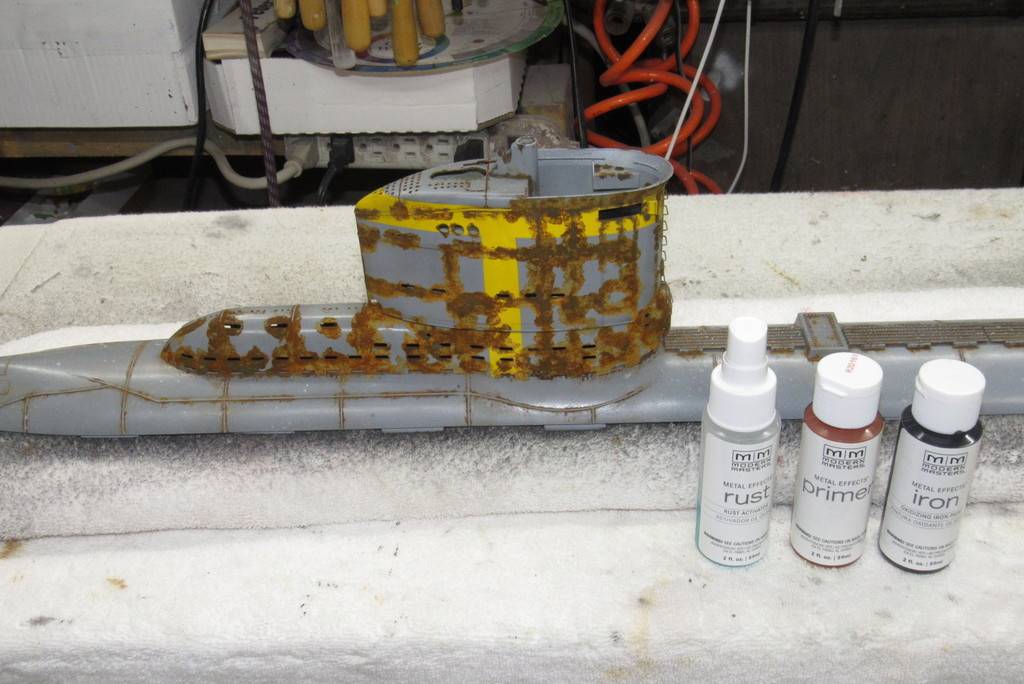
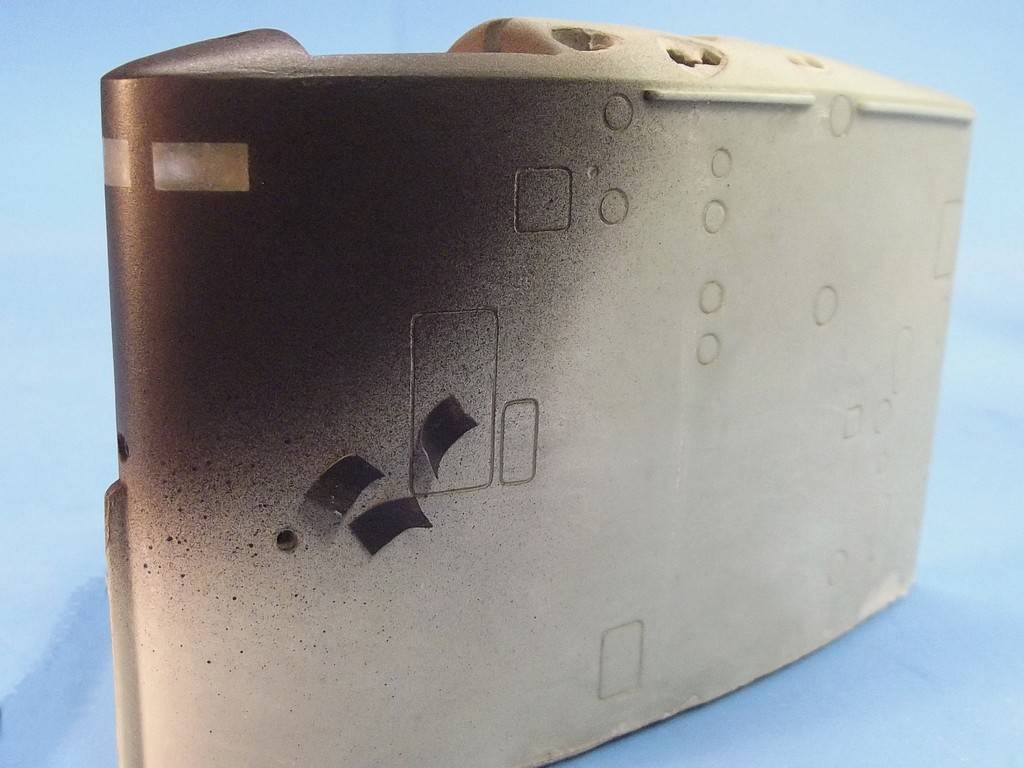
For this model I first gave everything a nice think gloss clear-coat and then employed the Modern Masters 'rust' system: A primer to hold the iron powder paint, and a acid spray bottle to oxidize the applied iron bearing paint.
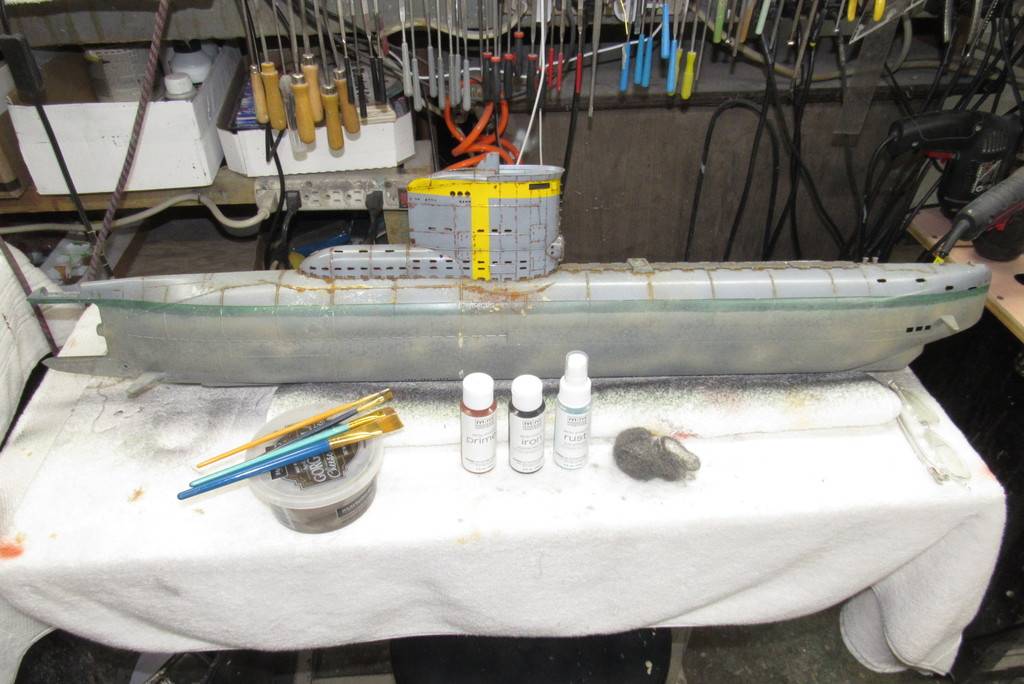
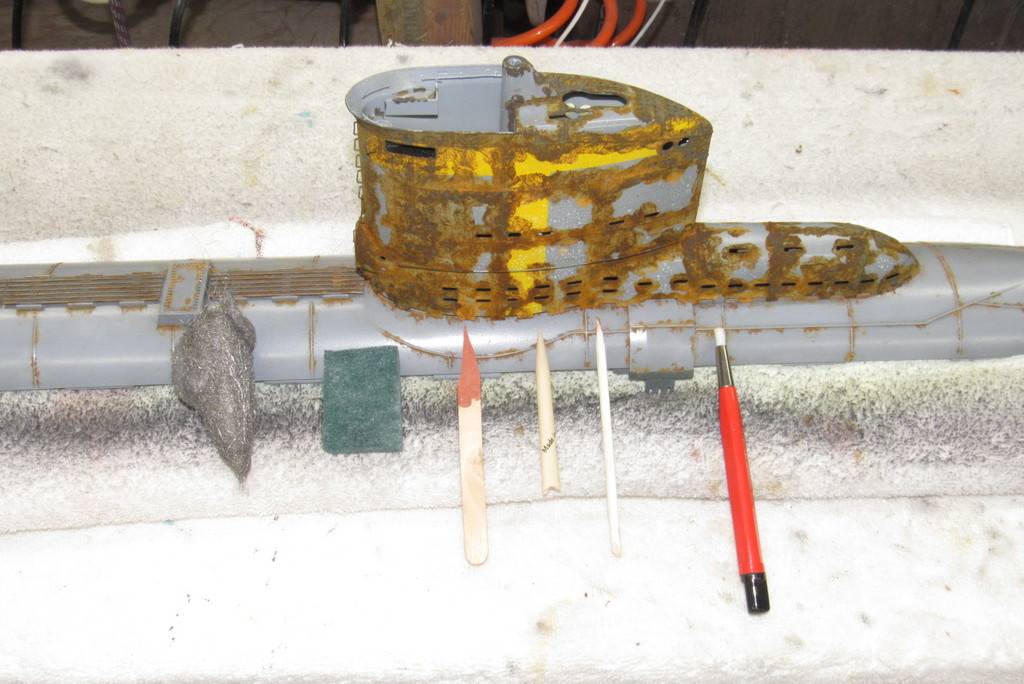
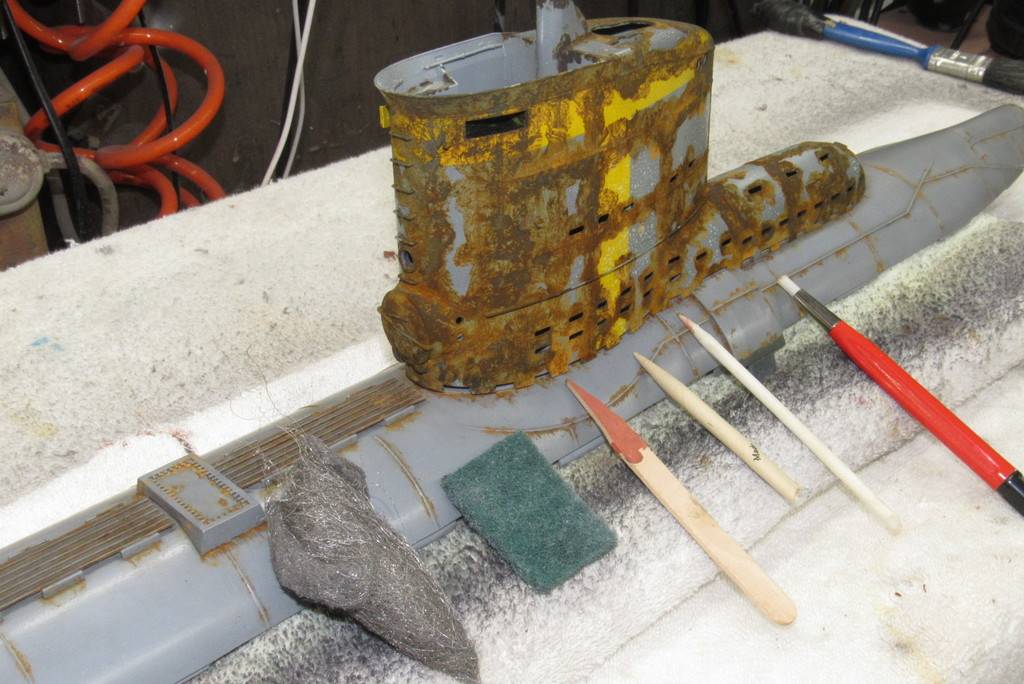
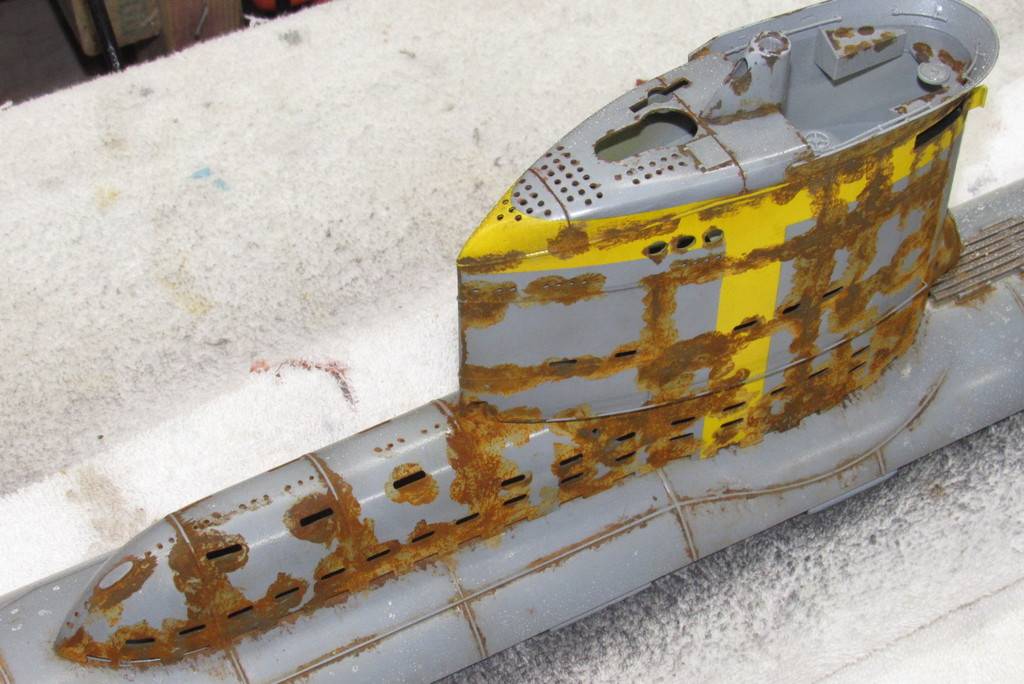
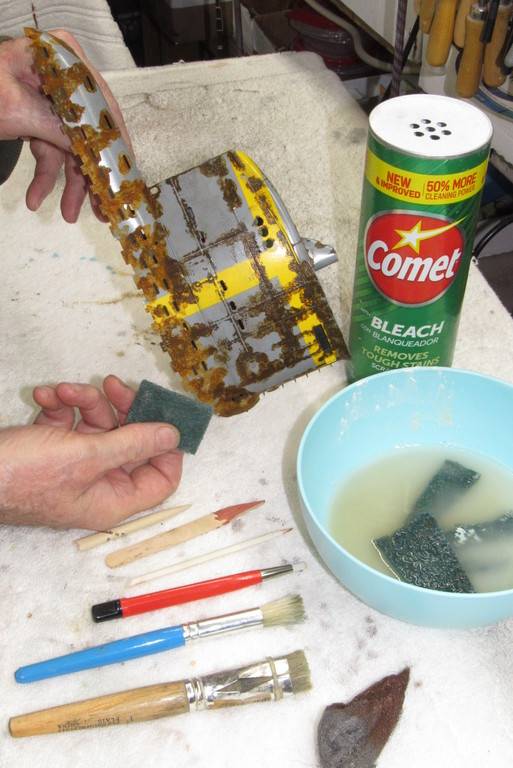
This looks like a stinking mess (and at this point it is!) but with all the iron oxidized and belching rust all over the place, it's now up to me to wipe away with various abrasives the excess rust and to do it in such a manner as to suggest how rust will respond to the force of gravity and the geometry of the surfaces it originates at and runs down from.
The sail has only received the primer at this point, but the hull has had both primer and iron paint applied and oxidized. You can see the untouched results.
Applying primer to weld beads, access door and hand-hole edges, base of ladder rungs and railing, limber holes, and other areas where rust will originate and propagate.
Meanwhile I painted the black portions of the KILO, WEBSTER, and BLUEBACK. A very, very dark gray – my stand-in for any model surface that is supposed to represent 'black'.
Removing the masking after laying down the black. This revealed some holidays in the anti-fouling red paint. Some counter-masking and touch-up with the red fixed all that.
As the red-black demarcation line was at the BLUEBACK's waterline I had to mark off and mask the upper rudders demarcation line. Back to the kitchen table-top to mark off the pencil cheat-line to the rudder.
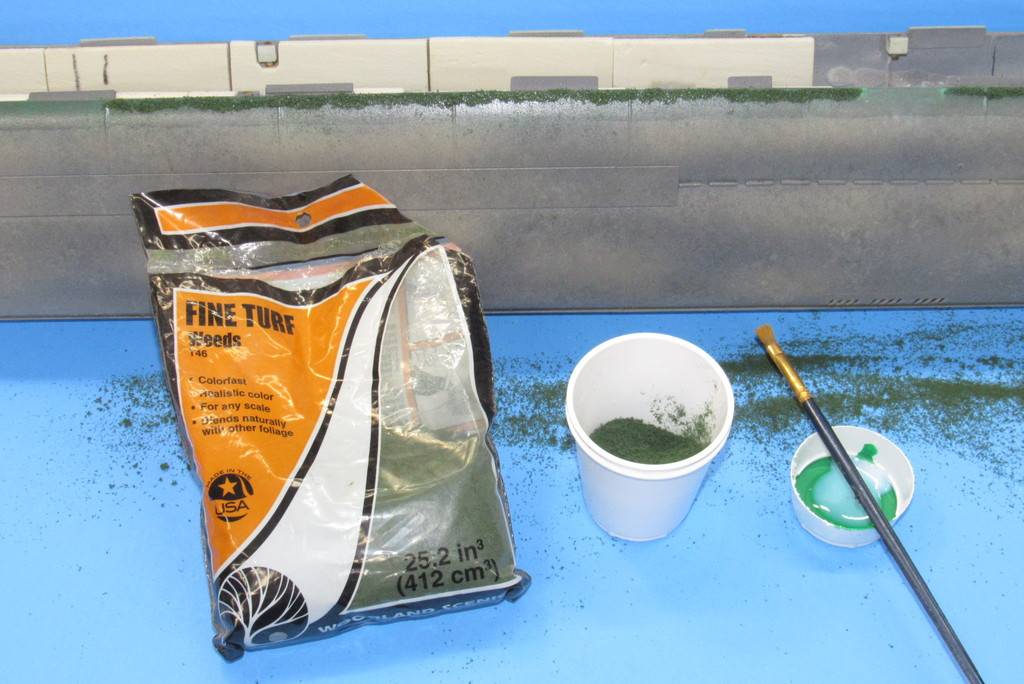
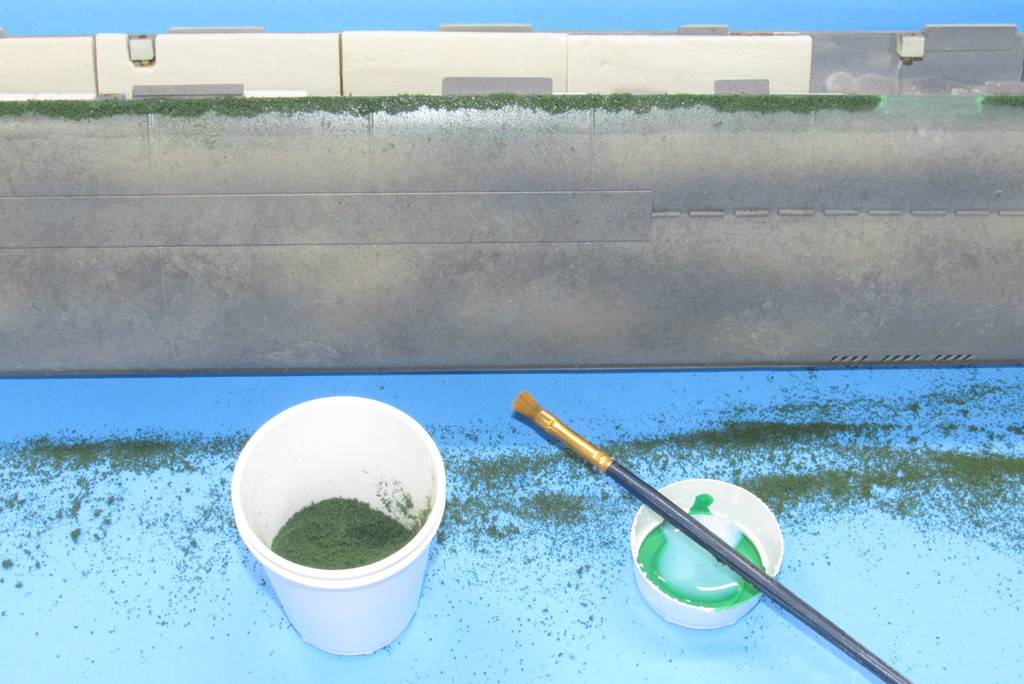
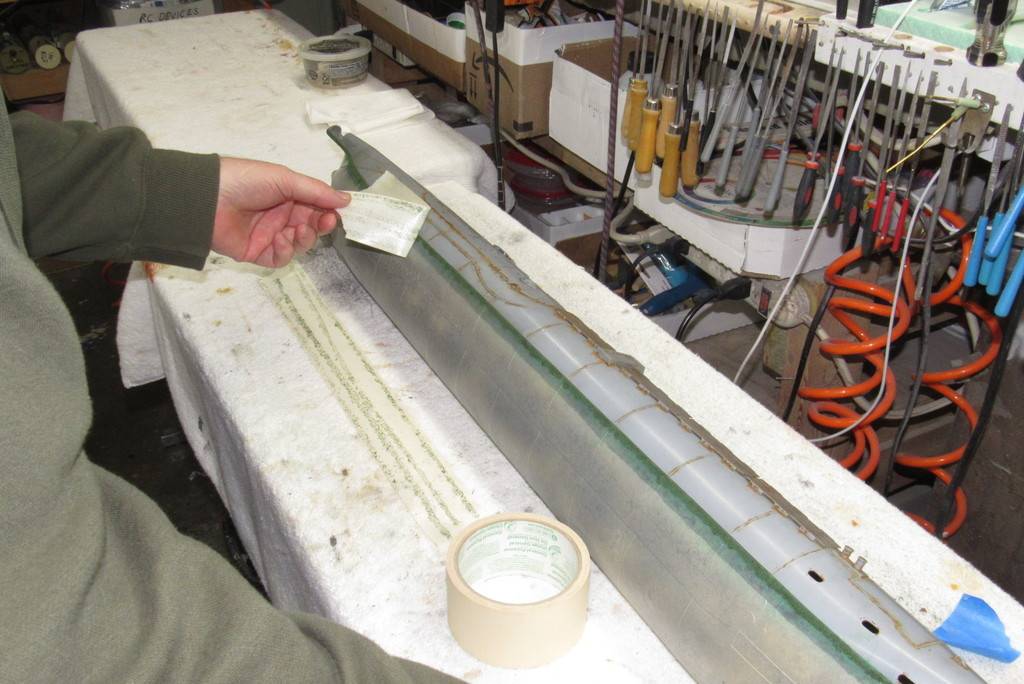
Almost done with this model. A clear flat-coat, some dry brushing, and lay-down of some green railroad 'turf' to represent the waterline grass and this display is finished and ready for the SubFest all r/c submarine regatta next month.
The larger sized submarines, and by that, I mean just about any watercraft of 1/48th or larger, are big enough to realistically employ model railroad green 'fine turf' as a stand in for the waterline 'grass' often observed on boats either tied up to a pier, or recently left standing on keel blocks in dry-dock. The 1/35 Bronco Type-23 model was a perfect candidate for this treatment.
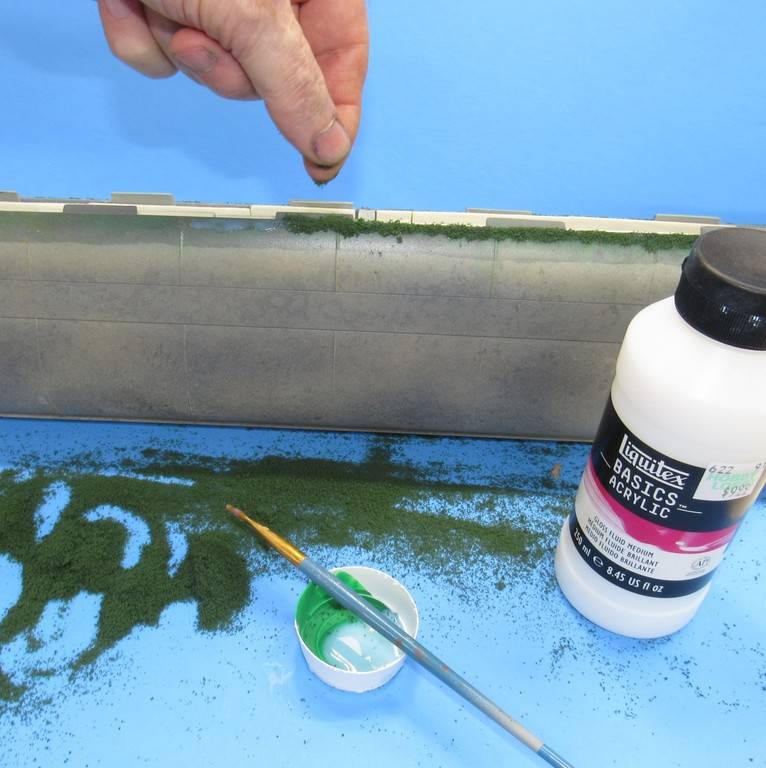
The trick is simple: brush on a slow-dry/cure adhesive at the waterline – water soluble (but waterproof after drying) acrylic 'medium' is the adhesive of choice here. Before the glue dries you simply sprinkle on railroad turf and pat it down every so lightly to embed most of it into the glue. Leaving the work alone til the glue dries/cures hard.
The majority of the rail-road turf will fall way as its laid down and patted into place, so it's a good idea to do the work over a piece of cardboard that make reclaiming of the turf that falls away an easy matter.
Note that the majority of the break between lower and upper hull halves was made at the waterline. I only had to take care of the bow and stern sections when laying down the glue as the central portion of the lower hull had its break edge at the waterline – no way to screw up with the brush there!
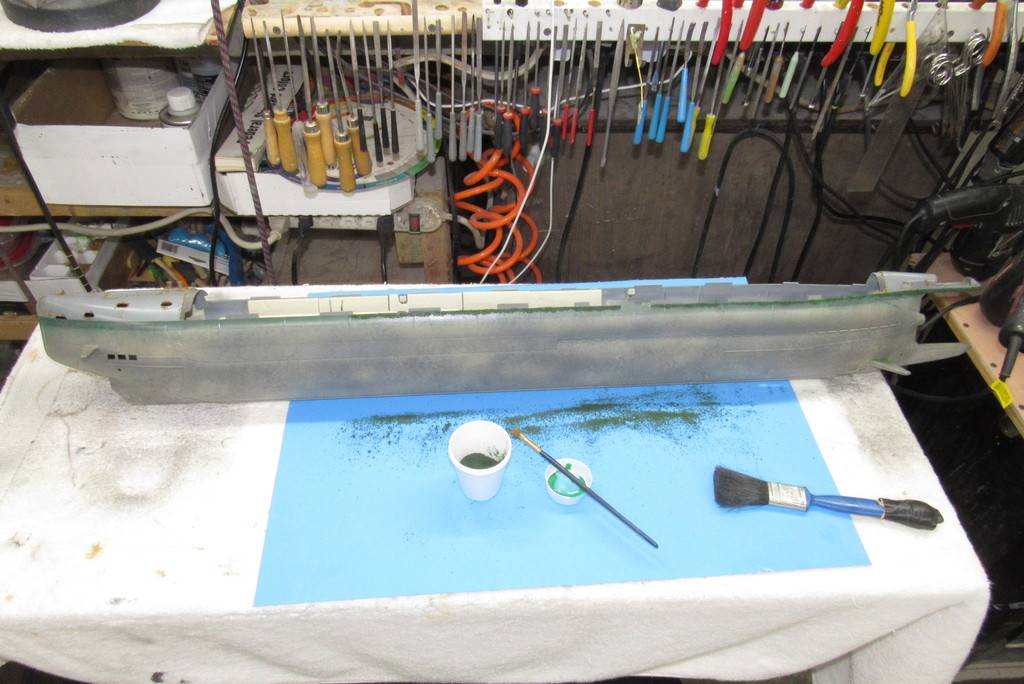
Once the glue had dried masking tape was used to pull away any turf not secured enough to keep it from flying away during the clear-coating lay-down – which would ruin the effort. The model was then ready for any touch-up painting and given a final well flattened clear-coat to lock down all paint and weathering agents and to give the display a uniform sheen.
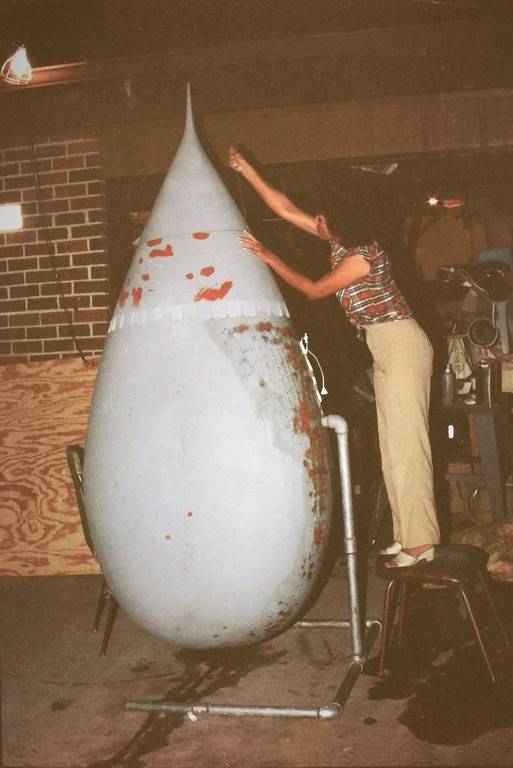
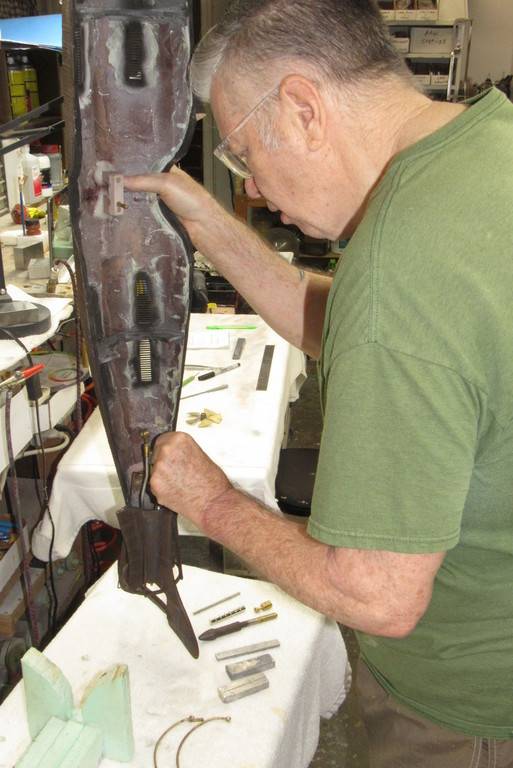
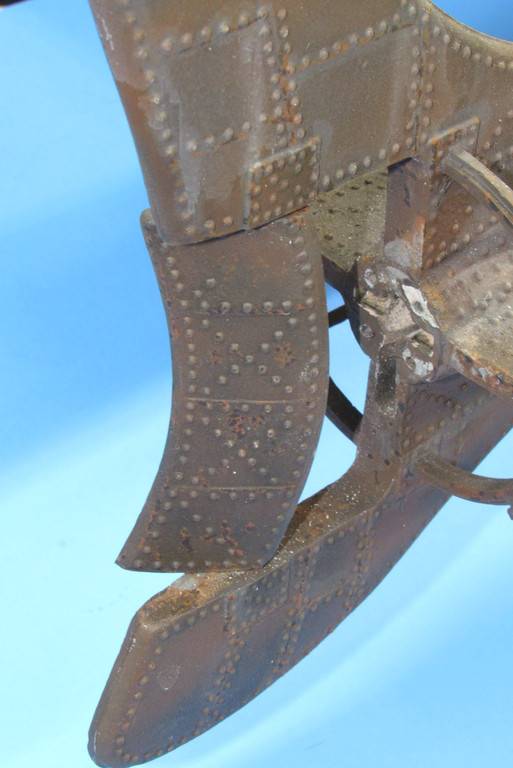
Almost done with the Ray Mason Disney NAUTILUS Jake has assembled and painted. It's now in my horrible custody for final checks, dial-in, and trimming before we can declare this thing certified and ready to cruise the Red Clay Resort swimming pool looking to ram ships found to be in the service of that, 'accursed nation' (I'm looking at you, Casey!)
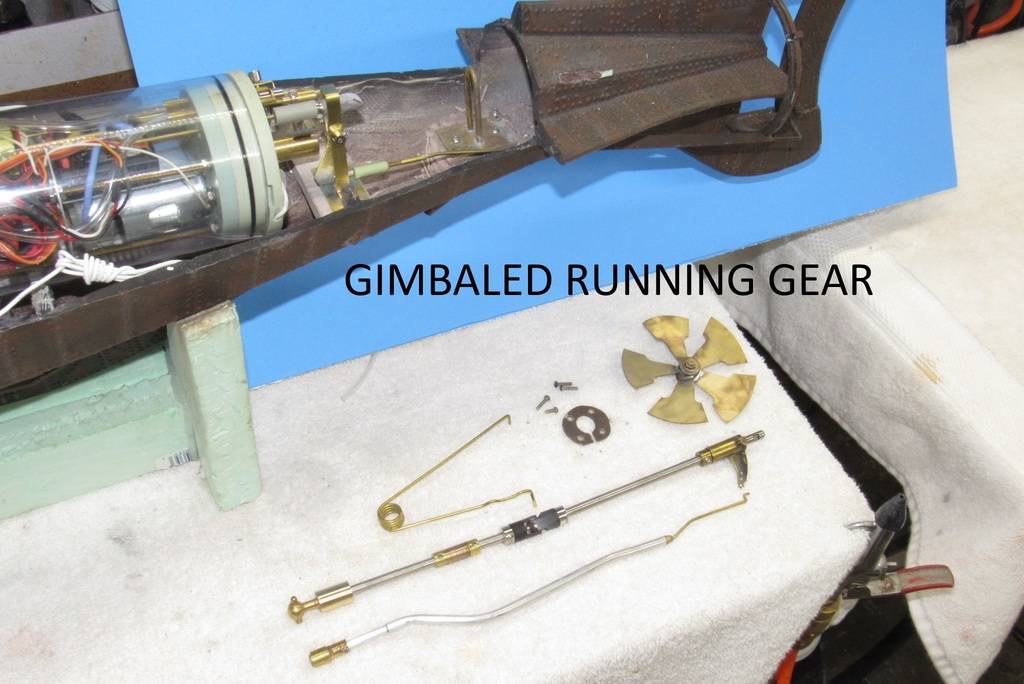
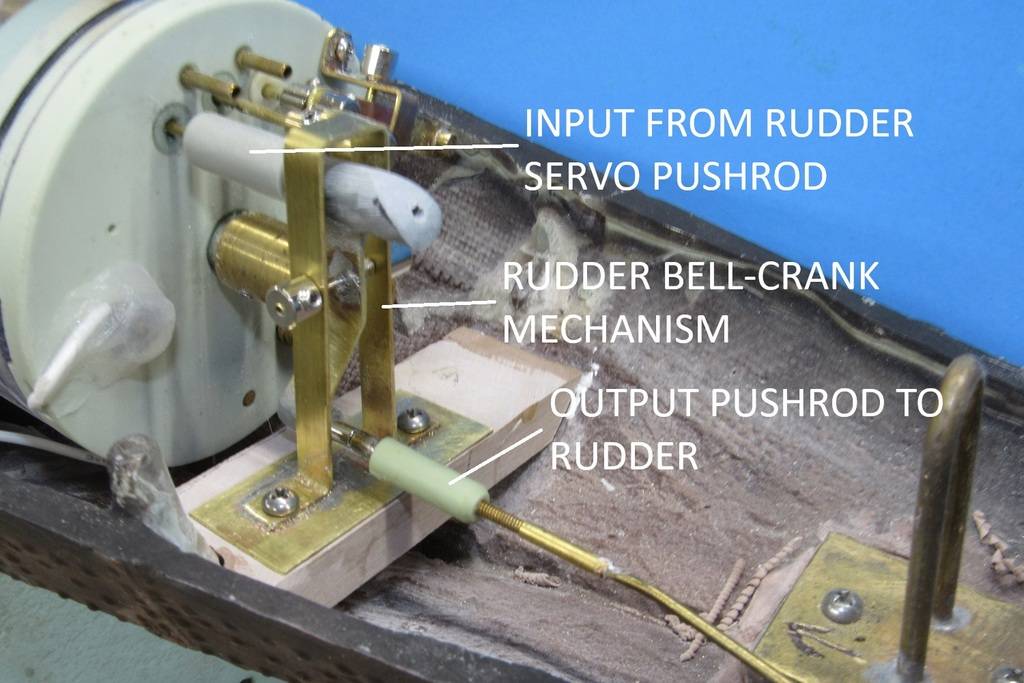
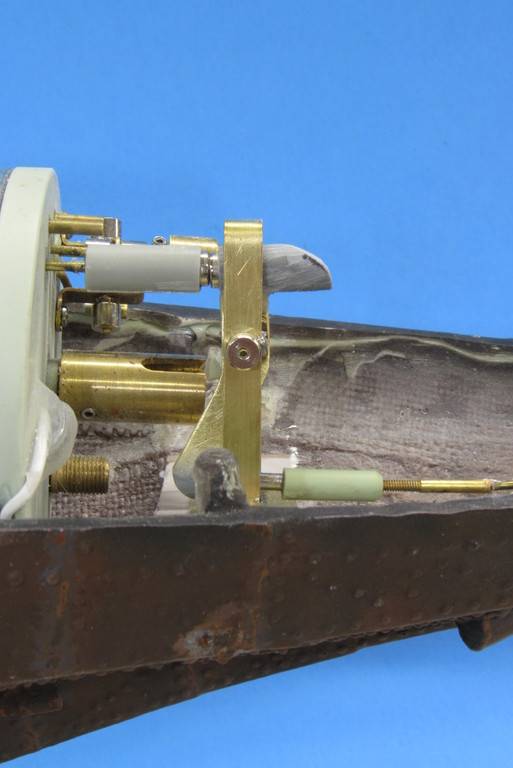
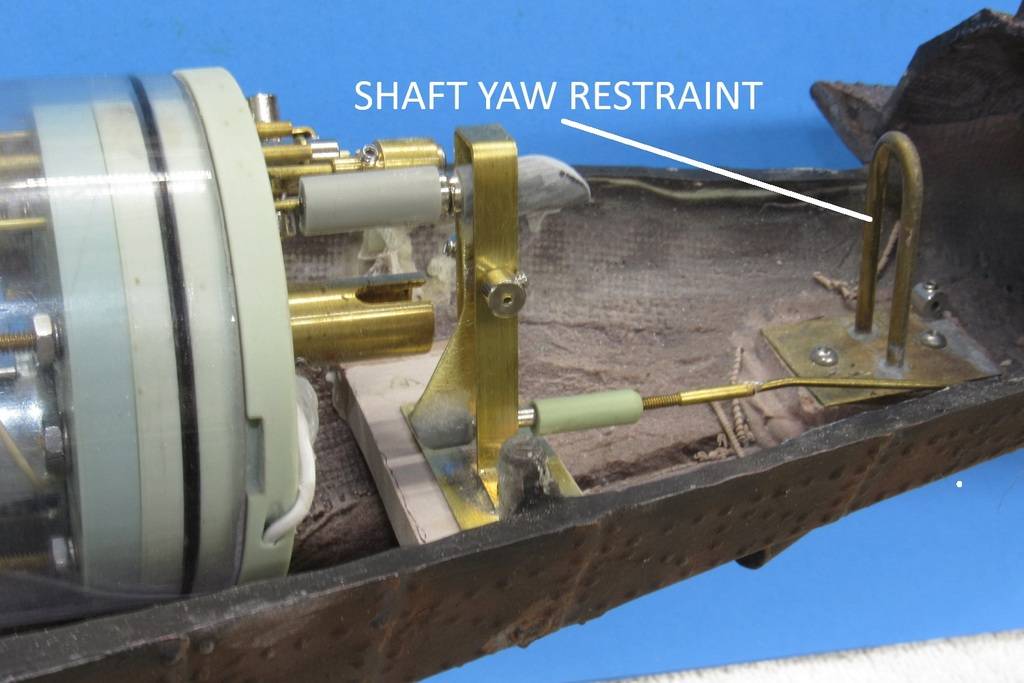
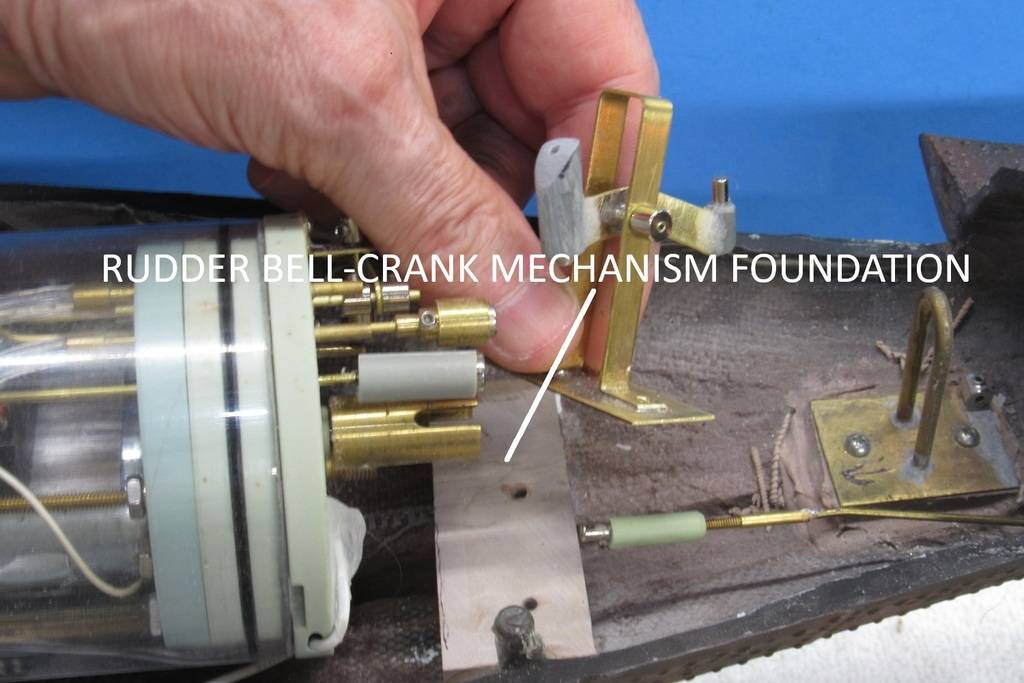
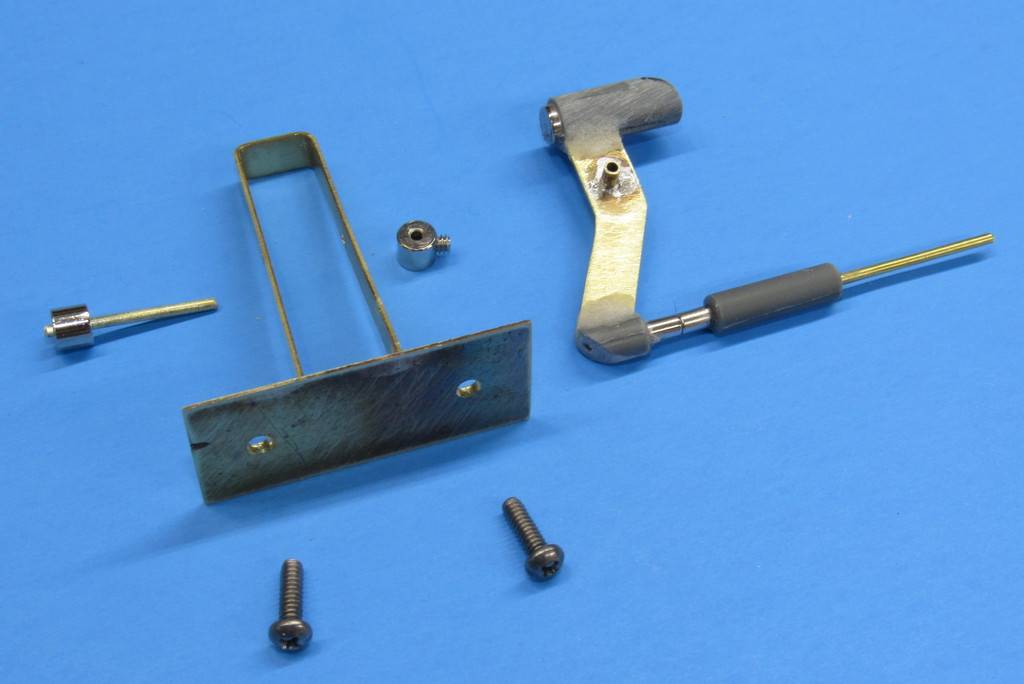
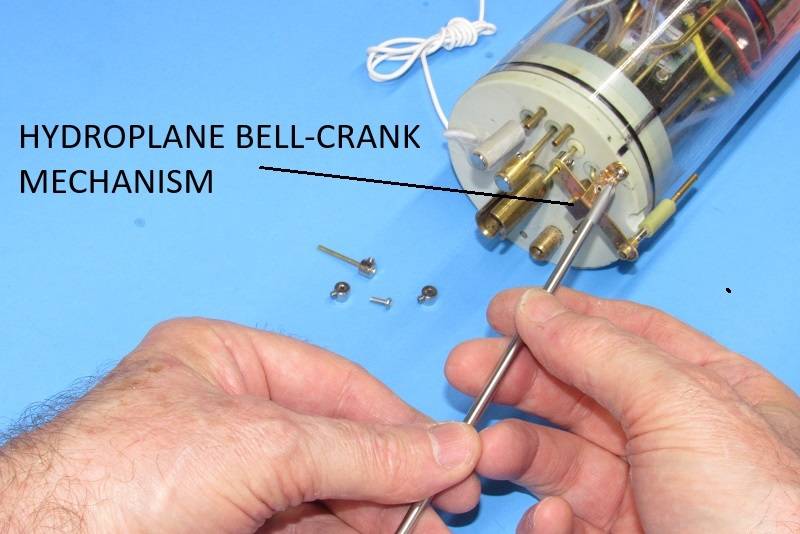
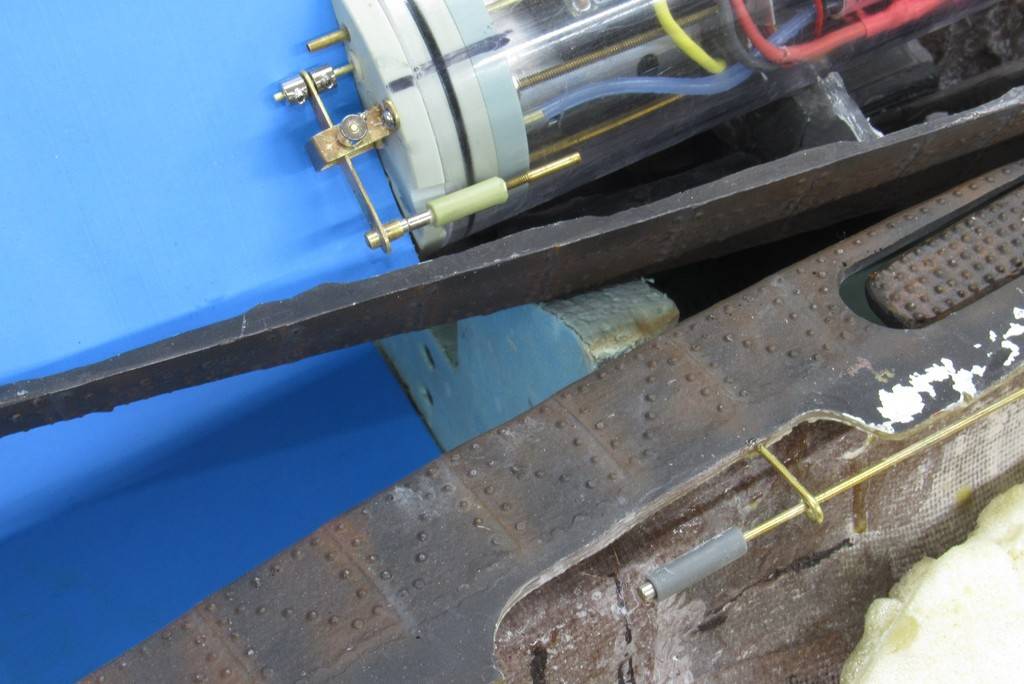
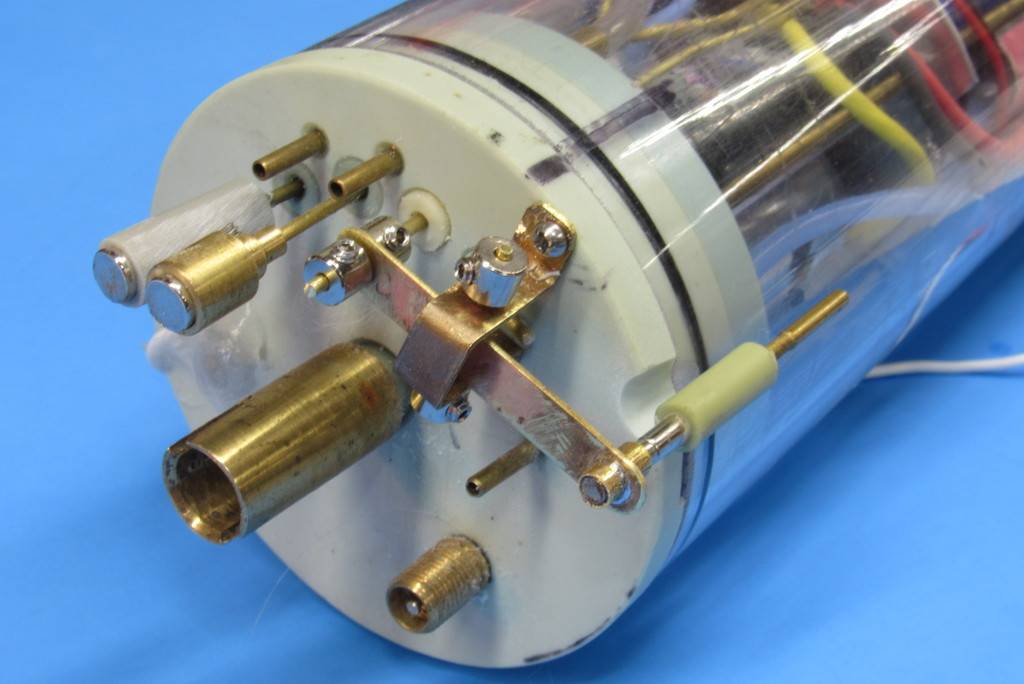
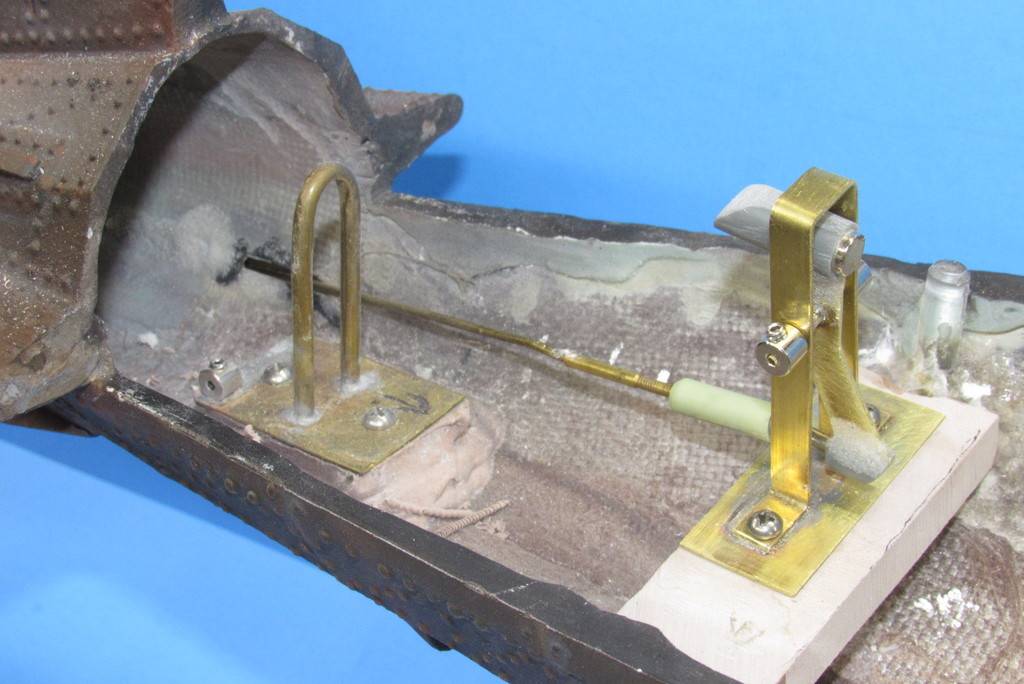
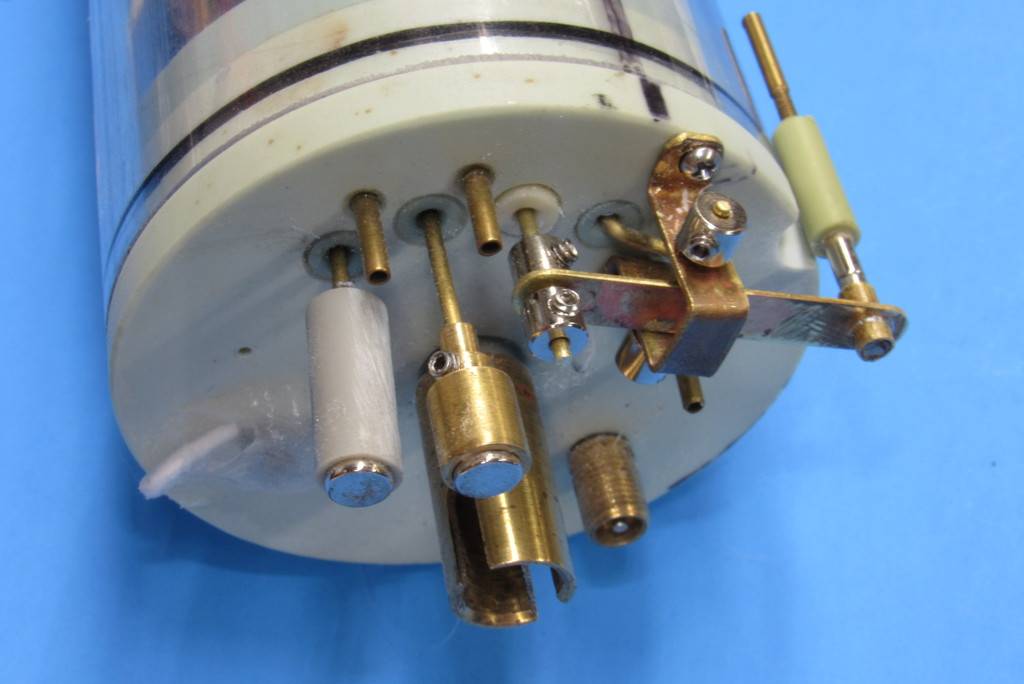
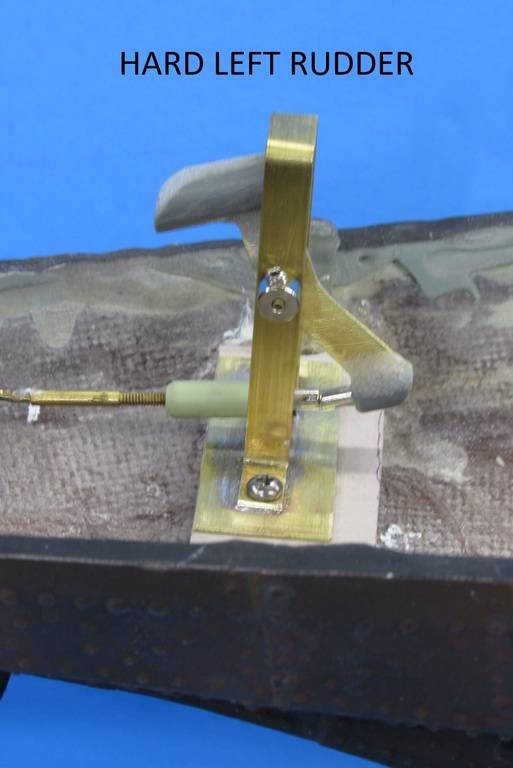
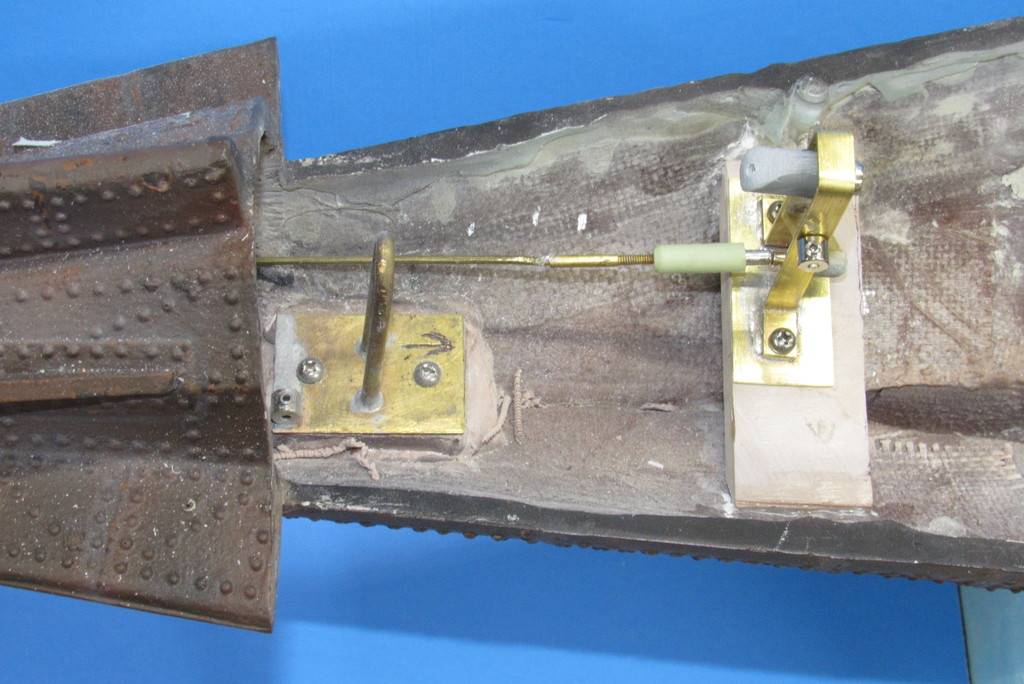
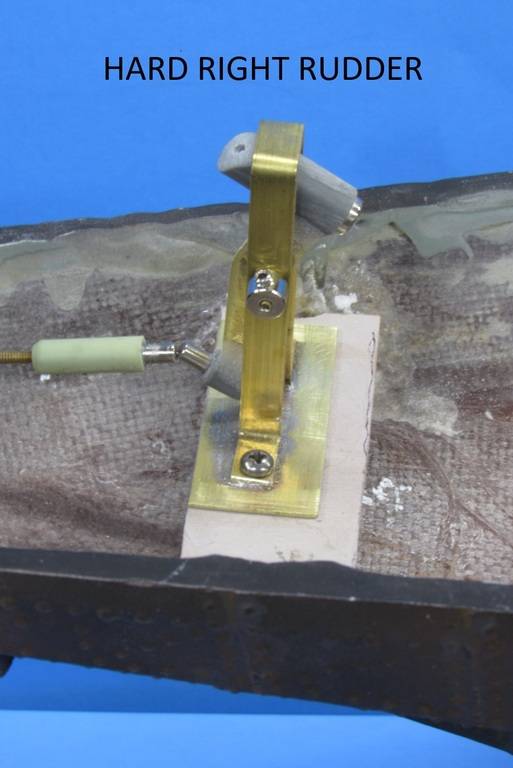
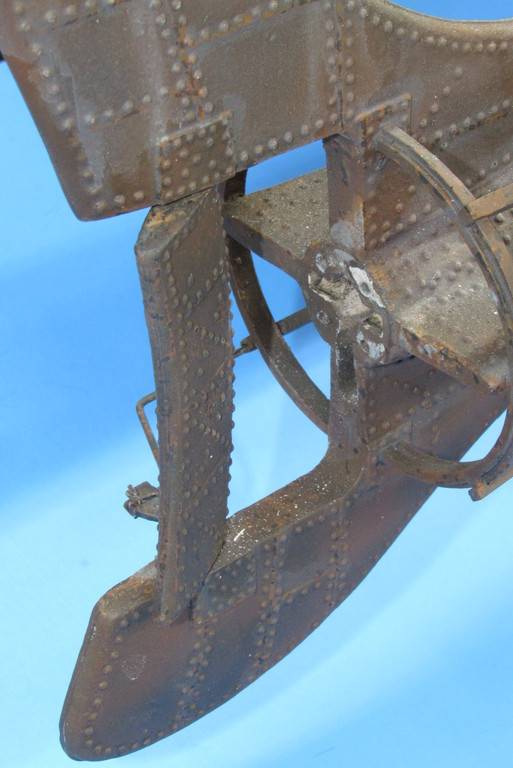
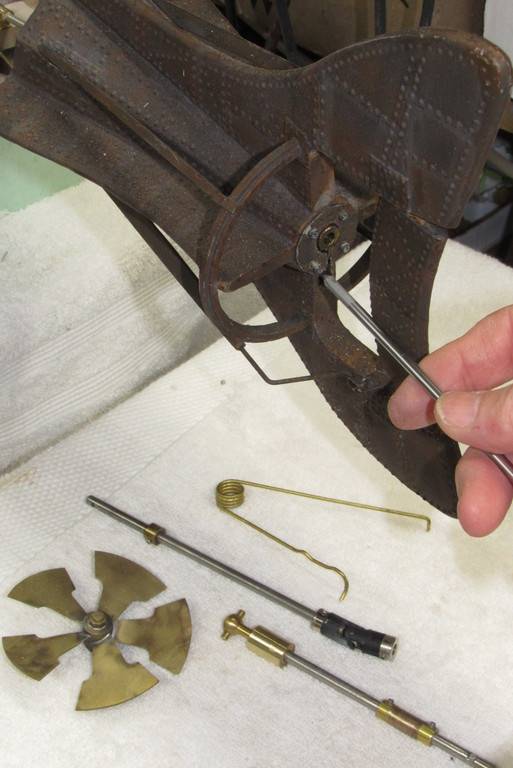
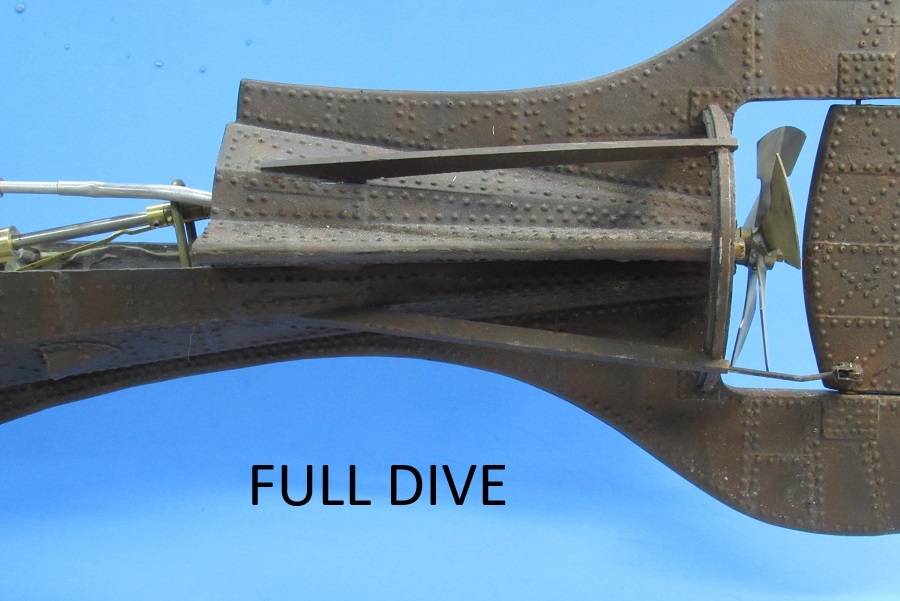
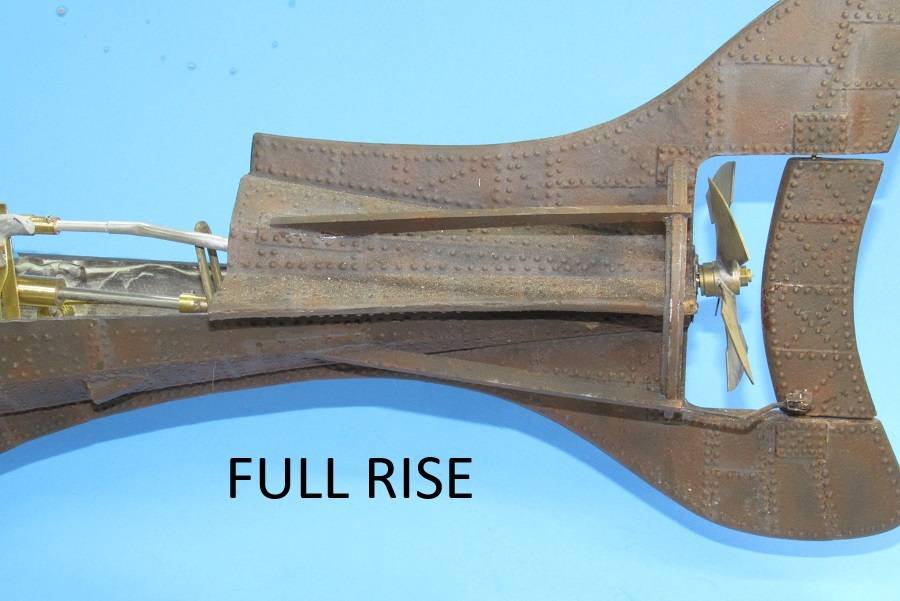
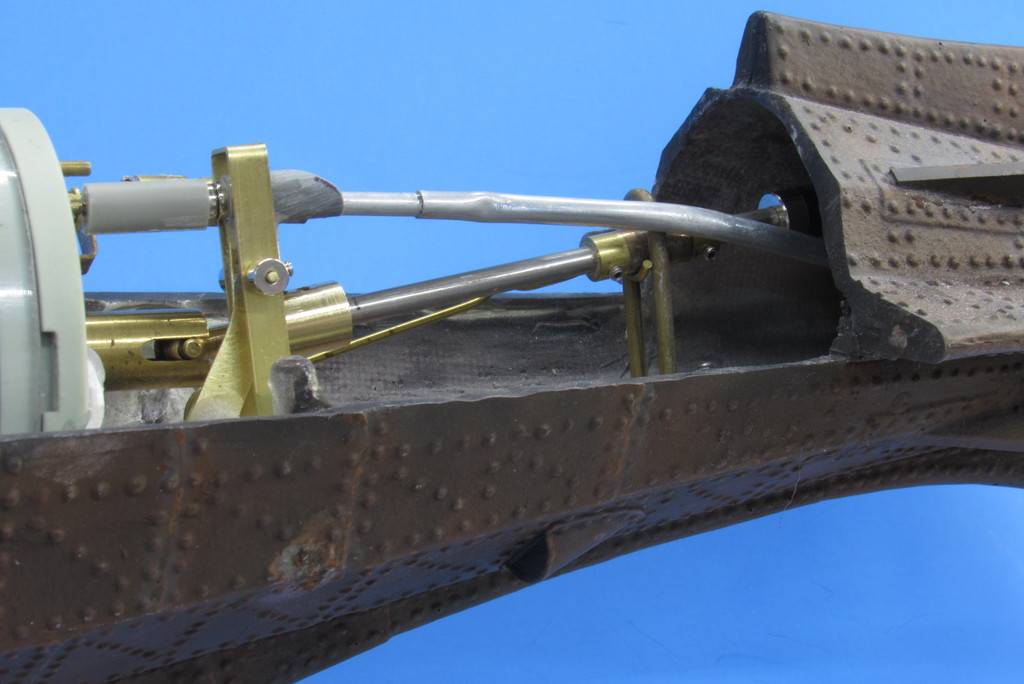
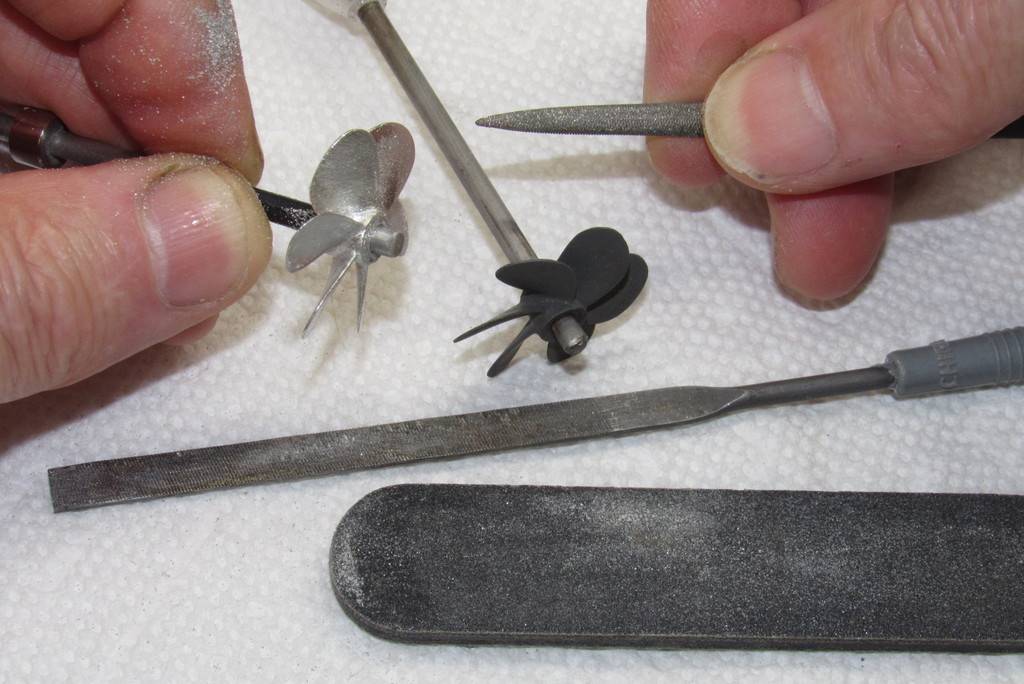
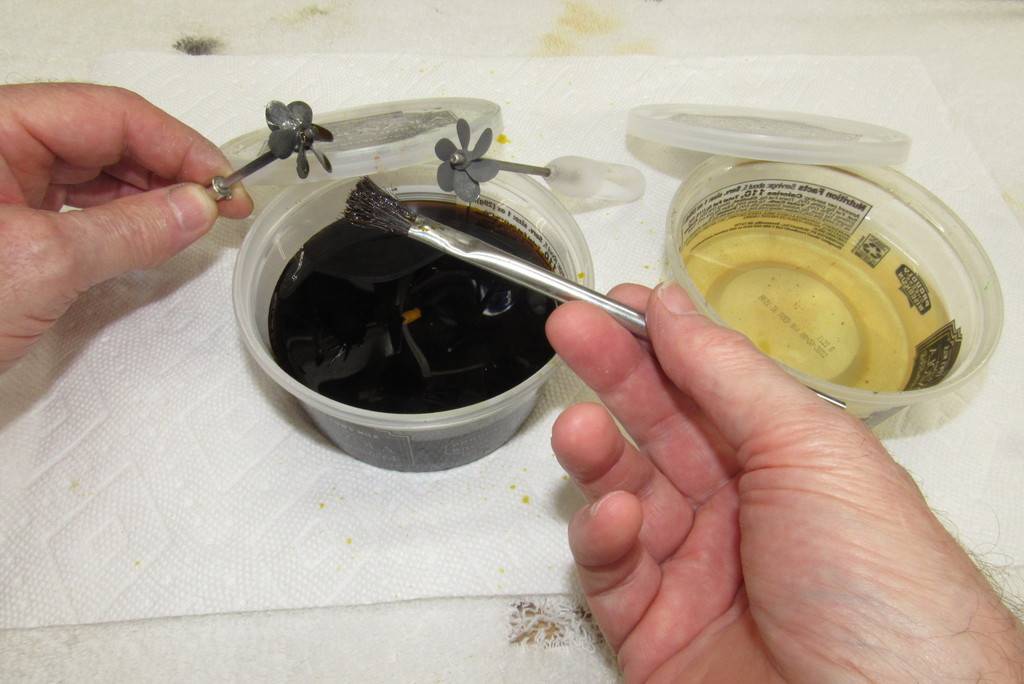
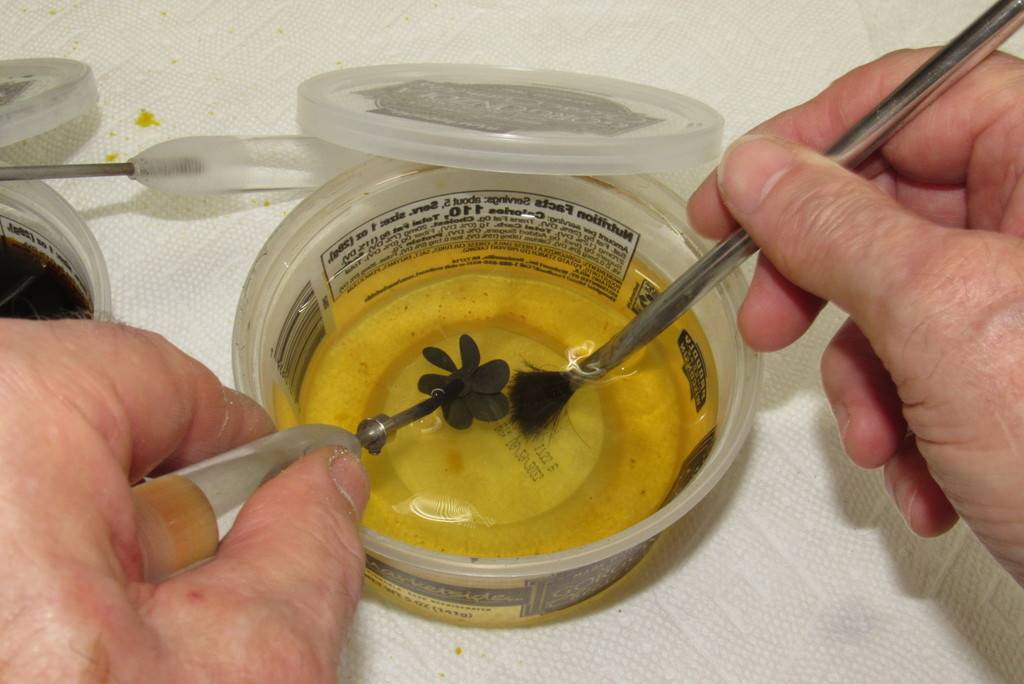
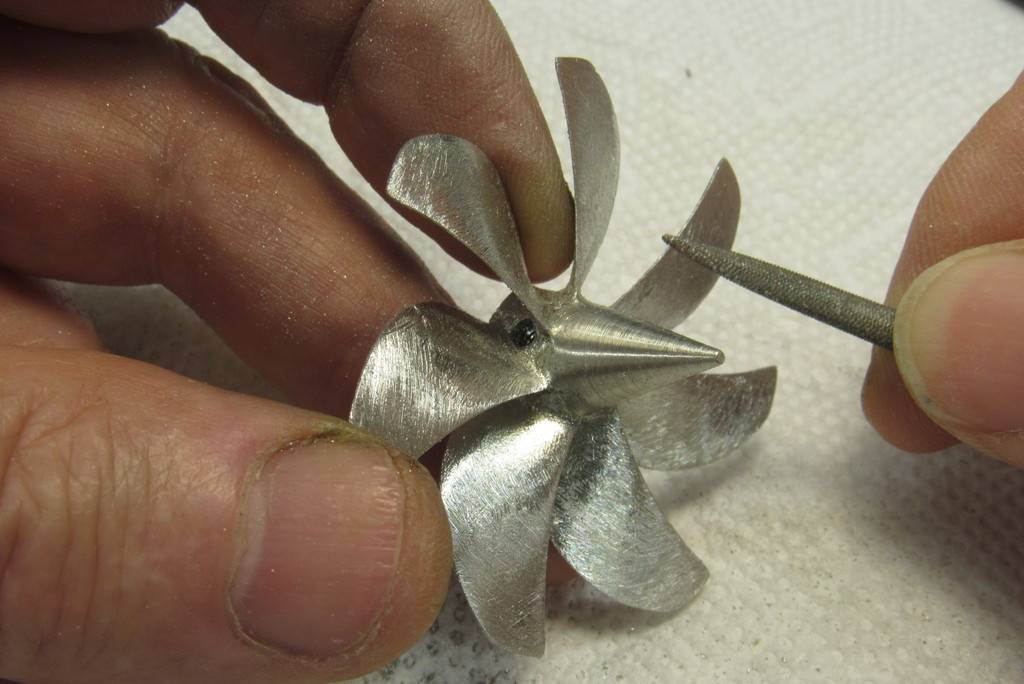
Here I'm putting on the final touches to free up the propeller gimbal mechanism. As the Disney NAUTILUS had no practical planes to control pitch I've elected to vary the propeller thrust line about the pitch axis to effect pitch angle changes and maintenance – needed to make this otherwise incredible submarine work in a credible manner.
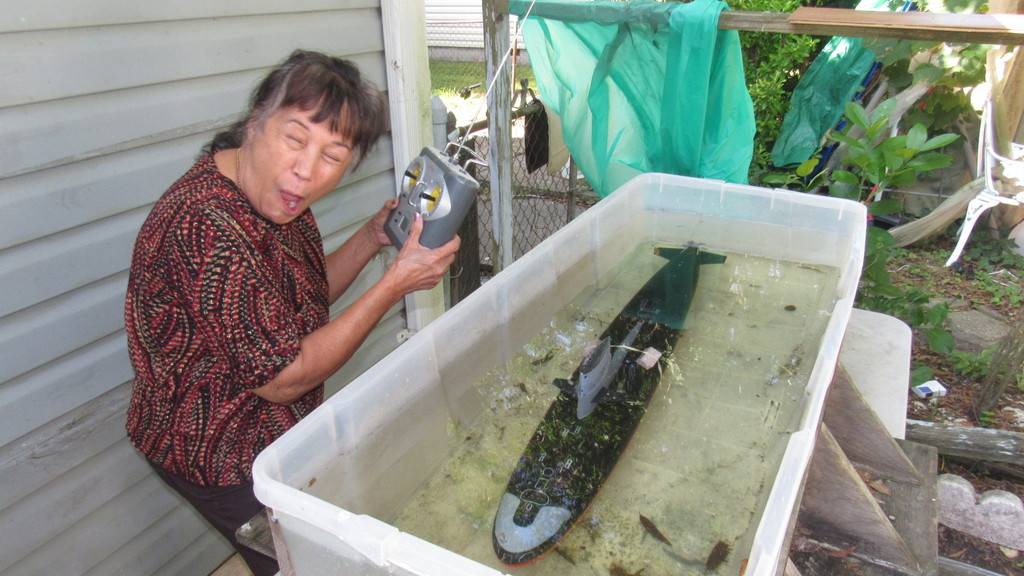
Jake was here yesterday with the painted model – and he did a wonderful job too, simply beautiful and so gracefully capturing the look of the movies miniatures and full-scale sets. Trouble was – though we planned to have it in my test tank for final trimming, we kept encountering gremlins with the electronics.
After a half-day of sleuthing, I finally narrowed the search down to an intermittently working battery eliminator circuit (BEC) – it worked sometimes, sometimes it worked half-ass, and other times it would not work at all. Replaced that POS problem-child with another and all problems went away. It was not until this morning I could put the NAUTLUS in the water and set the end-points for the throttle.
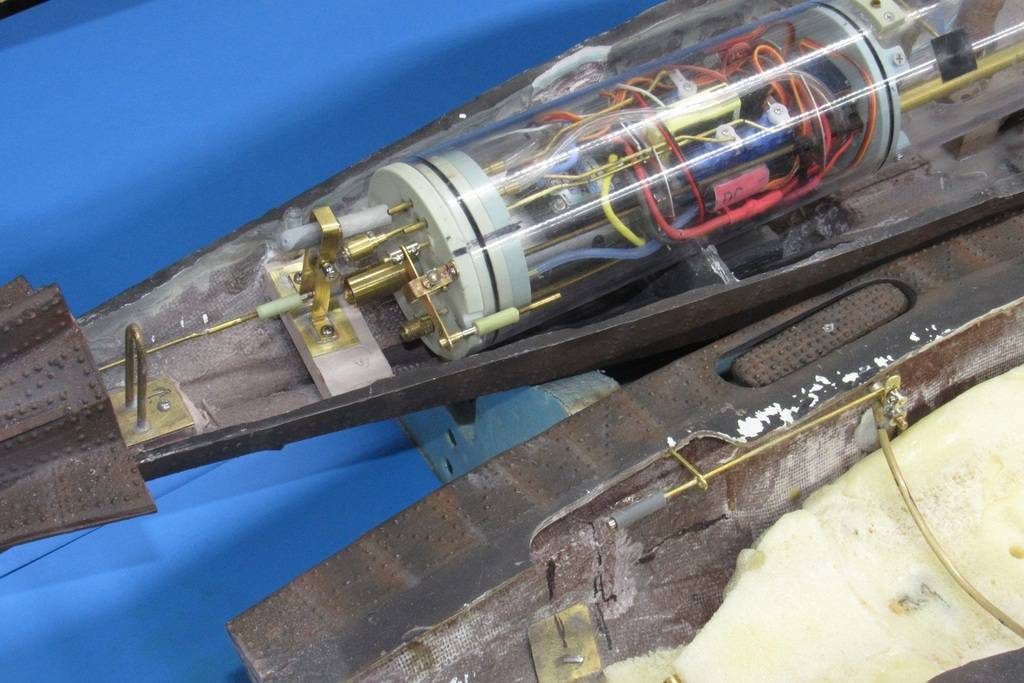
While at it I reduced the sensitivity of the angle keeping device – which controls the servo that works to pitch the propeller shaft axis about the pitch plane – to keep the propeller from jumping about owing to motor and running gear vibrations.
This morning, in the test tank, with everything in the water, I got the hoped for damping effect that attenuated most of the vibration sources; this greatly reduced the inevitable twitching produced by the angle keeper in response to system motor and servo operation.
This site uses cookies to help personalise content, tailor your experience and to keep you logged in if you register.
By continuing to use this site, you are consenting to our use of cookies.


![d1737b5886dabbf0e203ea8a5b4d7a31[1].jpg](https://www.secretprojects.co.uk/data/attachments/241/241008-8848c454d9babd3c7f30f02753dffa8e.jpg "d1737b5886dabbf0e203ea8a5b4d7a31[1].jpg")