Brengun's 1/48 Me P 1103 in raw materials

Skyraider3D

Aviation Artist
Joined
2 September 2008
Messages
401
Reaction score
136
Website
www.aviationart.aero
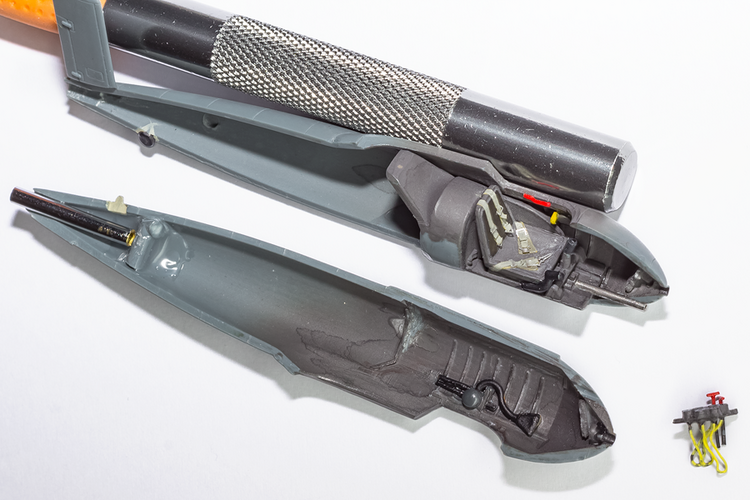
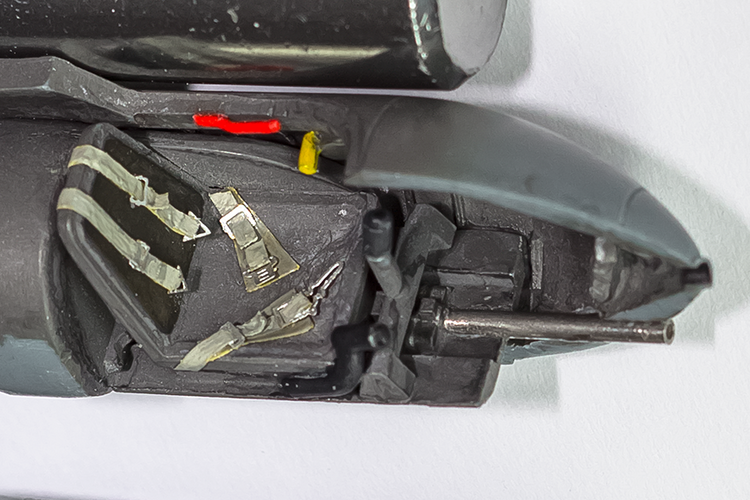
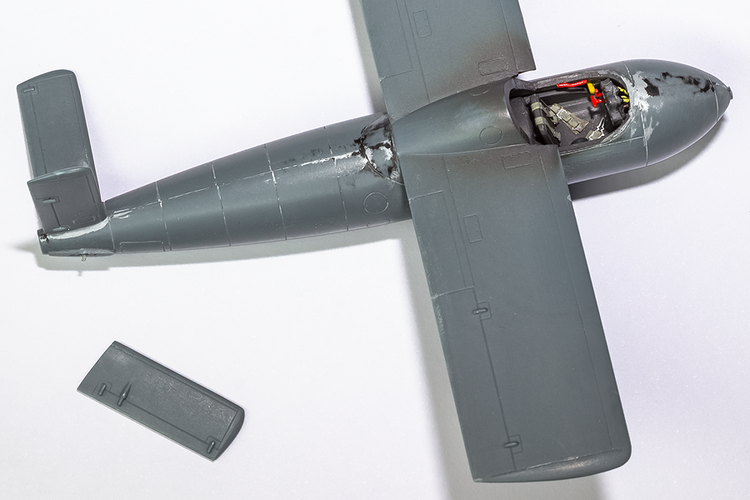
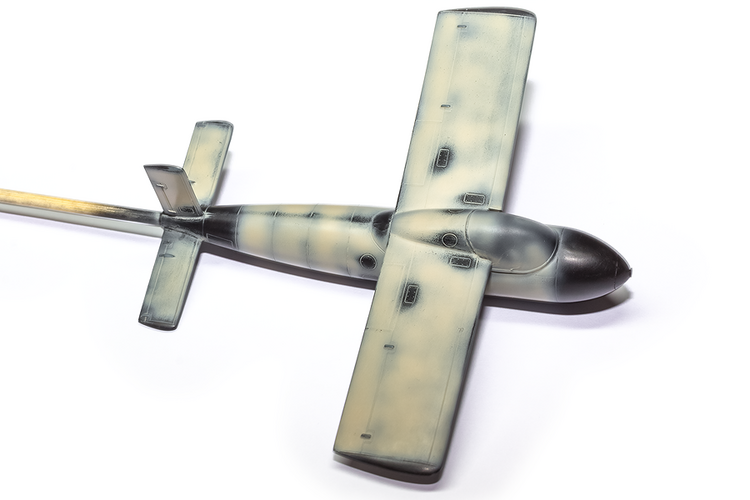
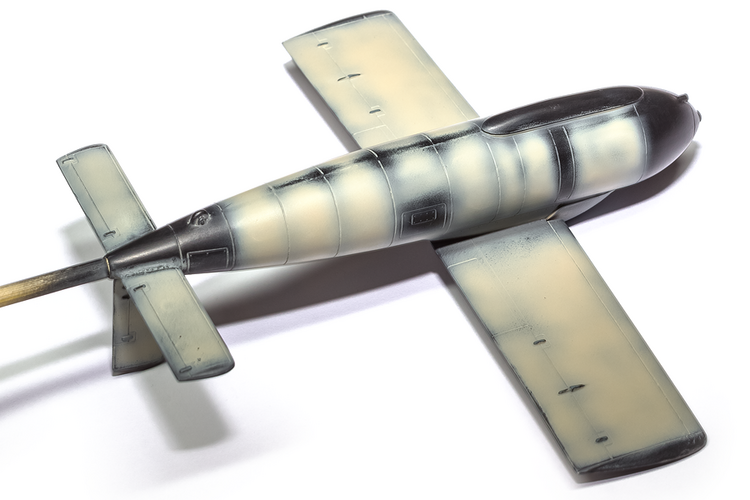
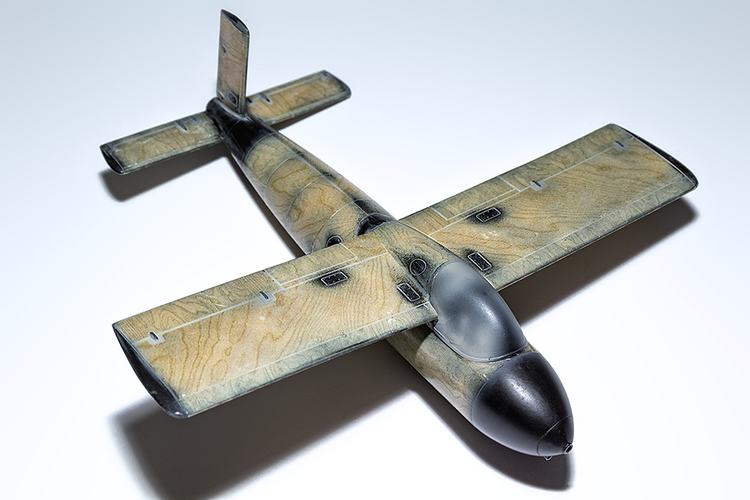
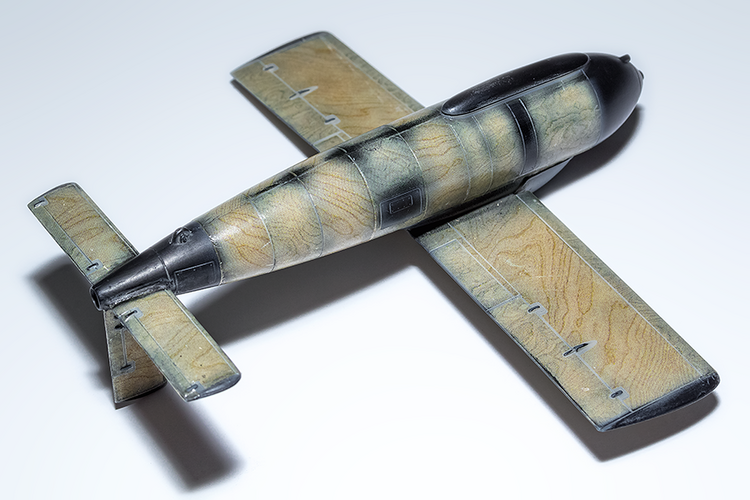
Normally you'd find me posting artwork here, but I've recently picked up scale modelling again. This will be the first thing I finish in a quarter of a century (yikes!).
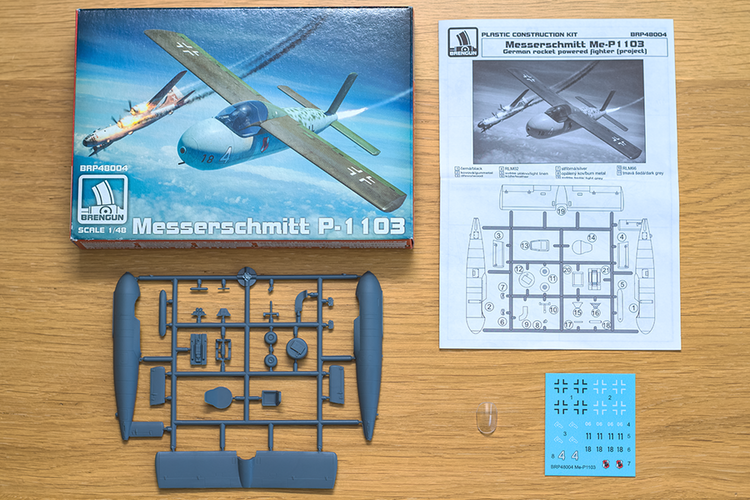
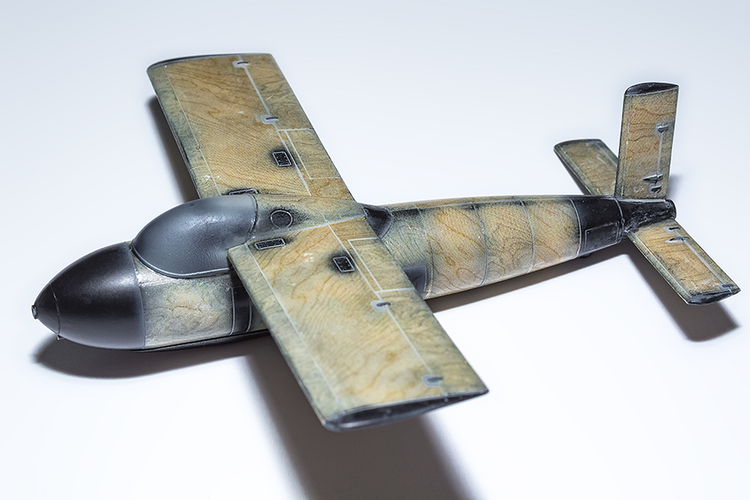
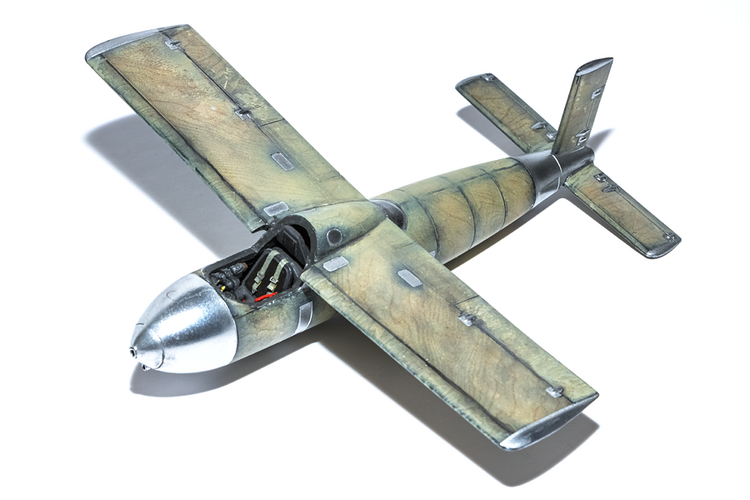
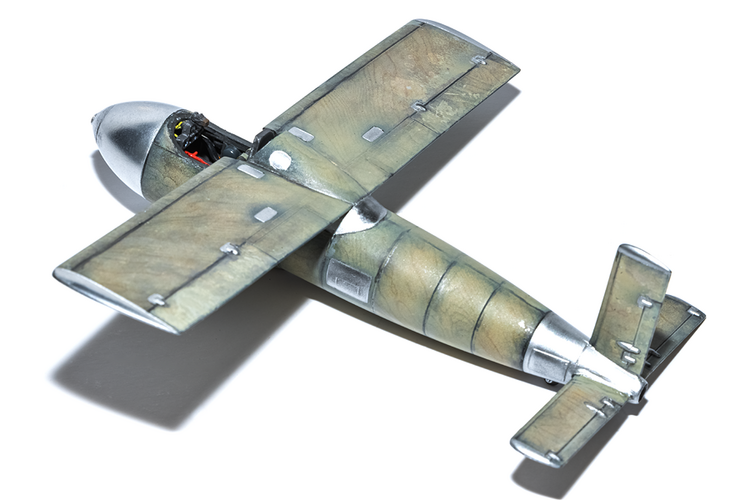
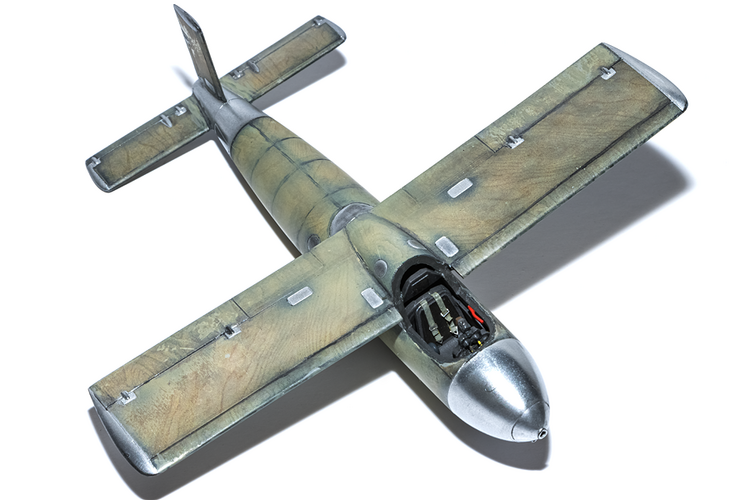
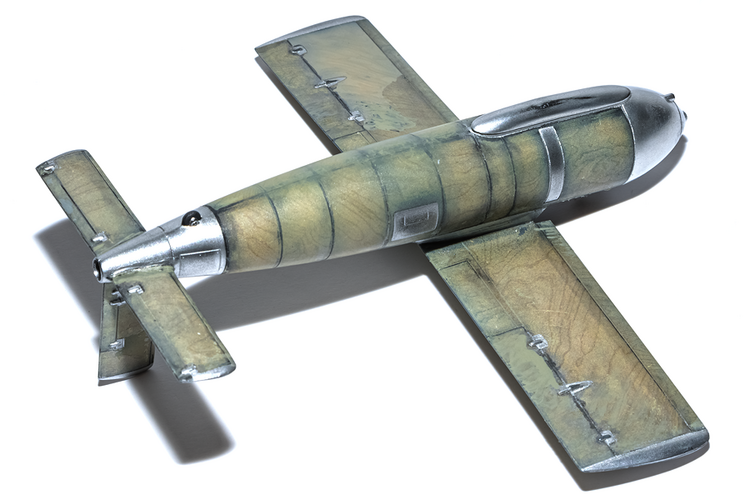
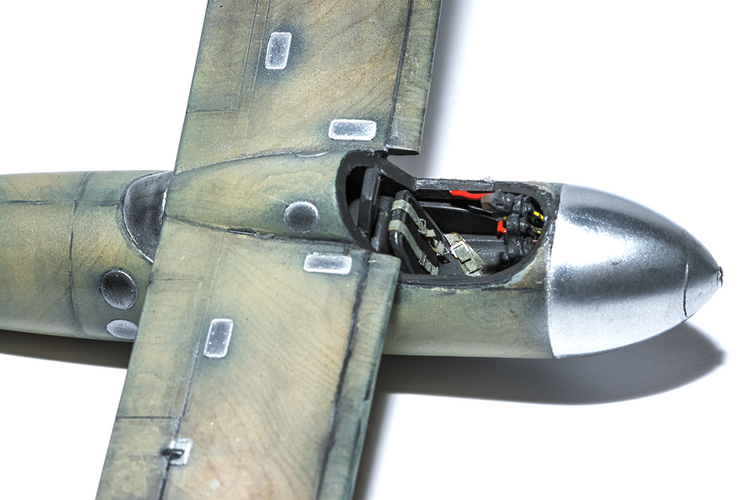
It's Brengun's diminutive Messerschmitt Me P 1103 in 1/48th scale. The kit is very small indeed (and there is a 1/72nd scale version too!), with less than two dozen parts and beautiful box art by the late Gino Marcomini. It is representative of design XII 283 from 12 September 1944. I'm building this in raw material style, meaning mostly wood with some dural panels and hatches.
 

Attachments

  • MeP1103_wip01.png
    MeP1103_wip01.png
    867.6 KB · Views: 103
For a 1/48 kit it's pretty tiny and even if the real plane would've had a spartan cockpit, I figured the cockpit could do with some extra detail. It only comes with an instrument panel, flight control stick and rudder pedals. To this I added a throttle, levers for the flaps, landing skid and for unhooking the tow cable. I also added a simplistic oxygen regulator plus some wiring behind the instruments and a canopy lock/jettison latch. The colour these extra items add is most welcome! The handgrip of the flight control stick was shortened and angled to make space for the extra instruments and to more represent the sticks seen in other Messerschmitt designs. I might try and jam an oxygen gauge in there somewhere, but I already closed it up last night.
The 30 mm cannon barrel was replaced with a medical syringe and I cut off the jet pipe and replaced it with a piece of telescopic radio aerial.
Seat belts were made from Tamiya 1 mm-wide masking tape and a vintage set of ExtraTech photo etch buckles that I've had for decades. "© 1989 Made in Moravia Czechoslovakia" (!)
The tailplane assembly was tricky as the locator tabs were unusable. Using a heated pin I made tiny holes in the fuselage and tailplane, into which I superglued a small piece of a staple hoping to create a stronger bond. It didn't really work all that well, though it's better than nothing.
 

Attachments

  • MeP1103_wip02a.png
    MeP1103_wip02a.png
    643.9 KB · Views: 87
  • MeP1103_wip02b.png
    MeP1103_wip02b.png
    799.6 KB · Views: 57
  • MeP1103_wip03.png
    MeP1103_wip03.png
    620.1 KB · Views: 57
Base paint for the wood decals is a mix of white and Dark Earth. The black areas will receive aluminium paint after the decals have been varnished. I prefer to handle the model as little as possible once the metal paint has been laid down.
Masks traced on Oramask with pencil, then scanned at 600 dpi, traced on the PC and used to cut Uschi's 1/48 Ho 229 wood decals with a Cameo plotter. Thankfully the results are near-perfect (look at the openings around the hatches). Of course this pattern will double up as a mask for the aluminium paint, later on. The first decals are meanwhile in place and look more or less as expected.
 

Attachments

  • MeP1103_wip04a.png
    MeP1103_wip04a.png
    296.3 KB · Views: 69
  • MeP1103_wip04b.png
    MeP1103_wip04b.png
    400.7 KB · Views: 64
  • MeP1103_wip05.png
    MeP1103_wip05.png
    363.4 KB · Views: 80
Base paint for the wood decals is a mix of white and Dark Earth. The black areas will receive aluminium paint after the decals have been varnished. I prefer to handle the model as little as possible once the metal paint has been laid down.
Masks traced on Oramask with pencil, then scanned at 600 dpi, traced on the PC and used to cut Uschi's 1/48 Ho 229 wood decals with a Cameo plotter. Thankfully the results are near-perfect (look at the openings around the hatches). Of course this pattern will double up as a mask for the aluminium paint, later on. The first decals are meanwhile in place and look more or less as expected.
That wood paneling looks pretty good. How does it look to the naked eye? Does it look like something printed off a computer, or is it convincing?
To be honest, the print pattern is more noticeable than I'm comfortable with. When viewing the model normally (half a foot or more), it's not really visible, but when you look up close to appreciate the details it does attract the eye. A simple solution would be to place it in a diorama or inside a display case and thereby force a little distance from the model, but ideally I'd have wanted it to be invisible to the naked eye.
I intend to coat it with a matt varnish with a tiny bit of white or light grey added to brighten the effect somewhat (it looks a bit too much like furniture now, which is not that bad as these planes were to be built by furniture shops amongst others). I hope the extra coat will help soften and hide the miniature dots. Next time I'll photograph it I'll make a close-up.
 
To be honest, the print pattern is more noticeable than I'm comfortable with.

I was afraid of that. I wonder if there might be a technique that would 'melt' the ink very slightly, get the dots to run together *slightly*. What that would be that wouldn't burn right through the decal, I can't guess.
 
About time for an update! Basically just decal work since last time and all wooden areas are now complete. It took longer than hoped/expected, particularly fine-tuning the masks (there are slight variations in the positioning of hinges etc. left/right/top/bottom!).
After a clear coat I will spray the remaining areas in aluminium paint.
 

Attachments

  • MeP1103_wip06a.png
    MeP1103_wip06a.png
    491.6 KB · Views: 40
  • MeP1103_wip06b.png
    MeP1103_wip06b.png
    527.9 KB · Views: 42
  • MeP1103_wip06c.png
    MeP1103_wip06c.png
    486.2 KB · Views: 50
I loved building these off-beat Luft 46 type stuff (although I don't build anymore)... One of the things I would try is the old way of making wood grain, by re-running some burnt umber oil paint (almost like dry-brushing) over the same lines of the print (with variation in the hardness softness of the application). It might take some time, but should be worth the effort if it works!

Perhaps test it first on an underside area, then if you like it's effect, role it out on the top and sides (visible) areas only (if it takes a lot of time/effort to do).

Keep posting your progress pics - I love seeing them!
 
It's been awhile since I updated this post! A few months ago I sprayed the black areas in Mr Hobby aluminium paint. Sadly some of the wood decals got damaged while unmasking. Lessons learnt: wood decals last, next time! I'll have to replace one of the underwing decals, but I'm gonna leave the rest as is, it's not too distracting thankfully as the model is only tiny. The main things left to do are adding the canopy and handling dolly.
 

Attachments

  • MeP1103_wip08a.png
    MeP1103_wip08a.png
    346.8 KB · Views: 24
  • MeP1103_wip08b.png
    MeP1103_wip08b.png
    341.6 KB · Views: 22
  • MeP1103_wip08c.png
    MeP1103_wip08c.png
    387.5 KB · Views: 21
  • MeP1103_wip08d.png
    MeP1103_wip08d.png
    395 KB · Views: 23
  • MeP1103_wip08e.png
    MeP1103_wip08e.png
    536.8 KB · Views: 30

Similar threads

Back
Top Bottom